|
|
Home | Switchboard | Unix Administration | Red Hat | TCP/IP Networks | Neoliberalism | Toxic Managers |
| (slightly skeptical) Educational society promoting "Back to basics" movement against IT overcomplexity and bastardization of classic Unix | |||||||
| News | Documentation | Recommended Links | Reference | Redbooks | TEC | Advanced Monitoring |
|
|
Task is old way of doing remote administration and monitoring via Tivoli, that probably existed from the initial Tivoli release. Task is collection of executable (one for each platform) that you can put on the server that that will be downloaded to selected endpoint and run by Tivoli.
|
|
Task can be created via GUI or wcrttask command. A task can be executed from Tivoli desktop. This is useful for testing and for running unique, individual tasks.
Jobs are essentially tasks with parameters necessary to run them so that they can be scheduled. Can be created vi GUI or wcrtjob command.
Task libraries are collections that allow you to create and store tasks and jobs that can be run on one or more managed resources. Task libraries can store executable files or scripts that are used by Tivoli applications. The task library also provides information about options that are required to run each task it contains the options required to run each of the tasks that it contains.Tivoli offers the Task Library Language (or TLL) to describe the tasks. TLLs simplify porting set of scripts from the development to the production environment. TLL can contain Perl or other scripting language. Here is the header of the task library:
TaskLibrary "Utility_Tasks" {
        Context = ("", "*", 1);
        Distribute = ("", "ALI", 1);
        HelpMessage = ("", "Utility Tasks", 1);
        Requires = ("", ">2.1", 1);
        Version = ("", "1.0", 1);

        ArgLayout GenericString {
                Text;
        };

        Task "Exec_Local_Script" {

    ....
The Tivoli Task Library consists of the following entities:
Here is the header of the task:
Task "Exec_Local_Script" {
   Description = ("", "Exec_Local_Script", 0);
   HelpMessage = ("", "This task takes a script name and args and executes it on the local endpoint", 0);
   Roles = ("", "admin", 1);
   Uid = ("", "*", 1);
   Argument ("", "Command", 0) {
   DefaultValue = ("", "", 0);
   Layout = ("", "GenericString", 0);
};
Implementation ("default")
   .#!/usr/bin/perl
   .
   .use Fcntl;
   .use POSIX qw(tmpnam);
....
TMF contains a scheduler that allows scheduling job similar to cron. Start of the task occurs according to TMF server clock. If the endpoint is in a different time zone it should be scheduled separately.
|
|
Switchboard | ||||
| Latest | |||||
| Past week | |||||
| Past month | |||||
The Tivoli Framework tasks can be invoked using the tgmtask command:
tgmtask -h eehost -u tmeid -k tmepw {-o tmeendpointoid|-r endpointhostname} tskname|tsklib|tskargs
where:
eehost: The event enablement or task server host name
tmeendpointoid: Object ID of the endpoint, in the format of <tmr num>.<dispatcher num>.0+
endpointhostname: Endpoint's label
tmeid, tmepw: User ID and password to access the TMR
task information: Task name, task library name, and task argumentsWith this capability, we can extend the menu for any distributed objects that we can identify as belonging to a Tivoli Management Region where a task server is defined. For simplicity, we define additional commands for resources that are defined from TEC, where an Event Enablement host is one of the attributes.
We pick up a generic object that is defined as the cid of G02K and add an extension to perform a DIR command on a Windows platform or a df command on a UNIX platform. We create a Tivoli Framework task called DIRCDrv under TBSMTasks Task Library. The script that the task runs is shown below:
#!/bin/sh
if [ x\"$OS\" = x\"Windows_NT\" ] ; then
CMD.EXE /C DIR C:
else
df
fi
exit 0
We then define a stored procedure called _DIRCDrv, as shown below:
CREATE PROCEDURE _DIRCDrv
@cid ClassID,
@id ObjID,
@ReturnCode INT = NULL OUTPUT
AS
RAISERROR('_DIRCDrv: %s, %d', 0, 1, @cid, @id)
DECLARE @command NVARCHAR(255)
DECLARE @userID NVARCHAR(255)
DECLARE @tmeid NVARCHAR(255)
DECLARE @epname NVARCHAR(255)IF @cid = 'LOB'
SELECT @cid = phy_cid, @id = phy_id FROM lob_link WHERE dst_id = @idSELECT @tmeid = _EEhost, @epname = _MgedSystemName
FROM G02Kcname_V where id = @id
EXEC asisp_getContextUserID @userID OUTPUTIF @tmeid is NULL
BEGIN
SELECT '_DIRCDrv ERROR: Could not locate EE host'
RETURN 8
END
SELECT @command = 'tgmtask -d TME -h "' + @tmeid + '" -r "' + @epname + '" '
IF @userID IS NOT NULL SET @command = @command + ' -u "' + @userID + '" -k "********" '
SET @command = @command+' "DIRCDrv|TBSMTasks|'EXEC @ReturnCode = master..xp_cmdshell @command
RETURN @ReturnCode
GO
We then use DefineDIRCDrv.sqi file to define the method for G02K, as shown below:
include(BusinessObject.sqi)
BEGIN_METHOD(DIRCDrv, 'Dir of C drive','Display C Drive')
METHOD_PARAM(ReturnCode, ASIVARIANT, 'RETURN Code', 'RETURN Code')
METHOD_PARAM_FLAG(output)
METHOD_PARAM(Results, ASIDBTABLE, 'Results', 'Results')
METHOD_PARAM_FLAG(output)
METHOD_PARAM_FLAG(collection)
END_METHOD(DIRCDrv)
BEGIN_METHOD_CALLERS(DIRCDrv)
METHOD_CALLER(G02K)
END_METHOD_CALLERS(DIRCDrv)We run the sh clsql DefineDIRCDrv.sqi command and invoke the SQL Query Analyzer to load the generated DefineDIRCDrv.sql. Then we run asisp_definemenuitem against the G02K object. This time, we apply to all instances using the command:
EXEC asisp_definemenuitem 'DIRCDrv', 'G02K', 0, 'DIR C Drive', NULL, NULL, 'DIRCDrv', NULL, '', 1342242816
The result of the new menu is shown below:

. Special Notices This material has not been submitted to any formal IBM test and is published AS IS. It has not been the subject of rigorous review. IBM assumes no responsibility for its accuracy or completeness. The use of this information or the implementation of any of these techniques is a customer responsibility and dep
Many of Orb Data's customers find that the quickest method of integrating existing scripts and programs into Tivoli, is to use the Task management system that Tivoli provides as part of its core Framework services. Scripts or programs can be incorporated very quickly into a Tivoli task and then run on any Managed Node or Managed Agent in the Tivoli Management Environment (TME).
This is particularly useful where a system administrator has to log onto the remote system in order to execute the script or program to accomplish a specific task. With Tivoli tasks this can be achieved in a matter of seconds.
Tivoli also offers the Task Library Language (or TLL) to enable a series of executables to be incorporated into Task Libraries using a single compilation. This allows for scripts developed in a test or development environment to be ported to the live environment very easily and quickly. In addition, this approach allows for code to be placed under source code control, which aids the process of coherent change management.
The standard method for creating tasks provides a limited capability for user interaction.
With the use of TLL, however, it is possible to create sophisticated dialogs to present to the user at the time of execution, which significantly increases the scope of funtionality that can be applied.
See the 'Adhoc Inventory Scan' example here.
Proven expertise.
As one of its core values, Orb Data believes in the sharing of knowledge, and to this end we have written a technical journal on TLL development, which is freely available from our web site (www.orb-data.co.uk). We have shown that our knowledge of TLL is second to none, and this is amply demonstrated by the interest shown in the journal. Since its publication in February 1999, the journal has received over 30,000 hits by Tivoli customers and practitioners.
However, knowledge is nothing without the experience to match it, and Orb Data has gained considerable experience in writing TLL customisations for a number of its customers. We would like to apply our knowledge and experience to help you.
Development
Orb Data can provide expertise to help you define, design and implement each of your administrative tasks. In addition to the specialist knowledge of TLL, Orb Data also has consultants who are experts in UNIX shell and Perl scripting, and C/C++/Java programming.
With the help of the eventual users of the tasks, Orb Data will create the interfaces, and then we can either use your own scripts and executables, or we can write these for you as well. If you should decide to ask Orb Data to code the tasks, each script or program will be expertly written in the language of your choice.
Deliverables
You will receive a fully working solution, along with all of the relevant code and documentation delivered on a CD. All code will be installable using the standard Tivoli mechanisms. The CD will contain:
- TLL Code
- A set of Task scripts
- A utility to compile all TLL code in a single action
- Documentation
Documentation can be provided in PDF, MS Word or HTML formats.
Google matched content |
For information about editing jobs from the command line, see the wgetjob and wsetjob commands in the Tivoli Management Framework Reference Manual.
Deleting a job
Notes
Tasks and jobs are similar in the following ways:
Both can be created only within a task library.
Both can be run on supported managed resources by dropping the Job icon or the Task icon the Job or the Task icon on the managed resource icon.
Tasks and jobs are different in the following ways:
Jobs can be scheduled using the Tivoli scheduler. Tasks cannot be scheduled because they do not contain a list of targets.
Job icons can reside on the Tivoli desktop. Job icons are links to the jobs inside of task libraries. Task icons cannot reside on the Tivoli desktop. If you drop a Task icon on the Tivoli desktop, the entire task library is copied as a link to the originating task library.
In addition to containing tasks and jobs, task libraries store binaries, programs, and scripts that are generally referred to as executable files. When you create a task, an image of the files is stored in the binary tree of the Tivoli server.
Note
If you modify any executable file used in a task, you need to respecify the modified executable file in the task definition. If you do not respecify the modified file, the change is not refreshed in the binary tree.
Working with Task Library icons
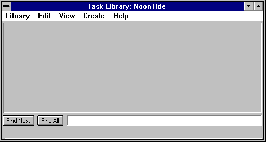
A Task Library icon is displayed in the Policy Region window for each defined task library in that policy region. The pop-up menu of a Task Library icon identifies the name of the task library and includes the following options:
Open Opens the task library window and allows access to its defined tasks and jobs
Create Task Displays the window where you can create a task
Create Job Displays the window where you can create a job
Execute Task Displays the window where you can specify its execution options
Execute Job Displays the window where you can select a job and execute it
Creating a task library
You can create a task library within a policy region only. After creating a task library, you can create its tasks and jobs.You need authorization role senior and root permission of target system to run the task. You can create a task library from the Tivoli desktop or the command line.
Using the desktop to create task libraries
To create a task library, perform the following steps:
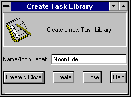
In a Policy Region window, select Task Library from the Create menu to display the Create Task Library window:
Note
If there is no entry on the Create menu for creating a task library, you need to add Task Library as a managed resource type for that policy region. See Modifying managed resource types in policy regions for more information about adding and removing managed resources within policy regions.
Type the name of the task library in the Name/Icon Label text box.
The first character of the name must be an alphabetic character. The remaining characters can be alphanumeric, underscores (_), hyphens (-), periods (.), or spaces.
Click Create & Close to create the task library and return to the Policy Region window.
Listing contents of a task library
After you create a task library, you can list its jobs and tasks.
The following table provides the context and authorization role required for this operation.
Activity Context Required role Listing the contents of a task library
Policy region
user
You can list the contents of a task library from the command line only.
For information about listing the contents of a task library, see the wlstlib command in Tivoli Management Framework Reference Manual.
Importing and exporting task definitions
By default, you can pass arguments to a task, but you can only do this from the command line. If you need to pass arguments using a window, you need to use the Task Library Language (TLL) to create the window. The high level steps are as follows:
Export the library definition to American National Standard Code for Information Interchange (ASCII) using the wtll command
Modify the task library definitions
Import the modified library definitions using the wtll command
The task library has default and validation policies. The default policies set the available options of targets (endpoints, managed nodes, and profile managers) to run the task or job. The validation policies validate the creation and execution of the task or job in the task library. These policies can be customized using a shell script to set or validate data.
For additional information on the wtll command and the task library policies, see the Tivoli Management Framework Reference Manual. For additional information on the Task Library Language, see the Tivoli Management Framework Reference Manual.
Controlling task-binary distributions
When you create a task, you specify the files to be used when the task is run. These files are copied to the $BINDIR directory on one of the following resources:
The Tivoli server in the local Tivoli region, which is the default
All file servers in the local region
All file servers in interconnected Tivoli regions
The extent of this distribution is determined by the distribution mode specified in the tl_def_dist_mode default policy. See Default policies for task libraries for more information about modifying the default distribution policy.
For daily use of the task library--creating tasks and jobs that are run by administrators--the default distribution mode is sufficient. Tivoli Management Framework searches for the task executable file on the Tivoli server and passes that executable file to the target. Additional distribution of the task-executable files does not increase productivity or efficiency.
Distributing task binaries to file servers either in the local Tivoli region or in connected regions is useful only when you have Tivoli applications that use executable files stored in a task library.
Some Tivoli applications include an application-specific task library. These required files are distributed when the product is installed. You can also distribute existing task binaries by using wdisttask. For more information about the distribution modes and on distributing task binaries, see wdisttask in Tivoli Management Framework Reference Manual.
Distributing the executable files to all the file servers in a Tivoli region gives the application faster access to the files. Having access to local tasks also makes an application more flexible and extensible in the actions it can perform. For example, the application can have access to a wider variety of tasks or can perform multiple actions, where previously it could perform only one.
Note
Do not distribute task binaries to file servers other than the Tivoli server until you begin using Tivoli applications that are capable of using this function. If you distribute task binaries to file servers that are shared among multiple Tivoli regions, file creation or editing conflicts cause the distribution to fail.
Tasks
A task is the definition of a network operation that needs to be performed on a routine basis. Tasks stored in a task library can be used any number of times. A task definition includes the following:
The name (or label) of the task
The platform (or interpreter type) on which the task is run
The Tivoli authorization role required to run the task
The user or group under which the task will be run
Comments concerning the task
In some cases, a task requires more information before it can run. For example, you want to create a task that uses the UNIX rdump command to dump your file systems to tape. For rdump to run, you must specify which file systems should be dumped. The task, therefore, requires input from the administrator when the task is invoked.
When a task requires additional information, you can do one of the following:
Specify this information from the command line when you invoke the task
Use the Tivoli Task Library Language (TLL) to create another window where you can specify this information
Using the Tivoli TLL, you can define the additional arguments required by the task. When you run tasks that are defined with the TLL, a window prompts you for the task arguments. These windows are displayed after the Execute Task window. At that time you can, for example, specify the file system to be dumped. See Tivoli Management Framework Reference Manual for information about using the TLL to create the additional windows as well as an explanation of other TLL capabilities.
Working with Task icons
A Task icon is displayed in a Task Library window for each task created. A single Task icon, however, can represent the operational definition of multiple implementations--one for each supported platform.
The pop-up menu of a Task icon identifies the name of the task and includes the following options:
- Execute Task
Displays the window where you can specify the execution parameters for a task.
Note
You can also run a task by double-clicking the Task icon or by dragging and dropping the icon on a managed resource icon.
- Edit Task
Displays the window where you can modify a previously created task.
Creating a task
You can create a task in a task library. Before you create a task, one or more executable files that implement the associated operation must exist. Requred authorization role admin
You can create a task in an existing task library from the Tivoli desktop or the command line.
Using the desktop to create tasks
To create a task, perform the following steps:
In a Policy Region window, double-click the Task Library icon where the task will reside to display the Task Library window:
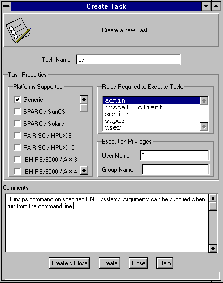
From the Create menu, select Task to display the Create Task window:
Type the name of the task in the Task Name text box.
The first character of the name must be an alphabetic character. The remaining characters can be alphanumeric, underscores (_), hyphens (-), periods (.), or spaces.
From the Platforms Supported list, select the first platform on which the task is to be run. For each platform selected, the following steps apply.
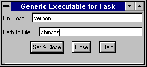
For example if you have a generic executable file, such as a shell script that will run on multiple platforms, select Generic from the list of platforms. The Generic Executable for Task window is displayed:
In the On Host text box, type the name of the managed node that contains the executable file for the selected platform.
In the Path to File text box, type the full path name of the executable file for the selected platform.
Click Set & Close to return to the previous window.
Repeat this step for each platform selected.
From the Roles Required to Execute Task scrolling list, select the roles that you want to require an administrator to have before they can run the task.
In the Execution Privileges area, specify the appropriate user and group IDs:
If you want the task to run under a specific user ID, type the user login name in the User Name text box. The default value is an asterisk (*), which specifies that the task runs under the ID of the administrator running the task.
If you want the task to run under a specific group ID, type the group name in the Group Name text box. By default, this text box is empty, which specifies that the task runs as nogroup.
Note
By default, you cannot specify root in the User Name or Group Name text box. To allow multiple administrators to create tasks that run as root, you must modify the tl_val_set_uid or tl_val_set_gid validation policy. See Tivoli Management Framework Reference Manual for procedures on editing policies.
Optionally, type a description of the task in the Comments scrolling list.
Click Create & Close to create the task and return to the Task Library window.
Using commands to create tasks
For information about creating a task from the command line, see the wcrttask command in Tivoli Management Framework Reference Manual.
Running a task
You can run a task after it is created in a task library. Each task is subject to the policies of the managed node or task library in the policy region where the task library is located.
The following table provides the context and authorization role required for this operation:
Activity Context Required role Running a task
Task library
As specified when the task was created or edited
When the task is run, all task information, including the full executable file name, is passed to the task target. To locate the executable file, Tivoli Management Framework looks for a platform-specific executable file. For example, if the task is run on an AIX managed node, Tivoli Management Framework looks for an AIX executable file. If a platform-specific executable file is not found, Tivoli Management Framework looks for a generic executable file. If a generic executable file is not found, the task fails.
When the executable file is located, the executable file, user or group ID, and authorization role are passed to the task target. Tivoli Management Framework then validates the user ID and authorization role and runs the task directly from the managed resource.
Note
Each time a task is executed, the task-executable file is passed to the task target. The passing of large executable files can have a significant impact on network resources. If you have a task with a large executable file, you should consider installing the executable file on the clients. You can then create a task that passes only a small script to run the installed executable file.
You can run a task in the task library using drag and drop, from the Tivoli desktop, or from the command line.
Using drag and drop to run tasks
To run a task, drag and drop the Task icon on a managed resource icon. When you drop the Task icon on any client icon, the task is run on that client. If you drop the task on a Profile Manager icon, the task is run in parallel mode on all of its subscribers.
Using the desktop to run tasks
To run a task, perform the following steps:
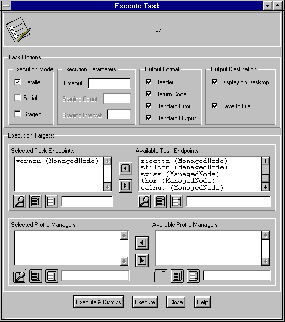
In a Task Library Window, double-click the Task icon to display the Execute Task window:
Specify the execution mode.
Select Parallel if the operation should run on all targets at the same time.
Select Serial if the operation should run on all targets, one at a time.
Select Staged if the operation should run in staged mode on sets of targets. When you select Staged, you must specify the number of targets to include in each set and how many seconds to wait between each set.
When the execution mode is serial or staged, the operation is run on the targets in alphabetic order.
In the Timeout text box, type the number of seconds before the operation times out. If the operation does not complete within the specified amount of time, all output from the operation is lost. If the operation does not start within the specified time, it is canceled.
Note
For tasks run against endpoints, the timeout value for the task must be greater than the timeout value for the gateway. For example, if the task timeout is 600 and the gateway timeout is 300, the task times out after 300 seconds.
In the Output Format group box, select the types of output you want to return. The output types are Header, Return Code, Standard Error, and Standard Output.
In the Output Destination group box, select where the output is written.
Select Display on Desktop if you want the output to be displayed on the Tivoli desktop on completion.
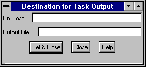
Select Save to File to save the output to a file and display the Destination for Task Output window. Skip to the next step if you do not want output saved to a file.
In the On Host text box, type the name of the managed node on which to save the output. The machine must be a managed node.
In the Output File text box, type the full path name of the file where the output is to be written.
Note
Use a different file for the output of each operation. If multiple operations are performed around the same time and use the same output file, the output from all the operation is written to this one file.
Click Set & Close to return to the Execute Task window.
In the Execution Targets area, specify the targets for the operation:
For specific clients, select the targets from the Available Task Endpoints scrolling list and click the left-arrow button. The selected targets are moved to the Selected Task Endpoints scrolling list.
For all subscribers of specific profile managers, select the profile managers from the Available Profile Managers scrolling list and click the left-arrow button. The selected profile managers are moved to the Selected Profile Managers scrolling list.
Click Execute & Dismiss to run the task as specified and return to the Task Library window.
Using commands to run tasks
For information about running task from the command line, see the wruntask command in Tivoli Management Framework Reference Manual.
Saving task output to file
If you run a task that displays output on the Tivoli desktop, you can still save the output to file.
The following table provides the context and authorization role required for this operation:
Activity Context Required role Saving displayed task output to a file
Task
As specified when the task that the job is based on was created or edited
You can save task output to file only from the Tivoli desktop.
To save task output to file, perform the following steps:
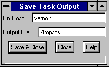
After the task completes and displays the output window, click Save to File to display the Save Task Output window:
In the On Host text box, type the name of the managed node on which to save the output. The machine must be a managed node.
In the Output File text box, type the full path name of the file to which the output is to be written.
Note
If the specified file already exists, the output is appended to the end of that file.
Click Save & Close to save the task output in the specified file and return to the output window. The file is written with the user ID and group ID of the administrator who invoked the task.
Editing a task
You can edit an existing task.
The following table provides the context and authorization role required for this operation:
Activity Context Required role Editing a task
Task library
admin
You can edit an existing task from the Tivoli desktop or the command line.
Using the desktop to edit tasks
You can edit a previously created task. Editing a task is similar the creating task procedure described in Using the desktop to create tasks. The changes to the procedure are as follows:
Instead of selecting to create a task from the Task Library window, select Edit Task from the Task icon menu.
The Edit Task window is similar to the Create Task window, with the following changes:
The Comments text area of the Create Task window is changed to the Text History and Comments text area. You cannot add new comments in this text area.
The New Comments text area is where you can provide comments that apply to your modification.
The buttons on the Edit Task window apply to changing tasks instead of creating tasks.
Using commands to edit tasks
For information about editing a task from the command line, see wgettask and wsettask in Tivoli Management Framework Reference Manual.
Deleting a task
You can delete a task.
The following table provides the context and authorization role required for this operation:
Activity Context Required role Deleting a task
Task library
admin
You can delete a task from the task library from either the Tivoli desktop or the command line.
Using the desktop to delete tasks
To delete a task from a task library, perform the following steps:
In a Task Library Window, select the icon of the task to be deleted.
From the Edit menu, select Delete. The selected task is deleted from the task library.
Using commands to delete tasks
For information about deleting a task form the command line, see the wdeltask command in Tivoli Management Framework Reference Manual.
Jobs
A job is a task that contains a number of run-time options, which includes the following:
The list of targets where the task is run
The execution mode of the task--serial or parallel
The output format--Tivoli desktop or file
Note
You must create a task before you can create a job.
Working with Job icons
A Job icon is displayed in a Task Library window for each job created. You can copy a single Job icon onto a Tivoli desktop without copying the entire task library. The administrator can then run that job as necessary.
The pop-up menu of a Job icon identifies the name of the job and includes the following options:
- Execute Job
Runs the job and sends the output to the specified destination
Note
You can also run a job by double-clicking the Job icon or, if you have the admin authorization role, by dragging and dropping the icon on a managed resource icon. When you drop the Job icon on a target, the job is run on only that target.
- Edit Job
Displays the window where you can modify a job that was previously created
Creating a job
Before you create a job, the task for the job must exist within a task library. Jobs are subject to the task library policies of the policy region.
The following table provides the context and authorization role required for this operation:
Activity Context Required role Creating a job
Task library
admin
You can create a job from the Tivoli desktop or the command line.
Using the desktop to create jobs
To create a job, perform the following steps:
In a Policy Region window, double-click the icon of the task library in which the job will reside to display the Task Library window:
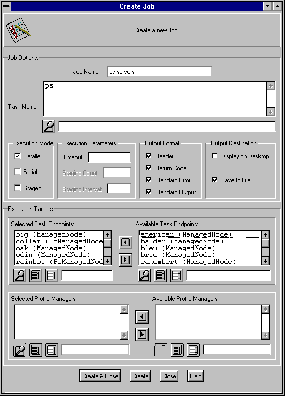
From the Create menu, select Job to display the Create Job window:
In the Job Name text box, type the job name.
The first character of the name must be an alphabetic character. The remaining characters can be alphanumeric, underscores (_), hyphens (-), periods (.), or spaces.
From the Task Name scrolling list, select the task that the job will execute.
Specify the execution mode.
Select Parallel if the operation should run on all targets at the same time.
Select Serial if the operation should run on all targets, one at a time.
Select Staged if the operation should run in staged mode on sets of targets. When you select Staged, you must specify the number of targets to include in each set and how many seconds to wait between each set.
When the execution mode is serial or staged, the operation is run on the targets in alphabetic order.
In the Timeout text box, type the number of seconds before the operation times out. If the operation does not complete within the specified amount of time, all output from the operation is lost. If the operation does not start within the specified time, it is canceled.
Note
For tasks run against endpoints, the timeout value for the task must be greater than the timeout value for the gateway. For example, if the task timeout is 600 and the gateway timeout is 300, the task times out after 300 seconds.
In the Output Format group box, select the types of output you want to return. The output types are Header, Return Code, Standard Error, and Standard Output.
In the Output Destination group box, select where the output is written.
Select Display on Desktop if you want the output to be displayed on the Tivoli desktop on completion.
Select Save to File to save the output to a file and display the Destination for Task Output window. Skip to the next step if you do not want output saved to a file.
In the On Host text box, type the name of the managed node on which to save the output. The machine must be a managed node.
In the Output File text box, type the full path name of the file where the output is to be written.
Note
Use a different file for the output of each operation. If multiple operations are performed around the same time and use the same output file, the output from all the operation is written to this one file.
Click Set & Close to return to the Execute Task window.
In the Execution Targets area, specify the targets for the operation:
For specific clients, select the targets from the Available Task Endpoints scrolling list and click the left-arrow button. The selected targets are moved to the Selected Task Endpoints scrolling list.
For all subscribers of specific profile managers, select the profile managers from the Available Profile Managers scrolling list and click the left-arrow button. The selected profile managers are moved to the Selected Profile Managers scrolling list.
Click Create & Close to create the job and return to the task library window.
Running a job
You can run a job after it is created in a task library.
The following table provides the context and authorization role required for this operation:
Activity Context Required role Running a job
Task library
As specified when the task that the job is based on was created or edited
You can run a job using drag and drop, from the Tivoli desktop, or from the command line.
Using drag and drop to run jobs
To run a job, drag the Job icon onto the icon of the managed resource on which you want the job to run.
Note
Using the drag and drop operation requires the admin authorization role.
Using the desktop to run jobs
To run a job, double-click the Job icon. The job is run and the output is displayed on the Tivoli desktop or sent to the file designated in the job specification.
Note
When you choose to display the output on the Tivoli desktop, output is displayed when the job completes on all target resources. If you schedule a job that displays its output to the Tivoli desktop, an output window is not displayed when the task runs. You should save the output to file when you schedule a job. For details on scheduling a job, see Scheduling jobs.
Saving job output to file
If you run a job that displays the output to the Tivoli desktop, you can still save the output to file.
The following table provides the context and authorization role required for this operation:
Activity Context Required role Saving displayed job output to file
Job
As specified when the task that the job is based on was created or edited
You can save displayed job output to file from the Tivoli desktop only.
To save the job output to file, perform the following steps:
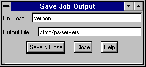
After the task completes and displays the output window, click Save to File to display the Save Job Output window:
In the On Host text box, type the name of the managed node on which to save the output. The machine must be a managed node.
In the Output File text box, type the full path name of the file to which the output is to be written.
Note
If the specified file already exists, the output is appended to the end of that file.
Click Save & Close to save the task output in the specified file and return to the output window. The file is written with the user ID and group ID of the administrator who invoked the task.
Editing a job
You can edit a previously created job.
The following table provides the context and authorization role required for this operation:
Activity Context Required role Editing a job
Task library
admin
You can edit a job in the task library from either the Tivoli desktop or the command line.
Using the desktop to edit jobs
You can edit a previously created job. Editing a job is similar the creating a job procedure described in Creating a job. The changes to the procedure are as follows:
Instead of selecting to create a job from the Task Library window, select Edit Job from the Job icon menu.
The Edit Job window is similar to the Create Job window, with the following changes:
The Edit Job window does not contain the Job Name text box.
The buttons on the Edit Job window apply to changing jobs instead of creating jobs.
Using commands to edit jobs
Required role admin
Using the desktop to delete jobs
In a Task Library Window, select the icon of the job to be deleted.
From the Edit menu, select Delete. The selected job is deleted.
Using commands to delete jobs
For information about deleting jobs from the command line, see the wdeljob command in Tivoli Management Framework Reference Manual.
Society
Groupthink : Two Party System as Polyarchy : Corruption of Regulators : Bureaucracies : Understanding Micromanagers and Control Freaks : Toxic Managers : Harvard Mafia : Diplomatic Communication : Surviving a Bad Performance Review : Insufficient Retirement Funds as Immanent Problem of Neoliberal Regime : PseudoScience : Who Rules America : Neoliberalism : The Iron Law of Oligarchy : Libertarian Philosophy
Quotes
War and Peace : Skeptical Finance : John Kenneth Galbraith :Talleyrand : Oscar Wilde : Otto Von Bismarck : Keynes : George Carlin : Skeptics : Propaganda : SE quotes : Language Design and Programming Quotes : Random IT-related quotes : Somerset Maugham : Marcus Aurelius : Kurt Vonnegut : Eric Hoffer : Winston Churchill : Napoleon Bonaparte : Ambrose Bierce : Bernard Shaw : Mark Twain Quotes
Bulletin:
Vol 25, No.12 (December, 2013) Rational Fools vs. Efficient Crooks The efficient markets hypothesis : Political Skeptic Bulletin, 2013 : Unemployment Bulletin, 2010 : Vol 23, No.10 (October, 2011) An observation about corporate security departments : Slightly Skeptical Euromaydan Chronicles, June 2014 : Greenspan legacy bulletin, 2008 : Vol 25, No.10 (October, 2013) Cryptolocker Trojan (Win32/Crilock.A) : Vol 25, No.08 (August, 2013) Cloud providers as intelligence collection hubs : Financial Humor Bulletin, 2010 : Inequality Bulletin, 2009 : Financial Humor Bulletin, 2008 : Copyleft Problems Bulletin, 2004 : Financial Humor Bulletin, 2011 : Energy Bulletin, 2010 : Malware Protection Bulletin, 2010 : Vol 26, No.1 (January, 2013) Object-Oriented Cult : Political Skeptic Bulletin, 2011 : Vol 23, No.11 (November, 2011) Softpanorama classification of sysadmin horror stories : Vol 25, No.05 (May, 2013) Corporate bullshit as a communication method : Vol 25, No.06 (June, 2013) A Note on the Relationship of Brooks Law and Conway Law
History:
Fifty glorious years (1950-2000): the triumph of the US computer engineering : Donald Knuth : TAoCP and its Influence of Computer Science : Richard Stallman : Linus Torvalds : Larry Wall : John K. Ousterhout : CTSS : Multix OS Unix History : Unix shell history : VI editor : History of pipes concept : Solaris : MS DOS : Programming Languages History : PL/1 : Simula 67 : C : History of GCC development : Scripting Languages : Perl history : OS History : Mail : DNS : SSH : CPU Instruction Sets : SPARC systems 1987-2006 : Norton Commander : Norton Utilities : Norton Ghost : Frontpage history : Malware Defense History : GNU Screen : OSS early history
Classic books:
The Peter Principle : Parkinson Law : 1984 : The Mythical Man-Month : How to Solve It by George Polya : The Art of Computer Programming : The Elements of Programming Style : The Unix Hater’s Handbook : The Jargon file : The True Believer : Programming Pearls : The Good Soldier Svejk : The Power Elite
Most popular humor pages:
Manifest of the Softpanorama IT Slacker Society : Ten Commandments of the IT Slackers Society : Computer Humor Collection : BSD Logo Story : The Cuckoo's Egg : IT Slang : C++ Humor : ARE YOU A BBS ADDICT? : The Perl Purity Test : Object oriented programmers of all nations : Financial Humor : Financial Humor Bulletin, 2008 : Financial Humor Bulletin, 2010 : The Most Comprehensive Collection of Editor-related Humor : Programming Language Humor : Goldman Sachs related humor : Greenspan humor : C Humor : Scripting Humor : Real Programmers Humor : Web Humor : GPL-related Humor : OFM Humor : Politically Incorrect Humor : IDS Humor : "Linux Sucks" Humor : Russian Musical Humor : Best Russian Programmer Humor : Microsoft plans to buy Catholic Church : Richard Stallman Related Humor : Admin Humor : Perl-related Humor : Linus Torvalds Related humor : PseudoScience Related Humor : Networking Humor : Shell Humor : Financial Humor Bulletin, 2011 : Financial Humor Bulletin, 2012 : Financial Humor Bulletin, 2013 : Java Humor : Software Engineering Humor : Sun Solaris Related Humor : Education Humor : IBM Humor : Assembler-related Humor : VIM Humor : Computer Viruses Humor : Bright tomorrow is rescheduled to a day after tomorrow : Classic Computer Humor
The Last but not Least Technology is dominated by two types of people: those who understand what they do not manage and those who manage what they do not understand ~Archibald Putt. Ph.D
Copyright © 1996-2021 by Softpanorama Society. www.softpanorama.org was initially created as a service to the (now defunct) UN Sustainable Development Networking Programme (SDNP) without any remuneration. This document is an industrial compilation designed and created exclusively for educational use and is distributed under the Softpanorama Content License. Original materials copyright belong to respective owners. Quotes are made for educational purposes only in compliance with the fair use doctrine.
FAIR USE NOTICE This site contains copyrighted material the use of which has not always been specifically authorized by the copyright owner. We are making such material available to advance understanding of computer science, IT technology, economic, scientific, and social issues. We believe this constitutes a 'fair use' of any such copyrighted material as provided by section 107 of the US Copyright Law according to which such material can be distributed without profit exclusively for research and educational purposes.
This is a Spartan WHYFF (We Help You For Free) site written by people for whom English is not a native language. Grammar and spelling errors should be expected. The site contain some broken links as it develops like a living tree...
|
|
You can use PayPal to to buy a cup of coffee for authors of this site |
Disclaimer:
The statements, views and opinions presented on this web page are those of the author (or referenced source) and are not endorsed by, nor do they necessarily reflect, the opinions of the Softpanorama society. We do not warrant the correctness of the information provided or its fitness for any purpose. The site uses AdSense so you need to be aware of Google privacy policy. You you do not want to be tracked by Google please disable Javascript for this site. This site is perfectly usable without Javascript.
Last modified: March 12, 2019