The most common format in which software packages are made available for SUSE Linux is a package
format called RPM, which originally stood for "RedHat Package Manager". Right now YUM is often used as an alternative.
The RPM system was developed in 1995 to manage applications in Red Hat Linux 2.0 and is derivative
of the Solaris packaging system. It was the successor to a collection of Perl scripts that functioned
as the earliest Linux packaging tools. Rewritten in the C language in 1996, it quickly became the de
facto standard for managing application installations for several Linux distributions, including SUSE.
Later RPM was renamed "RPM Package Manager". The name RPM refers to two things: a software package format,
and the utility for maintenance of software packaged in this format.
RPM is not the only package format around; another popular format is the one used by Debian Linux
(usually called .deb packages), which has many supporters and is used in Debian and Ubuntu distributions.
There are other formats used to distribute software—in particular, .tar archives ("tarballs"), which
are more often used to distribute source code. Other versions of Unix have their own packages formats,
such as the pkgadd format used by Solaris.
The basic idea behind RPM is to have an "enhanced archive" of a compiled binary files along with
the necessary configuration files that can be unpacked on the system with "one click" in working package
installation and later upgraded to a new version or de-installed without remembering all the places
where the fie went. An RPM database of all available applications is installed on your computer (in
/var/lib/rpm) and this database is accessible by various tools including YaST. It helps to
determine exactly what is on your system, what might be new and updated, and what files each package
provides that another package might need to run properly.
Created by Red Hat, RPM is probably the most popular Unix/Linux package format. Most popular are
binary packages. Good place to search for RPM packages is
rpmfind.net, one of the world's largest archives of
user and vendor-donated RPM packages.
An easy way to install RPMs along with associated dependencies is to use
yum (Yellow dog Updater, Modified)
or apt for RPM. Of the two
products, I would recommend using yum, as it has a smaller code base than apt for RPM, it is written
in python (similar to Red Hat's anaconda installer), and it makes upgrading to new Red Hat releases
relatively easy (apt for RPM has a dist-upgrade feature, but I have never tried it). It is pretty flexible in incorporating third-party RPMs, such as those at
freshrpms.net.
NOTE:rpm -qa --last produces history of installed RPMs
What RPM a file belongs to (you need to provide path and name not just name):
rpm -qf /usr/bin/w # ATTENTION you need to provide full path to get results
rpm -qf /usr/bin/w # the package which owns the file
Also can be used
rpm -q --whatprovides /usr/bin/w
The <filename> must be the full path to the file. If the file is associated with
an RPM package installed, the name of the package and the version installed is displayed. For example,
if the rpm -qf /etc/crontab command is issued, the output is crontabs-<version>-<release>,
where <version>-<release> is the version and release of the crontabs
package installed.
TIP: If the file is a command already in your PATH environment variable, use the following
syntax instead of typing the entire path to the file,:
An rpm package consists of basically three parts: a header, a signature, and the (generally compressed)
archive itself . The header contains a complete file list, a description of the package, a list of the
features and libraries it provides, a list of tools it requires (from other packages) in order to function,
what (known) other packages it conflicts with, and more. The rpm tool needs information in the
header to permit a package to be installed (or uninstalled!) in such a way that:
Installing the package breaks none of the already installed packages (recursively, as they may
need packages of their own to be installed).
All the packages that the package requires for correct operation are also (or already) installed
along with the selected package, recursively.
A later version of the package does not (accidentally) replace an earlier version of the package.
In general you can pass the package name to various rpm commands, and ignore the version
string.
When source code is compiled, the way that the binary package is produced is dependent on a
number of things. A major factor is the type of processor the machine is using. Among popular types
are:
i386 means older normal 32 bit Intel CPUs (no longer used)
i686 mean news Inter 32 CPUs
x86_64 -- means 64-bit CPUs
Noarch tends to be more for scripts and documentation packages which could be used
on any of these systems and do not depend on the CPU used.
The point is that you will need to be aware of these distinctions when downloading
your packages.
Most options come in two flavors: a long option and a short option. The long option features two
hyphens and the full option name, the short one hyphen and - in most cases - the first character of
the full option. Of course you only have to provide one option form (i.e. either rpm --install [name]
or rpm -i [name]).
The most frequently used rpm options (packagename below is just mane, it does not need to
contain version or extension (.rpm))
When installing a package, the rpm update a central database that is installed on your system (see RPM-based
integrity checking for additional details).Presence of database helps to ensure that the same
package is not installed twice, or that by installing this package you'd be "downgrading" to lower version.
One of the more complex but highly useful commands allows you to install packages with
dependencies (note option --aid) via FTP or HTTP.
This is a perfect way to install rpms from DVD with distribution. Just get into appropriate directory
that contains RPM and run the command. For example
rpm -i -aid mc-4.6.2.pre1-121.31.x86_64.rpm
If you are connected to the net and want to install a new package foobar-1.0-1.i386.rpm,
all you need to do is specify the file with a valid URL, like so:-
using centos or other new redhat/linux distributions rpm has the option aid (--aid
) for automatically install dependents I assume. This seems great that any package that wont
install because of failed dependencies can be installed as the rpm program will find the needed
suggested packages.
I needed this when after install centos we wanted to add X windows and Gnome but the number of
dependencies was a bit daunting. But using the –aid switch and pointing it at a location containing
all the rpms shipped with the system meant that once we had almost any X package installed we should
have a running GUI system.
But it expects it to be in an "unusual” location. I suspect it also looks in the current directory.
To change the location it will install the packages from your need to change this file
/etc/rpm/macros.solve
Before option --aid was available the typical way to install a package with dependencies
was trial and error process, for example let's try to install Apache:
rpm -iv http-server-2.0.4-9.i386.rpm
error: failed dependencies: http is needed by http-server-2.0.4-9
libhttp.so.2 is needed by http-server-2.0.4-9
We see that we cannot install it directly as some libraries are not yet installed. This "dependency"
problem is typical for large and complex packages. To solve this problem you can use
Now we know which package provides the missing library. And since the package name itself is "http,"
we can be fairly safe in assuming that "http" will be provided too. Now, the "-qp --provides" arguments
to RPM told it to go into query mode ("-q"), to query an uninstalled package file ("p"), and to list
what it provides ("--provides"). A list of more functions is available by typing "rpm --help | less"
or simply "man rpm".
Note usage of "-Uvh" as argument to rpm. This told it to Update/install a package,
be verbose about it (give detailed information on what it is doing), and print hash
marks as a progress meter. If http had been installed already, the use of "-U" would give rpm the ability
to update the package from an earlier version. To check what files were added use:
# rpm -ql http
We just asked rpm to view its central database we mentioned earlier, and to tell us what files it
knows of that belong to this http package.
if you've made a mistake, and want to get rid of the server, this is generally no hassle with packages.
Here's how it's done:
# rpm -e http
To re-check type it again: rpm -ql http
If you actually haven't got the prerequisite packages installed you can try "rpm -Uvh --nodeps
filename.rpm" However, this can lead to problems later.
A quick way to check on what a particular package is. This is achieved by the use of rpm -qpi
for uninstalled packages, or
rpm -qi
for installed packages. For example:
# rpm -qpi http-2.0.4-9.i386.rpm
Summary:
Install a package
rpm -i packagename
Install the package via FTP or HTTP. One of the more complex but highly useful
commands allows you to install packages via FTP or HTTP. If you are connected to the net and
want to install a new package, all you need to do is specify the file with a valid URL, like
so:
One way to find out RPM dependencies for a particular package is to use rpm
command. The following command lists all dependent packages for a target
package.$ rpm -qR
lusfp210:~ # rpm -qR telnet
netcfg
rpmlib(PayloadFilesHavePrefix) <= 4.0-1
rpmlib(CompressedFileNames) <= 3.0.4-1
libc.so.6()(64bit)
libc.so.6(GLIBC_2.2.5)(64bit)
libc.so.6(GLIBC_2.3)(64bit)
libc.so.6(GLIBC_2.3.4)(64bit)
libc.so.6(GLIBC_2.4)(64bit)
libc.so.6(GLIBC_2.8)(64bit)
libncurses.so.5()(64bit)
rpmlib(PayloadIsLzma) <= 4.4.2-1
You have new mail in /var/mail/root
What RPM a file belongs to (you need to provide path and name not just name):
rpm -qf /usr/bin/w # ATTENTION you need to provide full path to get results
rpm -qf /usr/bin/w # the package which owns the file
Also can be used
rpm -q --whatprovides /usr/bin/w
The <filename> must be the full path to the file. If the file is associated with
an RPM package installed, the name of the package and the version installed is displayed. For example,
if the rpm -qf /etc/crontab command is issued, the output is crontabs-<version>-<release>,
where <version>-<release> is the version and release of the crontabs
package installed.
TIP: If the file is a command already in your PATH environment variable, use the following
syntax instead of typing the entire path to the file,:
rpm -qf `which <filename>`
Show all packages and or files installed (you can use grep to narrow the search instead of
rpm facolities):
rpm -qa | sort
rpm -qa | grep mysql # do I have mysql installed ?
rpm -qal # list all installed files
List content of the installed package.Attention: the name of the package should a a single
name (no dots).
rpm -ql packagename
rpm -q foo # prints packagename, version, release number
List the content of RPM (possibly not yet installed)
rpm -qlp foo.rpm
rpm -qipl foo # list package foo information
NOTE: To list the content of the package you can combine some of the short options
rpm -qpi [name]
rpm -qc <packagename> To retrieve a list of configuration files from a package installed,
use the following command:
rpm --query (-q) [name] queries for package name and version of an installed
program
rpm --query --package (-qp) [name] does the same on a package which isn't
installed
rpm --query --package --info (-qpi) [name] tells you what the installed
package is about, who packaged it etc.
To list any documentation files installed with a package:
rpm -qd <packagename>
Each time a package is changed, the developer is responsible for adding a changelog entry to
describe the change. This becomes part of the information provided by the RPM package. The query
option has the ability to show the changelog for the package with the following command:
rpm -q --changelog <packagename>
These query commands can also be performed on an RPM package file instead of on the package name
of the package already installed. To do so, add the -p argument followed by the full
or relative path to the package file. For example, to view the changelog of a package before installing
it, use the following command:
1.rpm2cpio is the tool you'd need, to turn the RPM file into a CPIO stream, which you
then pipe through cpio to extract to disk. For example
(File and Archiving Commands)
Unpacking an rpm archive
   1 #!/bin/bash
   2 # de-rpm.sh: Unpack an 'rpm' archive
   3
   4 : ${1?"Usage: `basename $0` target-file"}
   5 # Must specify 'rpm' archive name as an argument.
   6
   7
   8 TEMPFILE=$$.cpio                         # Tempfile with "unique" name.
   9                                          # $$ is process ID of script.
  10
  11 rpm2cpio < $1 > $TEMPFILE                # Converts rpm archive into cpio archive.
  12 cpio --make-directories -F $TEMPFILE -i  # Unpacks cpio archive.
  13 rm -f $TEMPFILE                          # Deletes cpio archive.
  14
  15 exit 0
  16
  17 #  Exercise:
  18 #  Add check for whether 1) "target-file" exists and
  19 #+                       2) it is really an rpm archive.
  20 #  Hint:                    parse output of 'file' command.
2. You can install an rpm to an arbitrary root directory (e.g. targetdir) placing the
package files under targetdir and the rpm database in the targetdir/var/rpm directory with something
like:
3. Suse has unrpm, which been part of the distribution for a long time
4. Using mc (Midnight commander). This can enter and view the files inside the rpm, viewing not just the directory
structure, but the init script itself
I sometimes see a few rpm queries and questions that pop up
over time. I work a lot with RPM, and I have compiled a quick cheat sheet. It is by no means
complete. I am suprised a lot of people don't know that you can install rpms by wildcard, and
also specify multiple rpms on the command line (also with wildcards). (like rpm -i IBMJava2-SDK*.rpm
IBMJava2-JRE*.rpm). The neat thing here is rpm will work out the correct order to install the
RPMS to satisfy dependencies .. not you.
Install an RPM:
rpm -i rpmname.rpm - is the most basic use.
Remove an RPM:
rpm -e rpmname.rpm
This is the most basic use
Note: When you remove an rpm, you should not specify the arch.rpm
extensions (commonly it is i386.rpm).
Upgrade an RPM:
rpm -U rpmname.rpm - is the most basic use (though common options are -Uvh)
All of these commands have many, many modifiers. Here are some of the ones I use most frequently
--excludedocs - will leave out man files, docs files, info files from the install
--test - mock install/remove/etc. Don't really do it, but see if it works.
-v --hash - draw a progress bar of the install/remove/etc
--force - force an installation (can really mess up the database)
--nodeps - Don't check for dependencies (can really mess up the database)
Querying an rpm
There are several ways to query an rpm:
List all rpms in the system:
rpm -qa
List all files in an rpm (in this case one that has been installed):
rpm -ql rpmname
Note: Again do not specify the .arch.rpm. Also this does not have to be the full name of
the rpm. Partial names work too.
List all the files in an rpm file that has not been installed on your system
rpm -qp rpmname.rpm -ql
List all the files in an rpm file that has not been installed on your system, but you
have on disk. Also print a brief summary of the package function:
rpm -qp rpmname.rpm -ql --info
List all the files in an rpm file that has not been installed on your system, and does
not exist on your system. Query over ftp. Also print a brief summary of the package function
Here's a list of what I've found to be some of the most useful redhat linux
rpm commands, (examples assume a bash shell prompt).
rpm
-qa> rpmlist
-q indicates an rpm query, a indicates all packages in database. This
creates the file rpmlist. Use a text editor like vi to review the contents,
or pipe it to grep if you're trying to determine if you have a particular
package name installed, and if so, what version. Each line will display the
installed package string (with version#) ie
CODE:
dhcpcd-1.3.22pl1-7
In general you can pass the package name to various rpm commands, and ignore
the version string.
Getting Information about a package
rpm -qperl
Result:
CODE:
perl-5.00503-12
rpm -q depends on matching the package name up to the last - prior to the
package version information. This example searched for the popular sysadmin
tool perl. If the query succeeds, the currently installed package string is
returned. In this case, the example indicates that perl version 5.00503-12
is installed.
rpm -qiperl
Result:
CODE:
Name : perl Relocations: (not relocateable) Version : 5.8.0 Vendor: Red Hat, Inc. Release : 88.3 Build Date: Wed 13 Aug 2003 09:21:24 AM PDT Install date: Sat 08 Nov 2003 04:24:48 PM PST Build Host: stripples.devel.redhat.com Group : Development/Languages Source RPM: perl-5.8.0-88.3.src.rpm Size : 34942198 License: Artistic Signature : DSA/SHA1, Fri 12 Sep 2003 02:06:47 PM PDT, Key ID 219180cddb42a60e Packager : Red Hat, Inc. <http://bugzilla.redhat.com/bugzilla> Summary : The Perl programming language. Description : Perl is a high-level programming language with roots in C, sed, awk and shell scripting. Perl is good at handling processes and files, and is especially good at handling text. Perl's hallmarks are practicality and efficiency. While it is used to do a lot of different things, Perl's most common applications are system administration utilities and web programming. A large proportion of the CGI scripts on the web are written in Perl. You need the perl package installed on your system so that your system can handle Perl scripts.
Install this package if you want to program in Perl or enable your system to handle Perl scripts.
The -i (information) query option returns a wealth of useful information
about a package. Adding the 'l' option will include a listing of the files
inside the path in a format similar to ls. For example:
rpm -qil linc
CODE:
Name : linc Relocations: (not relocateable) Version : 0.5.2 Vendor: Red Hat, Inc. Release : 2 Build Date: Fri 23 Aug 2002 10:27:57 AM PDT Install date: Sat 08 Nov 2003 12:18:09 AM PST Build Host: daffy.perf.redhat.com Group : System Environment/Libraries Source RPM: linc-0.5.2-2.src.rpm Size : 70859 License: LGPL Signature : DSA/SHA1, Tue 03 Sep 2002 02:28:58 PM PDT, Key ID 219180cddb42a60e Packager : Red Hat, Inc. <http://bugzilla.redhat.com/bugzilla> Summary : Library for writing network programs Description :
linc is a library that eases the task of writing networked servers and clients. It takes care of connection initiation and maintainance, and the details of varioustransports. It is used by the new ORBit to handle message transmission/receipt. /usr/lib/liblinc.so.1 /usr/lib/liblinc.so.1.0.0 /usr/share/doc/linc-0.5.2 /usr/share/doc/linc-0.5.2/AUTHORS /usr/share/doc/linc-0.5.2/COPYING /usr/share/doc/linc-0.5.2/NEWS /usr/share/doc/linc-0.5.2/README
Note the reference to the Source RPM. RPM's are compiled into a binary
format for efficiency and compression. If you are interested in the complete
source for the RPM you can download the src.rpm and take a look at it with a
text editor. RPM provides a full set of tools for creating your own RPM's
for distributing your own open source projects. The details of this process
is covered in
Maximum RPM published by RedHat and distributed by them in electronic
form on their website.
Sometimes you are looking at a file, and aren't sure what package it belongs
to. This rpm command will determine that for you. Note that you must pass
the full path to the file and not just the filename itself, if you expect
rpm to find a match.
rpm -qf/usr/bin/gs
returns:
CODE:
ghostscript-7.05-20.1
RPM's main purpose is to actually install packages, so you don't have to
compile everything from source. It's also worth noting that packages are
created by the linux distro creators typically, and represent someones
opinion on how a particular piece of software should be installed on your
system. Although you can override these defaults to a degree, it's probably
not the best idea to fight against the "official" stance of the distro on
how that package works best.
Finding packages If you are having trouble installing a package because it depends on other
packages to already have been installed first, try
www.rpmfind.net. It's a handy database which cross references packages
across all the linux distributions and architectures that support RPM's. For
example, try searching for libcrypto.so.0. The results indicate the various
packages which include that file, and the location of the rpm for download.
There are options to install an rpm using a variety of protocols, but I
typically download the rpm to my server first and install it from the file.
RPM's installation syntax if very simple in this case:
rpm -i
I always tack on the vh options to get verbose output and the
progress hashes so you can determine whether or not rpm has locked up, which
on rare occasions it has been known to do.
So, you find out that a program you are using has a security vulnerability
and a new patch (and hopefully a new rpm) has been issued. Upgrading with
rpm is usually a snap.
rpm -Uvh
python-xmlrpc-1.2.1-0.6.x.i386.rpm
The -U option causes rpm to update the new package, checking for a prior
versions, and saving or reusing configuration options before deleting any
prior versions of the package from the system.
Unresolvable dependencies!
Sometimes you will be unable to update because of dependency issues between
two packages. If you find that each package errors saying there are
dependencies with the other, you can override the dependency check by add --nodeps
as an argument to the update command. For example:
I've had debates with people about this, but when two packages are in an rpm
deadly embrace where each is dependent on the other, there is no way
to move forward without telling one of the two to simply install anyways.
Although this should be used with care, it obviously exists for a reason,
and I've used it a few times without issue.
Batch patching
Sometimes you will have a whole slew of patched rpm's to deal with, and not
be completely sure if you need them or not. One solution is the rpm freshen
option.
rpm -Fvh
python-xmlrpc-1.2.1-0.6.x.i386.rpm
Like -U -F causes an update or "Freshening" of the package, however, if a
prior version of the package doesn't exist, rpm will exit without doing any
installation. Security patches are often distributed with the recommendation
that this mode be used. This way sysadmins can download the security patches
and attempt to freshen them without concern about whether or not the patch
is really needed.
Creating RPM package files can be both as easy or complicated as you desire. If you're
needing to create an RPM package from a tarball (.tar.gz) that a vendor sent you, this tutorial
will be beneficial for you. In this tutorial, I will describe a step-by-step procedure for
building an RPM package from a tar file. The procedure includes creating the required directory
structure, configuring a .spec file required for the rpmbuild
process, and building and installing the RPM package. An additional step is added for those who
may need to create more RPM packages in the future via a skeleton file.
We will be utilizing the rpmbuild command (included with rpm
package) to build your RPM package(s).
Step One: Install rpm Package
First, install the tools needed for building your RPM package.
For Debian-based
Linux:
$ sudo apt-get install rpm
For Red Hat-based Linux:
$ sudo yum install rpm
Step Two: Create Directory Structure and Land Your Source File
Next, create the appropriate directory structure needed for rpmbuild . If you
did not create these manually, the rpmbuild process would create them anyway. The
benefit of creating the directories now is that you can land your source file (the zipped
tarball) in the correct directory before rpmbuild complains about it missing. I
chose my home directory as the location for my rpmbuild location. Choose it as you
see fit.
Step Three: Utilize a Skeleton File for Reusability
Next, prepare to create your skeleton file - template.spec . This file will be
the default file each time you create a .spec file for your new RPM package.
Essentially with vim , if you have a certain file (bash script, python script,
etc) that you're always creating with a certain layout/framework, you can create a skeleton
(default) file for that extension. This makes your life a tad bit easier by filling in the same
layout/content each time you build a new RPM package.
Create the directory where your skeleton file will reside.
$ sudo mkdir -p /usr/share/vim/vimfiles/
Then create a skeleton file with the following content.
Next, to complete the skeleton implementation, you now need to update your user-specific
vimrc file ( ~/.vimrc ) (or whichever vim configuration
file you prefer) to utilize the skeleton file we created earlier.
$ vim ~/.vimrc
if has("autocmd")
  augroup templates
    autocmd BufNewFile *.spec 0r /usr/share/vim/vimfiles/template.spec
  augroup END
endif
Now let's begin creating/editing the .spec file that will be used to build your
RPM package.
$ vim ~/rpmbuild/SPECS/test-package-2.1.0.1.spec
You will see the same information populated from your skeleton file we created earlier. The
following information describes the items in more detail.
Name - Name of your package
Version - Major version of your package
Release - Minor version of your package
Summary - High level overview of the package
License - From the vendor (if any)
Source0 - Name of your source/zipped file (which is located in
~/rpmbuild/SOURCES )
Buildroot - Acts as your root directory when building RPMs
Buildarch - Set this to the architecture of the host this RPM will be installed on
%description - A more in depth description/overview of the package
%prep - Prepares the files from the source file
%install - Creates the final directory and lands the files from the zipped file, copying
the contents into this directory
%files - List of files installed and modification of permissions/ownership
Here is an example of a basic .spec file.
Name: test-package
Version: 2
Release: 1.0.1
Summary: My test software/package
License: Vendor
Source0: %{name}-%{version}.%{release}.tar.gz
Buildroot: %{_tmppath}/%{name}/%{version}
Buildarch: x86_64

%description
My test software/package to land my newly built application and scripts.

%prep
# Create the RPM from the tar file
%setup -c -n %{name}-%{version}.%{release}-64bit

%install
# Create the new test-package directory
mkdir -p $RPM_BUILD_ROOT/usr/share/%{name}-%{version}.%{release}-64bit

# Copy the contents of the RPM into our new directory
cp -Rp $RPM_BUILD_DIR/%{name}-%{version}.%{release}-64bit/* $RPM_BUILD_ROOT/usr/share/%{name}-%{version}.%{release}-64bit

%clean
rm -rf $RPM_BUILD_ROOT
rm -rf $RPM_BUILD_DIR

%files
# Set the permissions/ownership of all files in your new directory as needed
%defattr(-,minecraftuser,minecraftuser,-)
/usr/share/%{name}-%{version}.%{release}-64bit
Next, create the RPM package with your new spec file. Note that the -ba stands
for "Build binary and source packages". You can use other options here if needed that will help
during the rpmbuild process, such as -bp for "Executes the "%prep"
stage from the spec file", or -bc for "Do the "%build" stage from the spec file
(after doing the %prep stage)". These additional options will pause the rpmbuild
process at certain points to help with troubleshooting. For our case, we will just build the
RPM package.
To conclude, I demonstrated how to lay down the appropriate foundation/directory structure
for building an RPM package, creating a skeleton file for reusability, creating your
.spec file, building the RPM package with the rpmbuild command, and
finally installing the package.
I just want to create an RPM file to distribute my Linux binary "foobar", with only a couple
of dependencies. It has a config file, /etc/foobar.conf and should be installed in
/usr/bin/foobar.
Unfortunately the documentation for RPM is 27 chapters
long and I really don't have a day to sit down and read this, because I am also busy making
.deb and EXE installers for other platforms.
What is the absolute minimum I have to do to create an RPM? Assume the foobar binary and
foobar.conf are in the current working directory.
I often do binary rpm per packaging proprietary apps - also moster as websphere - on linux.
So my experience could be useful also a you, besides that it would better to do a TRUE RPM if
you can. But i digress.
So the a basic step for packaging your (binary) program is as follow - in which i suppose
the program is toybinprog with version 1.0, have a conf to be installed in
/etc/toybinprog/toybinprog.conf and have a bin to be installed in /usr/bin called tobinprog
:
Objective Our goal is to build rpm packages with custom content, unifying scripts
across any number of systems, including versioning, deployment and undeployment. Operating
System and Software Versions
Operating system: Red Hat Enterprise Linux 7.5
Software: rpm-build 4.11.3+
Requirements Privileged access to the system for install, normal access for build.
Difficulty MEDIUM Conventions
# - requires given linux commands to be executed with root
privileges either directly as a root user or by use of sudo command
$ - given linux
commands to be executed as a regular non-privileged user
Introduction One of the core feature of any Linux system is that they are built for
automation. If a task may need to be executed more than one time - even with some part of it
changing on next run - a sysadmin is provided with countless tools to automate it, from simple
shell scripts run by hand on demand (thus eliminating typo errors, or only save
some keyboard hits) to complex scripted systems where tasks run from cron at a
specified time, interacting with each other, working with the result of another script, maybe
controlled by a central management system etc.
While this freedom and rich toolset indeed adds to productivity, there is a catch: as a
sysadmin, you write a useful script on a system, which proves to be useful on another, so you
copy the script over. On a third system the script is useful too, but with minor modification -
maybe a new feature useful only that system, reachable with a new parameter. Generalization in
mind, you extend the script to provide the new feature, and complete the task it was written
for as well. Now you have two versions of the script, the first is on the first two system, the
second in on the third system.
You have 1024 computers running in the datacenter, and 256 of them will need some of the
functionality provided by that script. In time you will have 64 versions of the script all
over, every version doing its job. On the next system deployment you need a feature you recall
you coded at some version, but which? And on which systems are they?
On RPM based systems, such as Red Hat flavors, a sysadmin can take advantage of the package
manager to create order in the custom content, including simple shell scripts that may not
provide else but the tools the admin wrote for convenience.
In this tutorial we will build a custom rpm for Red Hat Enterprise Linux 7.5 containing two
bash scripts, parselogs.sh and pullnews.sh to provide a
way that all systems have the latest version of these scripts in the
/usr/local/sbin directory, and thus on the path of any user who logs in to the
system.
Distributions, major and minor versions In general, the minor and major version of the
build machine should be the same as the systems the package is to be deployed, as well as the
distribution to ensure compatibility. If there are various versions of a given distribution, or
even different distributions with many versions in your environment (oh, joy!), you should set
up build machines for each. To cut the work short, you can just set up build environment for
each distribution and each major version, and have them on the lowest minor version existing in
your environment for the given major version. Of cause they don't need to be physical machines,
and only need to be running at build time, so you can use virtual machines or containers.
In this tutorial our work is much easier, we only deploy two scripts that have no
dependencies at all (except bash ), so we will build noarch packages
which stand for "not architecture dependent", we'll also not specify the distribution the
package is built for. This way we can install and upgrade them on any distribution that uses
rpm , and to any version - we only need to ensure that the build machine's
rpm-build package is on the oldest version in the environment. Setting up
building environment To build custom rpm packages, we need to install the
rpm-build package:
# yum install rpm-build
From now on, we do not useroot user, and for a good reason. Building
packages does not require root privilege, and you don't want to break your building
machine.
Building the first version of the package Let's create the directory structure needed
for building:
$ mkdir -p rpmbuild/SPECS
Our package is called admin-scripts, version 1.0. We create a specfile that
specifies the metadata, contents and tasks performed by the package. This is a simple text file we
can create with our favorite text editor, such as vi . The previously installed
rpmbuild package will fill your empty specfile with template data if you use
vi to create an empty one, but for this tutorial consider the specification below
called admin-scripts-1.0.spec :
Name: admin-scripts
Version: 1
Release: 0
Summary: FooBar Inc. IT dept. admin scripts
Packager: John Doe
Group: Application/Other
License: GPL
URL: www.foobar.com/admin-scripts
Source0: %{name}-%{version}.tar.gz
BuildArch: noarch
%description
Package installing latest version the admin scripts used by the IT dept.
%prep
%setup -q
%build
%install
rm -rf $RPM_BUILD_ROOT
mkdir -p $RPM_BUILD_ROOT/usr/local/sbin
cp scripts/* $RPM_BUILD_ROOT/usr/local/sbin/
%clean
rm -rf $RPM_BUILD_ROOT
%files
%defattr(-,root,root,-)
%dir /usr/local/sbin
/usr/local/sbin/parselogs.sh
/usr/local/sbin/pullnews.sh
%doc
%changelog
* Wed Aug 1 2018 John Doe
- release 1.0 - initial release
Place the specfile in the rpmbuild/SPEC directory we created earlier.
We need the sources referenced in the specfile - in this case the two shell
scripts. Let's create the directory for the sources (called as the package name appended with
the main version):
As this tutorial is not about shell scripting, the contents of these scripts are irrelevant. As
we will create a new version of the package, and the pullnews.sh is the script we
will demonstrate with, it's source in the first version is as below:
#!/bin/bash
echo "news pulled"
exit 0
Do not forget to add the appropriate rights to the files in the source - in our case,
execution right:
We'll get some output about the build, and if anything goes wrong, errors will be shown (for
example, missing file or path). If all goes well, our new package will appear in the RPMS directory
generated by default under the rpmbuild directory (sorted into subdirectories by
architecture):
$ ls rpmbuild/RPMS/noarch/
admin-scripts-1-0.noarch.rpm
We have created a simple yet fully functional rpm package. We can query it for all the
metadata we supplied earlier:
$ rpm -qpi rpmbuild/RPMS/noarch/admin-scripts-1-0.noarch.rpm
Name : admin-scripts
Version : 1
Release : 0
Architecture: noarch
Install Date: (not installed)
Group : Application/Other
Size : 78
License : GPL
Signature : (none)
Source RPM : admin-scripts-1-0.src.rpm
Build Date : 2018. aug. 1., Wed, 13.27.34 CEST
Build Host : build01.foobar.com
Relocations : (not relocatable)
Packager : John Doe
URL : www.foobar.com/admin-scripts
Summary : FooBar Inc. IT dept. admin scripts
Description :
Package installing latest version the admin scripts used by the IT dept.
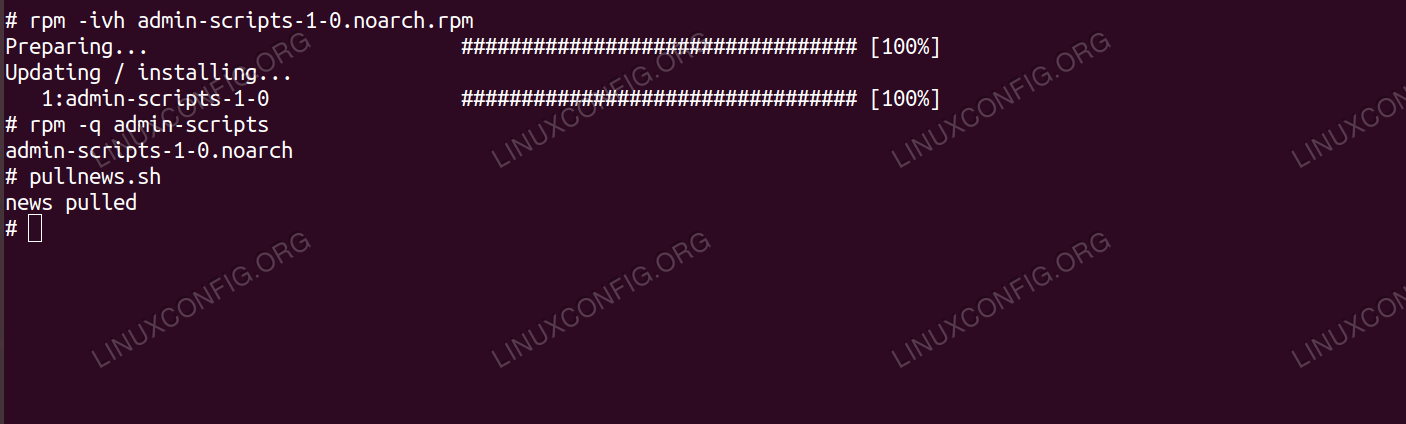
And of cause we can install it (with root privileges): Installing custom scripts with rpm
As we installed the scripts into a directory that is on every user's $PATH , you
can run them as any user in the system, from any directory:
$ pullnews.sh
news pulled
The package can be distributed as it is, and can be pushed into repositories available to any
number of systems. To do so is out of the scope of this tutorial - however, building another
version of the package is certainly not. Building another version of the package Our package
and the extremely useful scripts in it become popular in no time, considering they are reachable
anywhere with a simple yum install admin-scripts within the environment. There will be
soon many requests for some improvements - in this example, many votes come from happy users that
the pullnews.sh should print another line on execution, this feature would save the
whole company. We need to build another version of the package, as we don't want to install another
script, but a new version of it with the same name and path, as the sysadmins in our organization
already rely on it heavily.
First we change the source of the pullnews.sh in the SOURCES to something even
more complex:
#!/bin/bash
echo "news pulled"
echo "another line printed"
exit 0
We need to recreate the tar.gz with the new source content - we can use the same filename as
the first time, as we don't change version, only release (and so the Source0 reference
will be still valid). Note that we delete the previous archive first:
cd rpmbuild/SOURCES/ && rm -f admin-scripts-1.tar.gz && tar -czf admin-scripts-1.tar.gz admin-scripts-1
Now we create another specfile with a higher release number:
We don't change much on the package itself, so we simply administrate the new version as
shown below:
Name: admin-scripts
Version: 1
Release: 1
Summary: FooBar Inc. IT dept. admin scripts
Packager: John Doe
Group: Application/Other
License: GPL
URL: www.foobar.com/admin-scripts
Source0: %{name}-%{version}.tar.gz
BuildArch: noarch
%description
Package installing latest version the admin scripts used by the IT dept.
%prep
%setup -q
%build
%install
rm -rf $RPM_BUILD_ROOT
mkdir -p $RPM_BUILD_ROOT/usr/local/sbin
cp scripts/* $RPM_BUILD_ROOT/usr/local/sbin/
%clean
rm -rf $RPM_BUILD_ROOT
%files
%defattr(-,root,root,-)
%dir /usr/local/sbin
/usr/local/sbin/parselogs.sh
/usr/local/sbin/pullnews.sh
%doc
%changelog
* Wed Aug 22 2018 John Doe
- release 1.1 - pullnews.sh v1.1 prints another line
* Wed Aug 1 2018 John Doe
- release 1.0 - initial release
All done, we can build another version of our package containing the updated script. Note that
we reference the specfile with the higher version as the source of the build:
If the build is successful, we now have two versions of the package under our RPMS directory:
ls rpmbuild/RPMS/noarch/
admin-scripts-1-0.noarch.rpm admin-scripts-1-1.noarch.rpm
And now we can install the "advanced" script, or upgrade if it is already installed.
Upgrading custom scripts with rpm
And our sysadmins can see that the feature request is landed in this version:
rpm -q --changelog admin-scripts
* sze aug 22 2018 John Doe
- release 1.1 - pullnews.sh v1.1 prints another line
* sze aug 01 2018 John Doe
- release 1.0 - initial release
Conclusion
We wrapped our custom content into versioned rpm packages. This means no
older versions left scattered across systems, everything is in it's place, on the version we
installed or upgraded to. RPM gives the ability to replace old stuff needed only in previous
versions, can add custom dependencies or
provide some tools or services our other packages rely on. With effort, we can pack nearly any of
our custom content into rpm packages, and distribute it across our environment, not only with ease,
but with consistency.
Rpm is one of the most advanced Gnu/Linux package manager. Created by Red Hat, it is used in
many distributions, as for example Fedora and derivatives like Rhel and CentOS.
Packages to be installed with this package manager have the .rpm extension and
are basically archives which contain the files provided by a library or an application plus
information needed for the package to be installed and run correctly, such as its dependencies.
In this tutorial we will learn how to use rpmrebuild , a very powerful tool which
let us modify an existing rpm package without having to rebuild it from source code. Fixing
a missing dependency in the Atom package example For the sake of this tutorial we will fix
a real bug, affecting the official Atom editor rpm package. Atom depends on
GConf2 , however this package is omitted in the list of dependencies included the
spec file.
You may not notice this if you install Atom on a default installation of Fedora Workstation,
since the GConf2 package is already installed on the system (probably some other
package requires it as a dependency).
However, when installing Atom in a minimal environment the problem will arise: the package
will be installed without problems, but when trying to launch the editor, the following error
will be displayed:
/usr/share/atom/atom: error while loading shared libraries: libgconf-2.so.4: cannot open shared object file: No such file or directory
The libgconf-2.so.4 shared object is provided by the GConf2
package, as we can easily verify issuing the following linux command :
$ dnf whatprovides libgconf-2.so.4
GConf2-3.2.6-20.fc28.i686 : A process-transparent configuration system
Repo : fedora
Matched from:
Provide : libgconf-2.so.4
Let's fix this bug by adding the missing dependency in the spec file. Step 1 - Rpmrebuild
installation The first thing we need to do, is to install the rpmrebuild package,
which is available in the default Fedora repositories. The command may vary depending if the user
is in the wheel group, and therefore can use the sudo command, or if we want to run
the command switching to the root user, using su. I will assume the former case here:
$ sudo dnf install rpmrebuild
Let dnf do its job, and soon the package will be installed on our system. At this point, we
need to retrieve the Atom package from the official project website . We will use it as a base to build our custom rpm. Step 2 - Spec
file modification The spec file of a rpm package contains vital information about
the package itself, such as its dependencies and the files it provides: it is this file we need to
modify to fix this little bug. Assuming we are in the directory where we downloaded the Atom
package, we can issue the following linux command :
$ rpmrebuild -enp atom.x86_64.rpm
We invoked the rpmrebuild command providing three options: -e,-n and -p . Let's briefly see what they are for. The first option,
-e is the short version of --edit-specfile and it's needed to tell the
program that we want to edit the specfile of the package; the second one, -n ,
short version of --notest-install modifies the behavior of the program so that the
generated rpm will not be automatically installed at end of the building process.
Finally, by using the -p or --package option, we specify that we
want to use an actual .rpm package file as the base of our rebuild, instead of
using an already installed rpm.
Once we run the command above, the spec file will be opened into an instance of our default
text editor. In our case, what we want to do, is to add a Requires clause, in
order to include the missing dependency:
Requires: lsb-core-noarch
Requires: GConf2 # Here is our extra dependency
Requires: libXss.so.1()(64bit)
Requires: libsecret-1.so.0()(64bit)
Additionally, we can modify the package version, in order to distinguish our modified version
from the official one. It is very simple: all we need to do is to modify the line:
Release: 0.1
Into something like:
Release: 0.1_custom
Once we are done, we save and close the file: a prompt will be displayed on our terminal,
asking if we want to proceed and build the modified package:
Do you want to continue ? (y/N)
If we give an affirmative answer and press enter, the building will start (it could take a
while to finish). It is important to notice that the specified rpm will not be modified in place,
but a new one, based on it will be generated. At the end of the process, the new rpm will be
located in the $HOME/rpmbuild/RPMS/x86_64/ directory:
$ ls $HOME/rpmbuild/RPMS/x86_64/
atom-1.27.0-0.1_custom.x86_64.rpm
To verify that the dependency has been correctly added, we can use rpm and query the new
package dependencies:
GConf2 is now included in the list of the package dependencies. This becomes
evident when we try to install the package: as always, a summary of the operations to be performed
will be displayed when installing the package with dnf :
[...]
================================================================================
Package Arch Version Repository Size
================================================================================
Installing:
atom x86_64 1.27.0-0.1_custom @commandline 99 M
Installing dependencies:
GConf2 x86_64 3.2.6-20.fc28 fedora 1.0 M
at x86_64 3.1.20-10.fc28 fedora 80 k
cronie x86_64 1.5.1-9.fc28 fedora 105 k
cronie-anacron x86_64 1.5.1-9.fc28 fedora 40 k
crontabs noarch 1.11-16.20150630git.fc28 fedora 24 k
ed x86_64 1.14.2-2.fc28 fedora 80 k
esmtp x86_64 1.2-10.fc28 fedora 57 k
libXScrnSaver x86_64 1.2.2-14.fc28 fedora 29 k
libesmtp x86_64 1.0.6-14.fc28 fedora 67 k
liblockfile x86_64 1.14-1.fc28 fedora 30 k
m4 x86_64 1.4.18-6.fc28 fedora 221 k
mailx x86_64 12.5-28.fc28 updates 256 k
ncurses-compat-libs x86_64 6.1-4.20180224.fc28 fedora 331 k
redhat-lsb-core x86_64 4.1-44.fc28 fedora 44 k
redhat-lsb-submod-security x86_64 4.1-44.fc28 fedora 21 k
spax x86_64 1.5.3-12.fc28 fedora 216 k
time x86_64 1.9-1.fc28 fedora 53 k
util-linux-user x86_64 2.32-2.fc28 fedora 94 k
Transaction Summary
================================================================================
Install 19 Packages
[...]
The package will now run correctly, as all its runtime dependencies are correctly satisfied.
Final thoughts In this tutorial we saw how to modify a spec file of a package
without having to rebuild it from source code using the rpmrebuild tool. We fixed a
little bug, which consists in a missing dependency in the Atom official rpm package.
We downloaded and used the official Atom package as the base of our rebuild, however with
the same tool it's possible to work and modify files which are part of an already installed
rpm, in order to generate a new build of it which will include the modifications.
Rpmrebuild is a very useful and powerful tool; the suggestion, as always, it's to
dive into its manpage to master it unlock its full potential.
RPM Post-Upgrade Scripts 10 June 2017 · Filed in Open Source
Something different today: Here's something I learnt about RPM package management, and
post-upgrade scripts. It turns out that they don't work the way I thought they did.
Post-uninstall commands are called on both uninstall and upgrade. For my own reference as much
as anyone's here some info about it, and how to deal with it.
RPM Package Management
RPM is a
Linux package management system. It is a way of distributing and managing applications
installed on Linux systems. Packages get distributed as .rpm files. These contain the
application binaries, configuration files, and application metadata such as dependencies. They
can also contain scripts to run pre- and post- installations, upgrades and removal.
Using package management systems is a vast improvement over distributing source code, or
requiring users to manually copy files around and run scripts themselves.
There is some effort required to get the spec files used to create packages. But once it has
been set up, it is easy to create new versions of packages, and distribute them to users.
System administrators can easily check which version they're running, check what new versions
are available, and upgrade.
We use RPMs to distribute StackStorm
packages for RHEL/CentOS systems. Similarly, we distribute debs for Ubuntu-based installations.
These perform a similar function to RPMs, for Debian-based systems such Ubuntu.
Customer
Reports: Too Many Logs
We started getting reports from some users that they had too many StackStorm logs under
/var/log/st2 . This was surprising to us, since we include an st2 logrotate
configuration file in our standard packaging. This should exist at
/etc/logrotate.d/st2 . It contains rules for automatic compression and deletion of
st2 logs.
Yet some users said they didn't have this file. What was going on? We couldn't reproduce it.
All our test systems had this file present.
But the file was missing for these users. rpm -qV st2 told us that RPM expected
it to be there, but it was missing.
The issue only came up occasionally. Most users weren't affected. Only a few people were.
After a while I started to realise that they were all RHEL/CentOS users, and they had been
using ST2 for a while. Maybe there's a common thread here?
Smoking Gun: The
%postun Step
During investigation, I came across this section of the RPM spec file:
%postun
%service_postun st2actionrunner %{worker_name} st2api st2stream st2auth st2notifier
%service_postun st2resultstracker st2rulesengine st2sensorcontainer st2garbagecollector
# Wipe out st2 logrotate config, since there's no analog of apt-get purge avaialable
[ ! -f /etc/logrotate.d/st2 ] || rm /etc/logrotate.d/st2
At first glance, it looks OK. %postun sounds like it should be run
post-uninstall. It cleans up a leftover file, so it should be fine, right?. Problem is that
this section also gets called at the end of an upgrade, not just on uninstall. That was the bit
that caught me out.
Yes, when an RPM upgrade occurs, RPM first installs the new version of the package and
then uninstalls the old version of the package. Only the files of the old package are
removed. But your scripts (i.e. %pre , %post , %preun
, %postun ) need to know whether they are handling an upgrade or just a plain
install or uninstall.
--- a/packages/st2/rpm/st2.spec
+++ b/packages/st2/rpm/st2.spec
@@ -60,8 +60,10 @@ Conflicts: st2common
%postun
%service_postun st2actionrunner %{worker_name} st2api st2stream st2auth st2notifier
%service_postun st2resultstracker st2rulesengine st2sensorcontainer st2garbagecollector
- # Wipe out st2 logrotate config, since there's no analog of apt-get purge avaialable
- [ ! -f /etc/logrotate.d/st2 ] || rm /etc/logrotate.d/st2
+ # Remove st2 logrotate config, since there's no analog of apt-get purge available
+ if [ $1 -eq 0 ]; then
+ [ ! -f /etc/logrotate.d/st2 ] || rm /etc/logrotate.d/st2
+ fi
%files
%defattr(-,root,root,-)
When the %postun script gets called, it passes in "the number of packages that
will be left after this step is completed." So this fix says "Only run this script if this is
the very last instance of this package being removed or upgraded."
Now this step will only be executed on uninstall, not on upgrade.
One Upgrade's Not
Enough
The StackStorm packages have been updated, but unfortunately a single upgrade doesn't fully
solve the problem. If existing users upgrade, it will run the current %postun
scripts - so it will still delete the logrotate configuration file.
Users have to carry out a second upgrade cycle. This time the config file won't get deleted,
and all future upgrades will also be OK.
If you're maintaining multiple Red Hat Enterprise Linux systems
(or equivalent offsets like CentOS or Scientific Linux) your administration work
with the particular hosts will gain in a routine. Because even the best
administrator might forget something it would be advantageously to have a central
software and configuration management solution. Chef and Puppet are two very
mighty and popular mangement tools for this application. Depending on your system
landscape and needs these tools might also be oversized though – Red Hat Package
Manager (RPM) can emerge as a functional alternative in this case.
It is often forgotten that RPM can be used for sharing own software and
configurations as well. If you're not managing huge system landscapes with
uncontrolled growth of software and want to have a easy-to-use solution, you
might want to have a look at RPM.
I'm myself using RPM to maintain my whole Red Hat Enterprise Linux system
landscape – this article will show you how easy RPM can be used to simplify
system management.
Platform
The core of this scenario is a web-service which can be implemented on a
dedicated host or on a pre-existing server (e.g. web server) as well. This
web-service offers RPM packages for downloading and doesn't even need to be a
RHEL or CentOS system because the server only serves the RPM files (and ideally
doesn't create them).
RPM packages are created and replicated to the web server using SSH and Rsync
on dedicated RHEL or CentOS systems depending on the distribution releases you
want to maintain (e.g. RHEL 5 and 6). A YUM repository is created of the RPM
packages collection preliminary using createrepo. The YUM repository can be used
by additional servers and other clients and consists of multiple sub-directories
that are named after the supported processor architectures. After the repository
had been configured on the client it can be used for downloading and installing
additional software packages. If you only have to maintain RPM packages for one
distribution release you can scale down your test environment.
In this case a YUM repository for the Red Hat Enterprise Linux releases 5 and
6 is created.
Web server file structure
The YUM repository directory (myrepo in this case) consists of multiple
sub-directories containing the software packages per supported distribution
release and processor architecture. The names of these folders are very important
– the name has to be the same like the value of the appropriate YUM variable
$releasever (discussed later!).
A table of popular RPM-based Linux distributions:
$releasever
Explanation
5Server
RHEL 5
6Server
RHEL 6
5Workstation
RHED 5
6Workstation
RHED 6
5 / 5.1 / 5.2 /
CentOS / Scientific Linux 5
6 / 6.1 / 5.2 /
CentOS / Scientific Linux 6
17 / 18 /
Fedora 17 / 18 /
Example: If you want to serve software packages for the Red Hat Enterprise
Linux releases 5 and 6 you'll have to create two sub-directories: 5Server and
6Server.
The appropriate main directories are created on the web server – the
sub-directories and further contents are copied to the machine using SSH / Rsync
later:
# mkdir -p /var/www/html/myrepo/{5,6}Server
Preparation
Before RPM packages can be created and served to other hosts using a YUM
repository several development tools need to be installed:
# yum install rpm-build createrepo rpmdevtools
I suggest to create the RPM packages on dedicated hosts or virtual machines
and copy the packages to the web server using SSH and Rsync afterwards. The web
server should never be used as development environment additionally, due to
security reasons. Especially if you want to serve packages for multiple
distribution releases (RHEL5, RHEL6) you will definitely need appropriate test
environments.
The web server host needs to be prepared for serving the data (if not done
yet) – e.g. for a EL system:
# yum install httpd
# chkconfig httpd on
# system-config-firewall-tui
# service httpd start
Due to security reasons, a dedicated service user for creating the packages is
created on the development machines. RPM packages should never be created under
the user context of root! Afterwards the needed directory structures are created
using rpmdev-setuptree (this command doesn't exist under EL5):
# useradd su-rpmdev
# passwd su-rpmdev
# su - su-rpmdev
$ rpmdev-setuptree
$ ln -s /usr/src/redhat ~su-rpmdev/rpmbuild #symb. link under EL5
If you're using EL5 you'll find the needed structures below /usr/src/redhat –
the directory permissions need to be set for the created user su-rpmdev. In the
new created folder rpmbuild (respectively below /usr/src/redhat) consists of the
following sub-directories:
BUILD – folder in which source code archives are extracted and compiled.
RPMS – created RPM packages are stored here in appropriate sub-directories
per supported processor architecture (x86_64, i686, noarch, ).
SOURCES – contains source code archives that are needed for creating RPM
binary packages; e.g. software source codes or archives containing
configuration files (see example below).
SPECS – contains structure files (.spec files) that define the content and
structure of RPM packages; this file is needed to create the RPM file.
SRPMS – source code RPM packages; are created on demand. Enables clients
to also download source codes and compile packages manually using
yumdownloader.
SOURCES and SPECS are the most important directories – most of the time the
RPM farmer is moving around there.
Example 1: configuration files
The most administrators will customize the standard configuration of a
Enterprise Linux systems to fit their needs. Some popular examples of
customizable configuration files are:
NTP
sudo
environment profiles (below /etc/profile.d)
WINS and DNS configuration
As a matter of principle, creating RPM packages is a complex topic which is
only raised roughly in this article. If you want to go deeper with this topic you
might want to have a look at the Fedora wiki and documentation – there are plenty
useful information:
In thie case a NTP configuration shall be packaged in a RPM file and rolled
out on all hosts in the company. First of all, a specfile is created for the
future RPM package:
$ cd ~su-rpmdev/rpmbuild/SPECS
$ rpmdev-newspec mycompany-ntp
Skeleton specfile (minimal) has been created to "mycompany-ntp.spec".
All rpmdev tools doesn't exist under EL5 so that you'll have to create the
specfile on your own!
If you're on EL6, the previous command created a skeleton of a RPM specfile –
this file is edited using an editor now:
Beside meta information about the application, additional scripts for
compiling and creating the package are included. The particular meta variables
are largely self-explanatory – some explanations:
Name – name of the software package (mycompany-ntp-1.0-1)
Version – version of the software package (my-company-ntp-1.0-1)
Release – release of the software package (my-company-ntp-1.0-1)
Summary – short package description
Group – software group the package belongs to. A full listing of possible
groups can be found below: /usr/share/doc/rpm-*/GROUPS
License – assigned license (GPL, AGPL, MIT, )
URL – URL of the project website
Source0 – relative path starting in SOURCES to the source code
BuildRequires – dependencies that are needed to compile the source code
(e.g. header files or library source codes)
Requires – dependencies that are needed to run the application (in this
case: the NTP daemon)
Conflicts – defines third-party software packages and version that are
incompatible with the customized software packages (missing in template – but
very important)
%description – long description of the software package
%changelog – changelog, applied changes, authors, and so on
Some of the additional script or macro segments:
%prep – preparation before compiling the source code; e.g. applying
patches
%build – compiling the source code
%install – creating the RPM package; copying of created binary files and
directory structures to the RPM package
To be honest – it's not hard to lose track in the beginning. I suggest to have
a look at finished RPM specfiles – often you'll learn some "tricks" by having a
look at other's work.
There are two ways to have a look at finished RPM specfiles. Some additional
repositories are serving their specfiles over SVN or GIT. As an
example, Repoforge has a public GIT mirror for this: [click me!]
Another possibility is to include the optional source code channels of
additional repositories – like EPEL – and download the source code packages:
The RPM packages can be adapted using cpio – another more comfortable way is
to use Midnight Commander to examine the package. The RPM package includes a CPIO
archive named CONTENTS.cpio – the specfile is stored there:
To build a preferably "clean" package it is important to create a source code
archive – even if you only want to share configuration files. It is also possible
to create those files directly in the install macro of the specfile – but
especially if you want to share multiple or long configuration files you'll lose
track . In this case an archive containing the NTP configuration is created:
$ mkdir ~/rpmbuild/SOURCES/mycompany-ntp-1.0
$ cd ~/rpmbuild/SOURCES/mycompany-ntp-1.0
$ vi ntp.conf
driftfile /var/lib/ntp/drift
server localserver.loc
ESC ZZ
$ cd ..
$ tar cf mycompany-ntp-1.0.tar.gz mycompany-ntp-1.0/*
Afterwards the RPM specfile is modified – my version looks like this:
$ cd ../SPECS
$ cat mycompany-ntp.spec
Name: mycompany-ntp
Version: 1.0
Release: 1%{?dist}
Summary: MyCompany customized NTP configuration
Group: System Environment/Daemons
License: GPL
Source0: %name-%version.tar.gz
Requires: ntp
%description
This package includes MyCompany customized NTP configuration files.
Feel free to delete this package if received outside the MyCompany network.
%prep
%setup -q
%build
%install
rm -rf $RPM_BUILD_ROOT
install -m 0755 -d %{buildroot}%{_sysconfdir}/mycompany
install -m 0644 ntp.conf %{buildroot}%{_sysconfdir}/mycompany/ntp.conf
%clean
rm -rf $RPM_BUILD_ROOT
%files
%config(noreplace) %{_sysconfdir}/mycompany/ntp.conf
I'm sure you notices that the modified NTP configuration file isn't stored at
its accurate place (/etc/ntp.conf) – it is rather saved in an alternative
directory (/etc/mycompany/ntp.conf). The reason for this is that the former
configuration file (which is provided by the ntp package) can be replaced because
of the noreplace flag:
#code quote of the ntp RPM specfile
%files
%config(noreplace) %{_sysconfdir}/ntp.conf
This package stores its configuration file in an alternative directory which
can't be overwritten by other RPM packages.
You'll have to help yourself by using a "trigger trick" that saves the former
configuration and creates a symbolic link to the new configuration after the
installation. After the uninstallation of the package this step is rolled back.
For implement this you'll have to add the following macros to your RPM specfile:
%triggerin -- mycompany-ntp
if [ ! -h /etc/ntp.conf -o ! "`readlink /etc/ntp.conf`" = "/etc/mycompany/ntp.conf" ] ; then
if [ -e /etc/ntp.conf ] ; then
mv -f /etc/ntp.conf /etc/ntp.conf.orig
fi
ln -s /etc/mycompany/ntp.conf /etc/ntp.conf
fi
%triggerun -- mycompany-ntp
if [ $1 -eq 0 -a $2 -gt 0 -a -e /etc/ntp.conf.orig ] ; then
mv -f /etc/ntp.conf.orig /etc/ntp.conf
fi
%triggerpostun -- mycompany-ntp
if [ $2 -eq 0 ]; then
rm -f /etc/ntp.conf.rpmsave /etc/ntp.conf.orig
fi
if [ -e /etc/ntp.conf.rpmnew ] ; then
mv /etc/ntp.conf.rpnnew /etc/ntp.conf.orig
fi
%postun
if [ -e /etc/ntp.conf.orig -a -h /etc/ntp.conf -a ! -e "`readlink /etc/ntp.conf`" ] ; then
mv -f /etc/ntp.conf.orig /etc/ntp.conf
fi
Simplified summarization of the triggers functions:
Installation: if the former configuration file exists ".orig" is appended
to the file name and a symbolic link to the new configuration file is created
Deinstallation of the customized NTP configuration: if the former
configuration file still exists the file name is reset
After uninstalling the customized NTP configuration: remaining additional
or newly added NTP configuration files are deleted
After uninstalling: resetting the file name of the former NTP
configuration file
I abdicated the URL and BuildRequires tags in my specfile because there are no
websites or special compiling dependencies for a customized NTP configuration.
Example 2: Meta packages
There are plenty of applications and configuration that are part of a senseful
customized system installation – to name some practical examples: sudo
configuration, GNU Screen (of course!), and customized application profiles.
To avoid doing the application installation manually everytime, meta packages
can be built to simplify the process. These packages don't have their own files –
they only have dependencies to other packages.
Because of this, RPM meta packages aren't assigned to special processor
architectures (x86_64, i686, s390, ) – an additional specification "BuildArch
noarch" is added in the specfile.
Another practical example: a meta package for installing NTP including the
customized configuration and telnet for checking the daemon's function:
$ cd SOURCES
$ mkdir mycompany-ntp-full-1.0
$ tar cvfz mycompany-ntp-full-1.0.tar.gz mycompany-ntp-full-1.0
$ cd ../SPECS
$ cat mycompany-ntp-full.spec
Name: mycompany-ntp-full
Version: 1.0
Release: 1%{?dist}
Summary: MyCompany customized NTP configuration and netstat utility
Group: System Environment/Daemons
License: GPL
Source0: %name-%version.tar.gz
BuildArch: noarch
Requires: ntp mycompany-ntp net-tools
%description
This package includes MyCompany customized NTP configuration files.
Feel free to delete this package if received outside the MyCompany network.
%prep
%setup -q
%build
%install
%clean
rm -rf $RPM_BUILD_ROOT
%files
Using rpm you can list the package's dependencies:
Package dependencies can very depending on the distribution release. In this
example between RHEL5 and 6 – the packages providing the telnet command are
different here:
The first dependeny line is significant for all releases, the following lines
are considered under RHEL5 or RHEL6.
You can also define particular versions in combination with the Requires and
Conflicts tags – for example, if you want to reference a myapp package which is
at least version 1.1. One of the following lines can be used:
Requires: myapp >= 1.1
Conflicts: myapp < 1.1
If you want to reference a special version of a package there are also two
possibilities – choose one:
It's a kind of philosophical question which of the two possibilites is used –
like the question if the glass is half-full or half-empty. Either a package is
excluded or referenced explicitely.
Further information regarding RPM dependencies can be found on the official
RPM website: [click me!]
Let's go back to the former motivation of this meta package: as an alternative
you can also define package groups in your own YUM repository. If you have
already worked with the YUM commands grouplist, groupinstall and groupremove, you
might know this logical grouping of software packages. You can find an
interesting article about this in the YUM wiki: [click me!]
Package and repository creation
Okay – we have a RPM specfile now, what's next? RPM packages are creating
using the rpmbuild utility. This tool has a plenty of swithces and arguments – as
an example you can also create source code packages or packages for additional
processor architectures.
Important parameters:
Parameter
Explanation
-ba
Creates a binary and source code package
-bb
Creates a binary package
-bp
Extracting and patching (if necessary) of the source code
-bs
Creates a source code package
–target=noarch
Creates a platform independent package
–target=i686
a 32-bit package
–target=x86_64
a 64-bit package
Some examples:
# Creates a binary and source code package of myapp
$ rpmbuild -ba myapp.spec
# Creates a 32-bit binary package of myapp
$ rpmbuild -bb --target=i686 myapp.spec
Afterwards you'll find a RPM package below RPMS depending on your processor
architecture (noarch, i686 or x86_64). If you're a proud owner of a IBM System Z
machine you might want to have a look below s390 or s390z.
$ ls RPMS/*/*.rpm
RPMS/i386/mycompany-ntp-1.0-1.el6.i386.rpm
This RPM package could now be installed using YUM:
After creating the RPM packages on the particular test machines (e.g. RHEL6
and RHEL5) the packages need to be copied to the web server. I suggest using SSH
and Rsync for a synchronization between the test machines, the main test machine
and the web server.
If you don't want to do this manually every time you can automate this using a
small script:
1.Synchronization between the EL5 machine and the main test machine:
The first rsync command copied all RPM packages of all processor architectures
below /opt/myrepo – if a RPM package is deleted in the source, it is also
deleted below /opt/myrepo. createrepo created a SQLite database for the YUM
repository (myrepo) below /opt/myrepo. The second rsync command copies the local
YUM repository to the main test machine (MAIN).
2.Synchronization between the main test machine (EL6) and the web server:
The first rsync command copies all (EL6) RPM packages below
/opt/myrepo/6Server. After that createrepo creates a SQLite-Datenbank for the EL6
repository. The second rsync command copies the whole repository (including the
other EL5 repository) to the web server (WEB).
Usage and test
To use the new YUM repository on other hosts, an appropriate YUM configuration
needs to be created. In this file the repository URL and other parameters like
package signing are defined. The syntax looks a bit like good-old Windows .ini
files:
# vi /etc/yum.repos.d/myrepo.repo
[myrepo]
name=mycompany packages for EL
baseurl=http://server01/$releasever
enabled=1
gppgcheck=0
ESC ZZ
You might see the variable $releasever – it was mentioned in the table above.
This variable is replaced by another value depending on your distribution release
– in this case by 5Server or 6Server. These directories had been filled with the
appropriate RPM packages from the test machines.
After that, all available packages of the repository can be listed:
# yum --disablerepo='*' --enablerepo='myrepo' makecache
# yum --disablerepo='*' --enablerepo='myrepo' list available
...
mycompany-ntp 1.0-1 myrepo
If you have multiple repository web servers (e.g. because of big setups for
processing the amount of requests or compensate failures) you can assign a mirror
list:
# vi /etc/yum.repos.d/myrepo.repo
[myrepo]
...
#baseurl=...
mirrorlist=myrepo.mirror
ESC ZZ
# vi /etc/yum.repos.d/myrepo.mirror
http://server01/$releasever
http://server02/$releasever
http://server03/$releasever
For every download YUM uses one of these servers – beginning with the first
one. If this server fails or doesn't have the file YUM will select the next
server.
By the way – these configuration files could be shared using a RPM package,
too. If this is done, you only need to install a RPM package to access the YUM
repository zugreifen. This is how access to Fedora's Extra Packages For
Enterprise Linux (EPEL) is provided: [click me!]
This package could look like this:
# vi SPECS/myrepo-release.spec
Name: myrepo-release
Version: 1.0
Release: 1%{?dist}
Summary: mycompany Packages for Enterprise Linux repository configuration
Group: System Environment/Base
BuildArch: noarch
License: GPL
URL: http://www.mycompany.com
Source0: myrepo-release-%{version}.tar.gz
BuildRoot: %{_tmppath}/%{name}-%{version}-%{release}-root-%(%{__id_u} -n)
%description
This package contains the mycompany customized Packages for Enterprise Linux repository.
%prep
%setup -q
%build
%install
install -m 0755 -d %{buildroot}%{_sysconfdir}/yum.repos.d/
install -m 0755 myrepo.repo %{buildroot}%{_sysconfdir}/yum.repos.d/myrepo.repo
install -m 0755 myrepo.mirror %{buildroot}%{_sysconfdir}/yum.repos.d/myrepo.mirror
%clean
rm -rf $RPM_BUILD_ROOT
%files
%config(noreplace) %{_sysconfdir}/yum.repos.d/myrepo.repo
%config(noreplace) %{_sysconfdir}/yum.repos.d/myrepo.mirror
%changelog
* Sat Jun 29 2013 FirstName LastName - 1.0-1
- initial release
ESC ZZ
# tar tvfz SOURCES/myrepo-release-1.0.tar.gz
-rw-r--r-- su-rpmdev/su-rpmdev 94 2013-06-28 18:12 myrepo-release-1.0/myrepo.mirror
-rw-r--r-- su-rpmdev/su-rpmdev 189 2013-06-28 18:09 myrepo-release-1.0/myrepo.repo
# tar xvfz SOURCES/myrepo-release-1.0.tar.gz -C SOURCES/
# cat SOURCES/myrepo-release-1.0/myrepo.mirror
http://server01/$releasever
http://server02/$releasever
http://server03/$releasever
# cat SOURCES/myrepo-release-1.0/myrepo.repo
[myrepo]
name=mycompany packages for EL
#baseurl=http://server01/$releasever
mirrorlist=/etc/yum.repos.d/myrepo.mirror
enabled=1
gppgcheck=0
After the RPM specfile had been created the package can be created and
distributed easily. Finally, you only have to install the RPM package to use the
YUM repository:
Of course there is a lot that can be optimized. To name some of these things:
SSH public-key authentification – while synchronizing the RPM packages
between the test machines and the web server the password of the service user
has to be entered twice. This can be avoided by implementing SSH public-key
authentification.
Theme for viewing the repository in web browsers – when the repository is
accessed using a normal web browser the directory contents are displayed.
Depending on your web server this might look ugly – a header including your
company's logo and usage information could be used in addition.
Version control using SVN / GIT – especially if you're working in a team
on your repository it might be very handy to use a version control system like
SVN or GIT.
Integration in Red Hat Network Satellite, Spacewalk or SuSE Manager – if
you're maintaining a big amount of hosts you (hopefully) have the management
suite of your preferred distributor. You can include your repository to simply
share your packages.
Package signing – To avoid manipulated packages, packages can be signed
using a key which has to be copied to every client. Using this mechanism,
clients can verify that the downloaded packages are authentic.
To manage a plenty of systems you don't need a "egg-laying, milk-bearing
woolly sow" – RPM is a mighty tool which can also be used for software and
configuration management. If you're engaged with Red Hat Enterprise Linux, you
will often into a situation where you have to automate something quickly. And
that's where RPM can also help you to reach your goal quickly.
Creating RPMs
These notes give brief instructions on how to make your own RPMs - the package
management system used by RedHat Linux and many other Linux distributions. The system is
not really hard to use, but there are some tricks that will help you get started. These
instructions aren't really intended as a complete tutorial - rather a set of hints to get
you going. For a more complete tutorial, I recommend the
Mandrake RPM Howto
. There
is also the
RPM Howto
, which has some useful
information but is more roundabout and less specific.
How it works
Basically, RPM is a system for placing all the files for a software package in one
object (the rpm file) with some information about where the files go, what type they are
and what the package does. Creating a RPM for your own software requires three basic
steps:
Perhaps modifying your software install process to be rpm "aware".
Writing a spec file.
This last step is the heart of the matter. The "spec" file tells rpm-build everything
that it needs to know to make the software and install it.
The rpm build process basically works as any software build works. First it compiles the
software, then it installs it. The difference is that rpmbuild generally installs files in
a subdirectories of a temporary directory - that way it doesn't interfere with software
already installed and it is easy to identify the files that belong to the software package.
After the software is "installed", rpm-build compresses all the files in the subdirectory
into one file, and the information in the spec file is included. This way, when you go to
really install the resulting binary rpm, the files will end up in the correct place and rpm
knows which files are part of the package.
Creating Your Environment
A few simple additions to your home directory can make building and testing RPMs a
lot easier as a normal user and protects you from yourself. It is tempting to just build
RPMs as root since this is the account you will use to install and usually building as root
is already configured on Redhat systems. Nevertheless, building as root is
very
dangerous. If the RPM spec
file has intentional or unintentional errors, you risk deleting important files, destroying
your system, compromising protected information, etc.
That being said, building as the normal user you login to every day isn't much better.
Although your system is better protected, your precious home directory isn't - email,
secret keys, etc. A malicious software package downloaded off the web could try to gather
important information from your account and forward it on to a waiting hacker via email,
for example.
The best solution is to create a separate account solely for building and testing RPMs. I
created an "rpmbuild" account and use it for just this purpose. This might seem a bit
tedious, but it is a lot safer. Below, when I refer to ~/ I am assuming you are logged
into the "rpmbuild" account.
Now to configure your system. First you will want to create the following directories:
These are the directories where the build process will take place. You might have to add
more directories if your system architecture is different from i386 or i686.
Then you need to create a file ~/.rpmmacros with at least the following lines:
Replace "rpmbuild" with the name of the account you will be using to build RPMs if
different. This file lets rpm-build know that you want to build locally by telling it to
look for and create files in subdirectories of /home/rpmbuild/rpm. There are many other
things that could be added to this file, but this is a start.
Modifying the install routines
Next you might need to modify the process by which the software normally builds and
installs (ie. from a tarball or from CVS, without RPM). Basically, you want to modify your
Makefile or install script so that, when rpm-build is building your software, it knows to
place the files in a subdirectory of the build root (ie. that temporary directory where the
files will be placed). If the Makefile or automake file is well written, you might not
need to modify anything at all as rpmbuild relies on many standard names. If the Makefile
is poorly written, but the package installs relatively few files, it is sometimes easiest
to simply install the files manually from inside the spec file into the appropriate
directories for rpmbuild.
If not, you will have to make changes. rpmbuild makes this easy. When installing, it
generally makes available a wide variety of variables that indicate where things should go.
Examples:
$RPM_BUILD_ROOT - where files will go. Generally different for every RPM spec
file. Typically something like ~/rpm/tmp/nameofpackage-root, assuming you created
~/.rpmmacros as described above.
$RPM_DOC_DIR - standard place for documentation files from RPMs. Perhaps
/usr/share/doc.
%{_bindir} (or $bindir inside the Makefile) - this variable will be defined as
the standard place to put binaries, relative to build root. Something like
${RPM_BUILD_ROOT}/usr/bin.
%{_libdir} - similar to bindir.
There are many more. I don't intend to discuss them all. The point is that
Makefile's should expect and use these variables when deciding where to install things.
For example, at the beginning of one of my Makefile's, I put the following lines:
# These are typically taken from rpm, but, if not, defined here.
bindir=/usr/local/bin
libdir=/usr/local/lib
sysconfdir=/etc
mandir=/usr/local/man
The first few lines define default install locations. If rpmbuild is building the
software, these will be ignored and the values rpmbuild provides will be used. The ifdef
part looks for a variable which indicates if rpmbuild is present and uses it if so.
Writing the spec file
Writing spec files is not something that I want to discuss at length. That is
explained in the
Mandrake
tutorial
quite well. I do have some suggestions to make the process as painless as
possible:
Use emacs. When you initially create a spec file with emacs, it gives you a
template that has most of the sections you will ultimately want. Perhaps other text
editors will do this, but I don't know of any.
Download source RPMs from the net, install them (using rpm -ivh) as the
build user
and look at the results in ~/rpm/specs
and ~/rpm/SOURCES. You can learn more looking at other people's specs than reading a
tutorial.
In a spec file, anything that begins with a % is a macro. rpmbuild will expand
these. These macros are typically defined in /usr/lib/rpm/macros and nearby files.
Some macros are particularly important as they break the installation process
into sections. For example, %build tells rpmbuild to begin generating a simple bash
script that will be run to build the software package.
If the build process ends in an error, you can take a look at the bash scripts
in ~/rpm/tmp/rpm-tmp.*. Looking at these scripts will tell you exactly what variables
are being defined and what is being done. Often times you can fix an error in the spec
file just by looking at the scripts.
These scripts will be deleted upon termination of a section, preventing you
from looking at them. You can cheat and get a look at them by forcing an error in that
section. Just add "exit 1" to your spec file in the appropriate section. Another
useful thing is to "set; exit 1" in a spec file. This will exit and spit out a list of
defined environment variables. Finally, you can place "bash -i" in a spec file to stop
rpmbuild and drop to a shell where you can take a look around.
Use %config(noreplace) - this will save configuration files from being replaced
or over-written on update.
Building the RPMs
Finally you are about ready to make an RPM. The following commands should do the
trick:
Notice that your source files should be in a directory with the appropriate name and
version number before tar'ing.
Signing Your RPMs
Recently, I have begun to submit RPMs to the Fedora project. They require all
submissions to be digitally signed for security. As I had never used gpg or any of the
other tools for signing packages, it was quite difficult to get started. Here are some
basic instructions on how to do it. For more information, consult the
GPG Mini-Howto
.
First you will want to do all signing in your normal user account or in a special signing
account, but NOT the build account. This is for security reasons.
As your normal user, you generate a secret key with:
$ gpg --gen-key
This will ask you some questions regarding the name of the key you are generating,
often called the USERID, UID or KEYID. Then you will enter a password. This will generate
a key and it will be stored in some keyring somewhere.
$ gpg --list-sigs
will produce a list of your signatures like:
/home/USERNAME/.gnupg/key_ring_file.gpg
----------------------------
pub 1024D/xxxxxxxx 2003-10-15 David M. Kaplan (...) <email_address>
sig xxxxxxxx 2003-10-15 David M. Kaplan (...) <email_address>
The "David M. Kaplan (...) <email_address>" part is the USERID.
Now you need to generate a public key to give to other people and publish it so Fedora
users can get the key.
The public key should be spread around as much as possible. It is used by others to
verify that you signed your packages. It can also be used to send encrypted messages to
you (which you open with the private companion to the public key).
Now create a ~/.rpmmacros file in the account you will use for signing. Place the
following lines in the file:
Fedora Hints
Submitting packages to Fedora isn't hard, but requires some time. Here are a few
suggestions/links to point you in the right direction:
Read and follow the
guidelines for Fedora
packages
. This is the ultimate source. Unfortunately, I find it a bit unorganized.
That is why I have my hints here.
Use macros and RPM environment variables as much as possible in your SPEC
files. This makes them easier to maintain and more portable. There is a
useful list of macros
.
Be specific about the packages required to build and run the package you wish
to submit.
If it is an application you are submitting, add a desktop entry with
desktop-file-install.
GPG sign your packages.
Submit a bug report to
bugzilla.fedora.us
in the Fedora Meta section. It sometimes takes a while to respond, but once they did,
they were very helpful.
3. How to check dependencies of RPM Package before Installing
Let's say you would like to do a dependency check before installing
or upgrading a package. For example, use the following command to
check the dependencies of
BitTorrent-5.2.2-1-Python2.4.noarch.rpm
package. It will
display the list of dependencies of package.
-R
: List capabilities on which this package
depends..
4. How to Install a RPM Package Without Dependencies
If you know that all needed packages are already installed and RPM
is just being stupid, you can ignore those dependencies by using the
option
–nodeps
(
no dependencies check
)
before installing the package.
The above command forcefully install rpm package by ignoring
dependencies errors, but if those dependency files are missing, then
the program will not work at all, until you install them.
... ... ...
7. How to List Recently Installed RPM Packages
Use the following rpm command with
-qa
(
query
all
) option, will list all the recently installed rpm
packages.
[root@tecmint]# rpm -qa --last

BitTorrent-5.2.2-1.noarch                     Tue 04 Dec 2012 05:14:06 PM BDT
pidgin-2.7.9-5.el6.2.i686                     Tue 04 Dec 2012 05:13:51 PM BDT
cyrus-sasl-devel-2.1.23-13.el6_3.1.i686       Tue 04 Dec 2012 04:43:06 PM BDT
cyrus-sasl-2.1.23-13.el6_3.1.i686             Tue 04 Dec 2012 04:43:05 PM BDT
cyrus-sasl-md5-2.1.23-13.el6_3.1.i686         Tue 04 Dec 2012 04:43:04 PM BDT
cyrus-sasl-plain-2.1.23-13.el6_3.1.i686       Tue 04 Dec 2012 04:43:03 PM BDT
... ... ...
9. How to Upgrade a RPM Package
If we want to upgrade any RPM package "
–U
" (
upgrade
)
option will be used. One of the major advantages of using this option
is that it will not only upgrade the latest version of any package,
but it will also maintain the backup of the older package so that in
case if the newer upgraded package does not run the previously
installed package can be used again.
To un-install an RPM package, for example we use the package name
nx
, not the original package name
nx-3.5.0-2.el6.centos.i686.rpm
. The
-e (erase)
option is used to remove package.
[root@tecmint]# rpm -evv nx
11. How to Remove an RPM Package Without Dependencies
The
–nodeps
(
Do not check dependencies
)
option forcefully remove the rpm package from the system. But keep in
mind removing particular package may break other working applications.
[root@tecmint]# rpm -ev --nodeps vsftpd
12. How to Query a file that belongs which RPM Package
Let's say, you have list of files and you would like to find out
which package belongs to these files. For example, the following
command with
-qf
(
query file
) option
will show you a file
/usr/bin/htpasswd
is own by
package
httpd-tools-2.2.15-15.el6.centos.1.i686
.
14. Get the Information of RPM Package Before Installing
You have download a package from the internet and want to know the
information of a package before installing. For example, the following
option
-qip
(
query info package
)
will print the information of a package
sqlbuddy
.
[root@tecmint]# rpm -qip sqlbuddy-1.3.3-1.noarch.rpm
Name        : sqlbuddy                     Relocations: (not relocatable)
Version     : 1.3.3                        Vendor: (none)
Release     : 1                            Build Date: Wed 02 Nov 2011 11:01:21 PM BDT
Install Date: (not installed)              Build Host: rpm.bar.baz
Group       : Applications/Internet        Source RPM: sqlbuddy-1.3.3-1.src.rpm
Size        : 1155804                      License: MIT
Signature   : (none)
Packager    : Erik M Jacobs
URL         : http://www.sqlbuddy.com/
Summary     : SQL Buddy â Web based MySQL administration
Description :
SQLBuddy is a PHP script that allows for web-based MySQL administration.
15. How to Query documentation of Installed RPM Package
To get the list of available documentation of an installed package,
use the following command with option
-qdf
(
query
document file
) will display the manual pages related to
vmstat
package.
Sometimes rpm database gets corrupted and stops all the
functionality of rpm and other applications on the system. So, at the
time we need to rebuild the rpm database and restore it with the help
of following command.
Installed size: 8.0 M Is this ok [y/N]: y Downloading Packages: Running rpm_check_debug Running Transaction Test Transaction Test Succeeded Running Transaction Error in PREUN scriptlet in rpm package xen-runtime xen-runtime-4.1.2-8.el6.x86_64 was supposed to be removed but is not! Verifying : xen-runtime-4.1.2-8.el6.x86_64 1/1
# rpm -e xen-runtime
/var/tmp/rpm-tmp.LcPd6z: line 5: /bin/systemctl: No such file or directoryerror: %preun(xen-runtime-4.1.2-8.el6.x86_64)
	scriptlet failed, exit status 127
To remove the little bastard the
--nopreun needs to be passed
down to rpm -e. By doing
so the execution of the %preun
scriptlet is turned off thus allowing
rpm to uninstall the offending
package, like so:
Let's consider software packaging. This is something that all platforms have to deal with. Everyone
has a love-hate relationship with software packaging since it can relate to something as simple
as installing binaries for Mac OS X to something a bit more complex, unpacking and building source
code from scratch on Linux, or anything in between. Any number of issues can crop up depending on
what method or operating system is being used.
Since several Linux vendors have selected to use RPM as their packaging solution, it only stands
to reason that people would find issues with how RPM works.
On the Linux Annoyances mailing list, John Andersen suggested the following method for dealing
with what is commonly known as RPM Hell:
You try to install XYZ package but it has a prerequisite for abc.lib.so.7.
You take a swig of beer.
You Google around a bit and find that abc.lib.so.7 is supplied by package
abc-2.19-45.rpm.
You hunt around for that RPM on the Web (since a quick ls abc* | less on the
distribution CD didn't turn up anything) and you find it on a Bulgarian web site and download
it.
You try to install it, and it requires lib-hij.so.2.
You take a swig of beer.
You Google around a bit and find that lib-hij.so.2 is supplied by package
efg-5.10-54.rpm.
You hunt around for that RPM on the Web (those dang CDs again) and you find it on an Australian
web site and download it.
You try to install it, and it requires lib-klm.so.1.
You take a swig of beer.
"Hmm", you think to yourself, "maybe I'll just download and compile the source code".
No good, the configure script will just die on you, with unresolved externals and more prerequisites.
In John's immortal words, "The whole experience sours one on the whole concept and were it not
for the beer, would lead to many suicides and divorces."
And no, before you ask, this isn't just some clever college drinking game. I'm not advocating
drinking on the job; after all, one bookshelf starts to look like another to any drunken bookstore
clerk. But drinking is tempting when you have to configure a half dozen servers in a nightlong install-fest.
Surely, there has to be another way to install software without using a different operating system
or Linux distribution not built on RPM. Sometimes using another platform just isn't an option.
In the philosophy of the Annoyances books, if we take it upon ourselves to understand the annoyances
of a particular problem and instead of just giving up, we position ourselves better for dealing
with the problem at hand.
Another poster, Alex Butcher, suggests the following process for avoiding RPM Hell:
Stick to RPMs built for the distribution you're running. If in need of a package from an
outside source, try a third-party RPM repository dedicated to the Linux distribution you have
on hand. For example, the following websites focus on packages for Red Hat's distributions of
Linux:
Moreover, Alex points out, if you do need a package for which no RPMs are available, try the
following:
Take the source RPM for a similar distribution or from a later version of the same distribution.
Adjust any explicit dependencies in the .spec file.
Rebuild the binary for your distribution.
Of course, Alex admits that this process is easier said than done, but points out that it becomes
quite straightforward with a bit of practice and a little knowledge from the RPM documentation.
Finally Alex suggests that before using a third-party RPM or rolling your own, double check that
the file or package needed isn't included on hand after all.
Red Hat, for example, includes a fully populated RPM database that can be queried using the
--redhatprovides and --redhatrequires command line options. Simply install
the rpmdb-redhat package beforehand.
In three easy steps you can find out which Red Hat package provides libxml and which
packages require libxml . Another option is to create a local listing of RPMs on hand
using rpm's query option.
Then if you come across a package that has a specific requirement, you can quickly grep a personal
list of RPMs to find the proper package. For our little Red Hat Linux 9 system you can see that
if libxml version 1.8.17-8 is needed you can find the proper file on the Red Hat Install
CD 1.
$ cat install_cd_1.txt | grep libxml | less

Name        : libxml                      Relocations : (not relocateable)

Group       : System Environment/Libraries Source RPM : libxml-1.8.17-8.src.rpm
The libxml package contains an XML library, which allows you to
/usr/lib/libxml.so.1
/usr/lib/libxml.so.1.8.17
/usr/share/doc/libxml-1.8.17
/usr/share/doc/libxml-1.8.17/AUTHORS
/usr/share/doc/libxml-1.8.17/COPYING
/usr/share/doc/libxml-1.8.17/COPYING.LIB
/usr/share/doc/libxml-1.8.17/ChangeLog
/usr/share/doc/libxml-1.8.17/NEWS
/usr/share/doc/libxml-1.8.17/README
/usr/share/doc/libxml-1.8.17/TODO
Of course the real advantage of this last option is the ability to create a listing of RPMs from
any source of RPMs for future searches.
At the core is the simple idea of presenting solutions that enable you both to customize and
troubleshoot, to borrow from Karp's introduction again. Just because Linux may be the least annoying
solution for a problem, it does not follow that a Linux system has no idiosyncrasies to deal with.
After all, there is no "one true operating system".
All of this highlights the perspective of the free and open source philosophies: users are as
empowered as anyone else. We are not here to complain or to criticize but to learn, understand,
and fix.
The RPM 5 project team now entered the official
release engineering phase for RPM 5.0. Details of the proposed release engineering roadmap for RPM
5.0 can be found under http://rpm5.org/team.php.
The first step towards RPM 5.0.0 (scheduled for release end of this year) is the release of RPM
5.0a1 today. Find it under the rpm5.org files area
http://rpm5.org/files/rpm/rpm-5.0/.
But please keep in mind that RPM 5.0aX are *ALPHA* releases, which means that the RPM API
is still changing, the code might be still partly broken, the primary audience are just early adopters
in the RPM community and the purpose of the release is just to get initial feedback. It is *not*
intended for end users or even be used in any production environment. But if you are a software
distribution vendor who uses RPM 4, *NOW* is the time to start your evaluations of RPM
5 and give feedback!
The project is re-born, the new maintainer is Eric Gerbier, which maintain also the rpmrebuild,
rpmrestore, rpmorphan projects.
rpmerizor is a Perl script that uses rpm as an archiving utility. It allows you to create
an RPM package simply by specifying files on the command line and answering a few questions.
Changes: The utility was recoded to work with recent versions of RPM, fixing a
buildroot problem. Options are added to print help, to allow batch mode, and to build src.rpm packages.
In our examples you saw that installing an rpm with the rpm command requires the
full name of the package file (or URL), such as gcl-2.6.8-0.6.20090701cvs.fc12.x86_64.rpm. On the
other hand, installing with yum, or removing an rpm with either command requires only the
package name, such as gcl. As with APT, RPM maintains an internal database of your installed packages,
allowing you to manipulate installed packages using the package name. In this section, we look at
some of the information that is available to you from this database using the -q
(for query) option of the rpm command, or the associated yum
queries.
The basic query simply asks if a package is installed, and, if so, what version. Add the
-i option and you get information about the package. Note that you need to have root
authority to install, upgrade, or remove packages, but non-root users can perform queries against
the rpm database.
[ian@echidna ~]$ yum list gcl
Loaded plugins: presto, refresh-packagekit
Installed Packages
gcl.x86_64                  2.6.8-0.7.20100201cvs.fc12                  @updates
[ian@echidna ~]$ rpm -q gcl
gcl-2.6.8-0.7.20100201cvs.fc12.x86_64

[ian@echidna ~]$ yum info gcl
Loaded plugins: presto, refresh-packagekit
Installed Packages
Name       : gcl
Arch       : x86_64
Version    : 2.6.8
Release    : 0.7.20100201cvs.fc12
Size       : 40 M
Repo       : installed
From repo  : updates
Summary    : GNU Common Lisp
URL        : http://www.gnu.org/software/gcl/
License    : GPL+ and LGPLv2+
Description: GCL is a Common Lisp currently compliant with the ANSI standard.
           : Lisp compilation produces native code through the intermediary of
           : the system's C compiler, from which GCL derives efficient
           : performance and facile portability. Currently uses TCL/Tk as GUI.

[ian@echidna ~]$ rpm -qi gcl
Name        : gcl                          Relocations: (not relocatable)
Version     : 2.6.8                             Vendor: Fedora Project
Release     : 0.7.20100201cvs.fc12          Build Date: Tue 23 Mar 2010 03:20:36 PM EDT
Install Date: Wed 05 May 2010 01:01:34 PM EDT      Build Host: x86-02.phx2.fedoraproject.
org
Group       : Development/Languages         Source RPM: gcl-2.6.8-0.7.20100201cvs.fc12.sr
c.rpm
Size        : 41667750                         License: GPL+ and LGPLv2+
Signature   : RSA/8, Tue 23 Mar 2010 04:14:06 PM EDT, Key ID 9d1cc34857bbccba
Packager    : Fedora Project
URL         : http://www.gnu.org/software/gcl/
Summary     : GNU Common Lisp
Description :
GCL is a Common Lisp currently compliant with the ANSI standard.  Lisp
compilation produces native code through the intermediary of the
system's C compiler, from which GCL derives efficient performance and
facile portability. Currently uses TCL/Tk as GUI.
The more extensive listings show you some of the tags that can be associated with an RPM
package. You will notice that rpm and yum show slightly different
information in slightly different formats. For this article, we will stick to the basic output provided
by standard command options. See the man page if you would like to use the rpm --queryformat
option to build custom query output. Try running rpm --querytags if you want to know
all the tags supported by your version of rpm.
As shown in Listing 10, you can use yum to list installed packages. You can also
use it to list packages that have updates available, packages that are available for installation,
and packages with other characteristics, such as obsolete, or recently added to a repository. You
can even use yum to search for packages. In Listing 11, you see that the texmacs
package is not installed, but is available from the fedora repository. If you search for "texmacs"
you see four packages that mention it. You can easily see why the TeXmacs* packages were found.
Use yum info pydot to find out why the pydot package is also mentioned.
[ian@echidna ~]$ yum list texmacs
Loaded plugins: presto, refresh-packagekit
Available Packages
TeXmacs.x86_64                         1.0.7.2-2.fc12                          fedora
[ian@echidna ~]$ yum search texmacs
Loaded plugins: presto, refresh-packagekit
================================= Matched: texmacs ==================================
TeXmacs-devel.i686 : Development files for TeXmacs
TeXmacs-devel.x86_64 : Development files for TeXmacs
TeXmacs.x86_64 : Structured wysiwyg scientific text editor
pydot.noarch : Python interface to Graphviz's Dot language
For the remaining query examples, we will mostly use rpm, as it has a more extensive
set of options. Many of the examples can also be done with yum, and yum
has some capabilities that are not in the basic rpm options. See the man pages to
learn more.
You will often want to know what is in a package or what package a particular file came from.
To list the files in the gcl package, use the -ql option as shown in Listing 12.
There are many files in this package, so we've only shown part of the output.
You can restrict the files listed to just configuration files by adding the -c
option to your query. Similarly, the -d option limits the display to just documentation
files.
The above package query commands query the RPM database for installed packages. If you've just
downloaded a package and want the same kind of information, you can get this using the -p
option (for package file) on your query along with specifying the package file name
(as used for installing the package). Listing 13 shows this for the two vim packages that we downloaded
earlier. We run it as root only because the files were in root's home directory. You can add other
query options, such as -l to list files or -i to list information.
The -a option applies your query to all installed packages. This can generate
a lot of output, so you will usually use it in conjunction with one or more filters, such as
sort to sort the listing, more or less to page through
it, wc to obtain package or file counts, or grep to search for packages
if you aren't sure of the name. Listing 14 shows the following queries:
A sorted list of all packages on the system
A count of all packages on the system
A count of all files in all packages on the system
A count of all documentation files installed with RPMs
A search for all packages with "gcl" (case-insensitive) as part of their name
Using rpm -qa can ease the administration of multiple systems. If you redirect
the sorted output to a file on one machine, and then do the same on the other machine, you can use
the diff program to find differences.
Given that you can list all packages and all files in a package, you now have all the information
you need to find which package owns a file. However, the rpm command provides a
-f (or --file) option to help you locate the package that owns a file. Suppose
you want to know which of the vim packages we saw earlier actually provides the vim
command. You will need to full path to the file. Listing 15 shows how to use the which
command to get the full path to the vim command, and a handy tip for using this output
as input to the rpm -qf command. Note that the tick marks surrounding `which
guile-config` are back-ticks. Another way of using this in the Bash shell is to use $(which
vim).
You saw earlier that our attempt to erase the gcl-selinux package failed because of dependencies.
In addition to files, an RPM package may contain arbitrary capabilities that other packages
may depend on.
As you have seen, this usually works out fine. If you need to install several packages at once,
some of which may depend on others, simply use yum, or give the whole list to your
rpm -Uvh command, and it will analyze the dependencies and perform the installs in the
right order.
Besides trying to install or erase a package and getting an error message, there are ways to
find out what files or capabilities a package requires or depends on.
The rpm command provides an option to interrogate installed packages or package
files to find out what capabilities they depend on or require.This is the --requires
option, which may be abbreviated to -R. Listing 16 shows the capabilities required by gcl.
Add the -p option and use the full RPM file name if you want to query the package
file instead of the RPM database.
It can be somewhat tricky to match capabilities to the packages that provide them. The yum
command with the deplist option can help here. If you just give a package name that
is not qualified by version, you may get a listing for other known versions. Listing 17 shows how
to get the dependency list for just the version of gcl that is installed.
This list also shows possible providers for each capability. You can see that most dependencies
could be provided by more than one alternative level of a package. For example, /bin/sh could come
from either of two levels of bash. With a little creative filtering, you can reduce this output
to a list of package names as shown in Listing 18.
If you just need to know what packages need to be installed, you can always run yum install
and see the list before you are prompted to accept the installation proposal.
In addition to finding out what capabilities a package requires, you may need to find what package
provides some capability. You saw above how to find which package owns a file. Listing 19 shows
how to use rpm or yum to find what package provides the gcl-selinux(x86-64)
capability. In addition to information about installed packages providing the capability, YUM also
shows the packages or versions available in repositories. These are the original 2.6.8-0.6 version
from the fedora repository and the updated 2.6.8-0.7 version available from the updates repository.
To ensure their integrity, RPM packages include a digest, such as MD5 or SHA1, and are usually
digitally signed. Packages that are digitally signed need a public key for verification. To check
the integrity of an RPM package file, use the --checksig (abbreviated to -K)
option of rpm. You will usually find it useful to add the -v option for
more verbose output. Listing 20 shows an example for the vim-enhanced RPM.
[root@echidna ~]# rpm -vK vim-enhanced-7.2.411-1.fc12.x86_64.rpm
vim-enhanced-7.2.411-1.fc12.x86_64.rpm:
    Header V3 RSA/SHA256 signature: OK, key ID 57bbccba
    Header SHA1 digest: OK (f9a199545a515f7ff0716729768b41eb68fe29a8)
    V3 RSA/SHA256 signature: OK, key ID 57bbccba
    MD5 digest: OK (d4045f1f72d48073e3f401ee9d1f71cf)
You may get an output line like:
V3 DSA signature: NOKEY, key ID 16a61572
This means that you have a signed package, but you do not have the needed public key in your
RPM database. Note that earlier versions of RPM may present the verification differently.
If a package is signed and you want to verify it against a signature, then you will need to locate
the appropriate signature file and import it into your RPM database. You should first download the
key and then check its fingerprint before importing it using the rpm --import command.
For more information, see the RPM man pages. You will also find more information on signed binaries
at the RPM home page (see Resources for a link).
Like checking the integrity of an rpm, you can also check the integrity of your installed files
using rpm -V. This step makes sure that the files haven't been modified since they were
installed from the rpm. As shown in Listing 21, there is no output from this command if the package
is still good, but you can add the -v option to get much more detailed output.
Let's become root and corrupt our vim-common installation by deleting /usr/bin/xxd and replacing
/usr/share/vim/vim72/syntax/bindzone.vim /bin/bash. Let's try the verification again. The results
are shown in Listing 22.
This output shows us that the /usr/share/vim/vim72/syntax/bindzone.vim file fails MD5 sum, file
size, and mtime tests. One way to solve the problem would be to remove the package and then reinstall
it, but there are other packages that depend on vim-common and that are installed and still OK.
The solution is to forcibly reinstall it using the --force option of rpm,
or the reinstall function of yum. Listing 23 shows how to reinstall with
yum, and then verify that the package is now OK and the deleted file has been restored.
Usually the package management system keeps your packages in order. However, if you manage to
delete some file that is an important part of a package-and reinstalling the package without removing
does not fix the problem-then you may need to remove the package before reinstalling. For such a
case, you probably want to delete the existing copy and reinstall it, without needing to uninstall
and reinstall all the packages that depend on it. For this, you can use the rpm command's
--nodeps option to bypass dependency checking when you remove a package. Listing
24 shows how this might work if you accidentally removed the /usr/bin/xxd file, which is part of
the vim-common package, as we did earlier.
[root@echidna ~]# rm /usr/bin/xxd
rm: remove regular file `/usr/bin/xxd'? y
[root@echidna ~]# # Oops! we needed that file
[root@echidna ~]# rpm -Fvh vim-common-7.2.411-1.fc12.x86_64.rpm
[root@echidna ~]# ls /usr/bin/xxd
ls: cannot access /usr/bin/xxd: No such file or directory
[root@echidna ~]# # Oh! Freshening the package didn't replace the missing file
[root@echidna ~]# rpm -e vim-common
error: Failed dependencies:
	vim-common = 2:7.2.411-1.fc12 is needed by (installed) vim-enhanced-2:7.2.411-1.f
c12.x86_64
[root@echidna ~]# # Can't remove vim-common because vim-enhanced needs it
[root@echidna ~]# rpm -e --nodeps vim-common
[root@echidna ~]# # Bypassing the dependency check allowed removal
[root@echidna ~]# rpm -Uvh vim-common-7.2.411-1.fc12.x86_64.rpm
Preparing...                ########################################### [100%]
   1:vim-common             ########################################### [100%]
[root@echidna ~]# # Update (or install) vim-common again
[root@echidna ~]# ls /usr/bin/xxd
/usr/bin/xxd
[root@echidna ~]# # And /usr/bin/xxd is back
So now you have some approaches to updating or repairing if accidents happen and the ordinary
update process fails. Note that you can also bypass dependency checking when installing an RPM,
but this not usually a good idea.
Although yum will automatically retrieve packages from repositories, you may want
to download RPMs and save them, perhaps to install them on a non-networked system, or to examine
their contents, or for some other reason. You can use the yumdownloader command as
shown in Listing 25. In our case, the package is already installed, so there are no additional packages
to download. If there were such packages, the --resolve option would cause them to
be downloaded too.
If you download an RPM and need to examine its contents, rather than install it, you can use
the rpm2cpiocommand to convert the contents to a cpio archive and then filter
that through the cpio command to extract individual files or all the files in the
package. Listing 26 shows how to do this for the gcl-selinux package and then shows what files (and
directories) were unpacked. See the man pages for rpm2cpio and cpio
for additional details on these commands.
We saw earlier that YUM offers a search capability, which searches descriptions as well as package
names. If you need to find what package contains a program that you do not have installed, there
are a few other ways:
You can guess what package might contain it and download the package without installing.
Once you have the package, you can interrogate it.
You can search the Internet.
You may be able to use the command-not-found capability described below.
If you can't find a particular RPM through your system tools, a good Internet resource for locating
RPMs is the Rpmfind.Net server (see Resources for a link).
When the Bash shell searches for a command and does not find it, then the shell searches for
a shell function named command_not_found_handle. If the command_not_found_handle
function exists, it is invoked with the original command and original arguments as its arguments,
and the function's exit status becomes the exit status of the shell. If the function is not defined,
the shell prints an error message and returns an exit status of 127. The function is usually set
in the system /etc/bash.bashrc file. Listing 27 shows how we searched for the command-not-found
capability and then installed it.
[root@echidna ~]# yum search command-not-found
Loaded plugins: presto, refresh-packagekit
========================== Matched: command-not-found ==========================
PackageKit-command-not-found.x86_64 : Ask the user to install command line
                                    : programs automatically
You have new mail in /var/spool/mail/root
[root@echidna ~]# yum install PackageKit-command-not-found.x86_64
Loaded plugins: presto, refresh-packagekit
Setting up Install Process
Resolving Dependencies
--> Running transaction check
---> Package PackageKit-command-not-found.x86_64 0:0.5.7-2.fc12 set to be updated
--> Finished Dependency Resolution

Dependencies Resolved

================================================================================
 Package                          Arch       Version          Repository   Size
================================================================================
Installing:
 PackageKit-command-not-found     x86_64     0.5.7-2.fc12     updates     102 k

Transaction Summary
================================================================================
Install       1 Package(s)
Upgrade       0 Package(s)

Total download size: 102 k
Installed size: 262 k
Is this ok [y/N]: y
Downloading Packages:
Setting up and reading Presto delta metadata
Processing delta metadata
Package(s) data still to download: 102 k
PackageKit-command-not-found-0.5.7-2.fc12.x86_64.rpm     | 102 kB     00:00
Running rpm_check_debug
Running Transaction Test
Transaction Test Succeeded
Running Transaction
  Installing     : PackageKit-command-not-found-0.5.7-2.fc12.x86_64         1/1

Installed:
  PackageKit-command-not-found.x86_64 0:0.5.7-2.fc12

Complete!
Listing 28 shows how the function handle is defined after installing PackageKit-command-not-found.
If the function cannot perform the search, then it mimics the standard system behavior and returns
127.
No discussion of package installation would be complete without mentioning PackageKit, which
is a system designed to make installing and updating software easier. The intent is to unify all
the software graphical tools used in different distributions. PackageKit uses a system activated
daemon, which means that the daemon is activated only when needed. Packagekit has version for Gnome
(gnome-packagekit) and KDE KPackageKit). The command-not-found handle described above is also part
of PackageKit. It includes the commands pkcon to perform package management functions
from the console, and pkmon to monitor package kit activity. It also includes graphical
tools for adding software packages, or for updating your system. Figure 1 shows an example of the
Software Update graphical interface.
1. rpm2cpio is the tool you'd need, to turn the RPM file into a CPIO stream, which you then pipe
through cpio to extract to disk
2. You can install an rpm to an arbitrary root directory (e.g. targetdir) placing the package
files under targetdir and the rpm database in the targetdir/var/rpm directory with something like:
Packaging
software with RPM, Part 1: Building and distributing packages
In this first article in a three-part series on the RPM Package Manager, learn how to use RPM
not just to install software and attendant files but to package almost anything, from system
scripts to source code to documentation. (This series replaces an earlier series on RPM written
by Dan Poirier.)
Packaging
software with RPM, Part 2: Upgrading and uninstalling software
In this second article in a three-part series on the RPM Package Manager, learn how how to use
RPM to upgrade and uninstall software on your Linux system. (This series replaces an earlier
series on RPM written by Dan Poirier.)
Packaging
software with RPM, Part 3: Accommodating software dependencies
In this third article in a three-part series on the RPM Package Manager, discover the ins and
outs of software dependencies, and learn how to control and customize your software packaging.
(This series replaces an earlier series on RPM written by Dan Poirier.)
Article ID: 6928 - Created on: Apr 22, 2004 6:00 PM - Last Modified: Feb 17, 2009 10:19 AM
Release Found: Red Hat Enterprise Linux
The rpm -qf command will provide the name of the RPM package that contains a specific file. For
example, to see which rpm contains the file /usr/lib/libdb.so.2, run the following:
If you are trying to install an RPM package and you are getting an error message saying that
a file is missing, RPM may not be able to tell you which package that file is in. In this case,
the third party web site http://www.rpmfind.net
is a good resource. This website allows you to search by file, and then prints out the name of the
package that file is in.
Once you know which package you need to install, you can use up2date in Red Hat Enterprise Linux
4 and older, or yum in Red Hat Enterprise Linux 5 and newer, to install the package from RHN. Packages
can also be downloaded from the RHN website at
http://rhn.redhat.com.
About: rpmrebuild is a tool to build an RPM file from a package that has already
been installed. It can be used to easily build modified packages, and works on any Linux distribution
that uses RPM.
Changes: A bug where the --pug-from-fs option did not keep the UID/GID was fixed.
Two new plugins were added to help users understand and develop their own plugins. A UTF-8 French
localization was included.
AutoUpdate is a Perl script which performs a task similar to Red Hat's up2date or autorpm. It
can be used to automatically download and upgrade RPMs from different HTTP(S) or (S)FTP sites, while
also handling dependencies. Moreover, it can also be used to keep a server with a customized (Red
Hat) distribution plus all clients up to date.
rpmorphan finds "orphaned" RPM packages on your system. It determines which
packages have no other packages depending on their installation, and shows you a list of these packages.
It is a clone of the deborphan program from Debian, but for RPM packages.
Release focus: Major feature enhancements
Changes:
A bug in the Tk interface was fixed. A simulation mode was added. Severals counters were added to
the GUI. The GUI can now re-analyze dependencies after package removal. Virtual package treatment
was improved, and the tool now checks how many packages provide the virtual.
March 2006Abstract: This introduction to RPMs covers different
types of queries as well as tips on how to obtain information on RPMs and list their contents.
I. The Simplest Query
The query options are accessed by using the -q or --query option
to the rpm command. By default the query is applied to one or more installed package
listed by name at the end of the query, like this:
rpm -q <packagename> [<packagename>...]
The -q option with no additional options returns the canonical name-version-release
string for a package. For example:
$ rpm -q filesystem
filesystem-2.2.1-3
II. Querying Package Files
To apply the query to a package file instead of a currently installed package, use the -p
or --package option. For example:
$ rpm -qp sun-icu-2.1-6.i386.rpm
sun-icu-2.1-6
You may list more than one package file, or use shell globbing.
Note that this information was retrieved from the contents of the RPM file itself, not from the
file name. Renaming the package file does not affect these values. For example:
All query commands may be applied to a package file simply by adding the -p option
to the command.
III. Querying All Installed Packages
To apply the query to all installed package, use the -a option. Do not specify
any individual RPMs to query. Without any additional options, this lists all packages installed
on the system in canonical name-version-release format. For example:
$ rpm -qa | head -10
dietlibc-0.21-7
kon2-fonts-0.3.9b-18.1
man-pages-fr-0.9.7-7
kudzu-devel-1.1.21-1
basesystem-8.0-2
bogl-0.1.9-27
compat-slang-1.4.5-5
diffstat-1.31-2
elfutils-0.89-1
glib-1.2.10-11.1
[...and so forth]
All query commands may be applied to all installed packages simply by adding the -a
option to the command. Be careful, as this can result in a lot of information.
IV. Useful Queries
The full list of query options is described in the QUERY OPTIONS section of the rpm
man page. Here are the most useful:
General Information
The -i or --info flag returns general descriptive information about
the RPM. This information includes the build date and build host name. For example:
$ rpm -qpi sun-icu-2.1-6.i386.rpm
Name : sun-icu
Relocations: (not relocateable)
Version : 2.1
Vendor: Sun Microsystems, Inc.
Release : 6
Build Date: Mon 23 Feb 2004 12:07:17 PM PST
Install Date: (not installed)
Build Host: zzz-build.Sun.COM
Group : Operation System Environment
Source RPM: sun-icu-2.1-6.src.rpm
Size : 12387614
License: ICU License -ICU 1.8.1 and later and Sun Microsystems Binary
Code License (BCL)
Signature : (none)
Packager : Sun Microsystems, Inc.
URL : http://www.sun.com/
Summary : International Components for Unicode 2.1 with Sun enhancements
Description : The sun-icu package contains ICU 2.1 version of
internationalization
libraries and header files for C and C++ programming languages with
additional Sun-specific enhancements.
Listing All Files Contained in the RPM
Use the -l or --list option to list all files in a package. For
example:
$ rpm -qpl sun-icu-2.1-6.i386.rpm | head -10
/opt/sun/private/include/layout/ArabicLayoutEngine.h
/opt/sun/private/include/layout/GXLayoutEngine.h
/opt/sun/private/include/layout/IndicLayoutEngine.h
/opt/sun/private/include/layout/LEFontInstance.h
/opt/sun/private/include/layout/LEGlyphFilter.h
/opt/sun/private/include/layout/LEScripts.h
/opt/sun/private/include/layout/LESwaps.h
/opt/sun/private/include/layout/LETypes.h
/opt/sun/private/include/layout/LayoutEngine.h
/opt/sun/private/include/layout/OpenTypeLayoutEngine.h
[...and so forth]
V. Querying Individual Package Fields
The --queryformat or --qf option allows you to query rpm
for one or more fields, formatting the results however you see fit. This is very useful in scripting
situations. This command may be applied to one or more installed packages, to all installed packages,
or to one or more RPM package files.
$ rpm -q --qf
'%{name}\t%{version}-%{release}\t%{buildhost}\t%{buildtime}\n' mozilla
mozilla-nss mozilla-nspr
mozilla 1.4-3.0.18 porky.devel.redhat.com 1064264992
mozilla-nss 1.4-3.0.18 porky.devel.redhat.com 1064264992
mozilla-nspr 1.4-3.0.18 porky.devel.redhat.com 1064264992
See the man page for additional options which allow you to control the format of the individual
fields.
For a list of all fields you may query, run rpm --querytags.
When we added RPM support to APT
for Conectiva Linux, a few years ago, we found it many times slower than APT in Debian under similar
circumstances. It is clear for us now that this is caused mainly by the Berkeley database backend
used in RPM, the non-uniform handling of file dependencies and the
large
number of hidden dependencies automatically added by RPM.
APT is an excellent
tool, and it would be a highly un-scientific procedure just to dismiss it without careful evaluation.
When proposing a solution, we must make sure to do proper research and use what we learned as a
start point for a better design. Improving APT rather than creating a yet-another-update-tool was
strongly advocated by Arnaldo
to fight the NMH syndrome that is known to result in the spawning of
a myriad of incompatible, incomplete or ill-designed clones of many software products created by
or for a specific Linux distribution. A careful study of existing tools is essential to build better
alternatives, and it took Conectiva four years of APT development and usage to decide for
a new design.
The same applies to RPM. Anyone willing to come with a better alternative should
make sure it can fix the maximum possible number of problems in existing implementations (including
the issues listed below), and preferably outdo RPM in every single field, which is not an easy task.
The good points, such as the single specfile, pristine source, multi-patch and source package concepts
should of course be kept. I understand that
RPM is not new and many of its current problems couldn't be predicted at the time it was designed,
or even at the code overhauls it suffered along its evolutionary path. However, there's no excuse
for any next-generation replacement to ignore these issues or not solve them by just not understanding
the real nature of the problem.
So, without further ado, here are the ten main problems I'd like to see fixed
in an eventual RPM successor (or in a sanitized RPM reimplementation), in no particular order:
Berkeley database backend. Dpkg does a much faster and at least equally reliable
job with plaintext files, which don't get corrupt as often, don't need periodic reconstruction
and are human-readable. The SQL database backend is a huge step
in the wrong direction.
Installation of new package before removal of the previous version. This
adds unnecessary complexity and leads to a non-intuitive sequence in execution of pre- and post-
install/uninstall scriptlets, and can create problems only solvable using triggers. Triggers
shouldn't exist, they only solve problems caused by design problems and policy flaws.
Network awareness features. It increases size and complexity of the binary,
and tries to perform a task that should belong to an external utility such as Apt-get or Smart.
Recent versions
try
to contact PGP keyservers and block execution when it fails.
Obtuse macro expansion and commentary handling in specfiles. Macros expand
inside comments, and line breaks cause unexpected behavior.
Absence of logical OR in requirements forces the developer to always regenerate
all alternative packages to provide virtual packages.
Incomplete timestamp format in specfile changelogs. Standard date(1)
format or other providing time of change is needed.
File dependencies are treated in a special way and are not regular virtual
packages (a better design would make packages relate only to other packages, real or virtual).
They increase complexity of dependency resolution and promote sloppy pratices in software packaging.
Problematic handling of simple situations such as replacing directories with
symlinks. Bad habit of stating all mounted filesystems prior to installation (at least in earlier
versions).
Non-intuitive (or plain broken) algorithm to compare package versions (example:
1a > 1B) . Epoch zero is considered newer than no epoch at all.
No provisions for interactive configuration scripts or human inspection/approval
of new configuration files, and no concept of post-transaction configuration.
Can all these be solved in a single software product? Dpkg is not the answer,
it also has its share of problems (no source package, no simple multi-patch or multi-source handling,
package creation and metadata maintenance not as straighforward as RPM). Combining the best features
of both package managers - the RPM front-end with the Dpkg back-end - would make life easier for
both users and maintainers. Reimplementing a subset of the RPM specification in such a way that
it complies with the LSB requirements for a
package manager and is backwards-compatible with most (but not all) existing packages could be a
solution. Any takers?
One comment to problem 10, "No provisions for interactive configuration scripts
or human inspection/approval of new configuration files, and no concept of post-transaction
configuration":
This should probably also go into another tool (same argument as in point
3).
The easiest way I see to handle this would be to save the original, unaltered
configuration file at some common place (maybe a rcs repository which then could also contain
all previous versions; using tags one could easily retrieve them).
A tool then could retrieve a patch containing only the changes made upstream and try to apply
them (wiggle comes to mind here) and/or display the changes to the user.
So, the important point is IMHO, that we keep the old, unaltered configuration
file somewhere so that a patch can be computed.
First of all I read nearly all your postings and have enjoyed your series
comparing the Connectiva - Mandriva build systems. Your analyses are great, keep up the good
work.
Now about the RPM issues. Have you looked at the work of the Electra project?:
http://elektra.sourceforge.net/.
From MPOV it is by design probably the best technology there is now for managing config info.
But what do I know… what do you think?
I agree with Michael about handling the configuration in an external tool.
Probably some mechanism will be needed on RPM-or-its-sucessor, so the tool can be "notified"
when it should act, and maybe storing some "configured" flag on the RPM-or-its-sucessor database.
There are so many different ways of implementing this, that letting it be
done by an external tool would be nice. So, e.g. the default handling could be similar to debian,
but allowing it to be replaced by enhanced versions that do things such as storing all changes
on a rcs repository.
Michael, Eduardo: yes, certainly this can be handled by an external tool (like
debconf does with dpkg). The actual problem is that there's no hook to call the procedure after
all packages are installed. If we call it in post-install scripts, the entire installation process
would have to be human-assisted, which can be tiresome in long transactions.
athleston: I didn't know Elektra, I'll check it. Thanks for the comment and
for reading the other posts!
Those answering about config tools in RPM - have you seen how DebConfig works?
DebConfig allows the Debian packages to ask the user config questions, but abstracts away gow
it's done so the user is free to select text based dialogs, GUI, text files or "just take the
defaults".
DPKG does have a source package system (or is it apt?) On Debian I can automatically
fetch source code, build and output a deb file ready to install. I don't have to be root to
do this, (but do need to be root to install the resulting deb).
Improvements I'd like would be patch support - differential updates to reduce
download size. To make things easier for "Joe Pulic" though I'd like to see merge module support,
so a distributer can include all dependencies with the package (on the CDROM perhaps) and install
them if needed. This could be done at a layer above Dpkg or RPM. Apt solves the problem but
only using its preconfigured package sources. Perhaps if Apt could be told to temporarily use
the distribution CDROM or vendor web site as a package source when installing a given package,
merge module like functionality could be implemented well.
Merge modules are the one good thing about Microsoft's installer. RPM and
Deb however have far superior side by side installation support, dependency tracking, automatic
cruft removal with Aptitude and even management tools.
I'm not an expert on RPM or other package/build systems, but I'd add to (9)
that the entire idea of 'epoch' is wrong. The version number, and no other number, should indicate
the version. The epoch number is only needed because the version numbering is broken (problem
9). In my not so humble opinion non-numeral charactes in RPM version numbers should be banned
alltogether; they should all be of the format package-1.2.3-4.5. If the version of the distro
must be indicated, it should be the first number of the packaging release version ('4′ in the
example). This was suggested for Fedora and it was used for a while, e.g. FC1 kernels were 2.4.23-1.1234
etc. but it has been replaced in FC3 by postfixing '_FC3′ in the package release version, which
seems to me a step in the wrong direction
I'm not upgrading my Fedora Core 2 machine to Core 3, even though the new version has been out for
a couple of months. There's not anything wrong with FC3 itself, it's just that system upgrades are
both a blessing and a curse. I guess that's one of those dirty little secrets every Linux user knows,
but that none of us talks about.
There are plenty of valid reasons not to upgrade to the latest release of your Linux distribution.
You have to reapply all manner of preferences, hunt around in the new Applications menus to find
where your programs have moved to and what they're called this time around, get used to new ways
of doing the simplest tasks, and there's usually a new firewall subsystem to boot. But the one that
has always gotten under my skin is the fact that upgrading my distro always breaks the add-on software
I've installed myself.
If I'm lucky, it's just mangled. But on many occasions the installer program removes it entirely
because it judges it a conflict with something new. In fact, every support forum I've looked at
flat-out recommends that you do a clean install instead of attempting an upgrade. So it's guaranteed
that whenever you upgrade, you'll have to reinstall everything from media players and games to commercial
software and critical applications that just aren't mainstream enough for inclusion in the distro.
More and more people these days simplify package management with tools like apt and yum, and
third-party package repositories like freshrpms,
livna.org and
Dag Wieers'. But the repositories
and the distros each act like they live in separate worlds, and when upgrade time comes, it's the
user who is inconvenienced.
Mainly you see this in the way the repository applications try to install virtually everything
to /usr. According to the Filesystem
Hierarchy Standard (FHS), /usr belongs to the system and should not be touched after initial
installation. That may be a bit strict, but at the very least, binary packages should not be installing
software to /usr that is canonically not part of the Linux distribution. If they'd just make that
one change, I wouldn't have to re-install Mplayer after every upgrade.
Sure, it's not totally the packagers' fault -- the majority of software projects provide RPMs
that install to /usr, in disregard of the FHS. You can force an RPM to install somewhere else with
the --prefix switch, but only if it doesn't have any hard-coded paths, and a lot
of them do. There are options to relocate individual files at install time, but that quickly gets
impractical and might not work. But bad RPMs aren't the root of the issue.
This is a problem that already has a solution, and few people follow it: using /usr/local
and /opt.
Following the FHS definition,
any software you install yourself not from the distro really belongs in /usr/local. /usr/local
is in every user's path, it contains the same bin and lib subdirectory structure that /usr does,
and it won't get overwritten or mangled by a system upgrade that writes through /usr. If you write
custom scripts, compile something from source, or install something self-contained (like Thunderbird
and Sunbird tarballs), it finds its home in /usr/local.
There is some debate as to whether binary packages should follow the same policy. We encounter
that old multiple personality disorder issue when installing a lot of RPMs -- you have to become
root to do it, so in a sense you are becoming "the system" for a few minutes. But ultimately it's
still you -- not the distro -- managing the application.
So what happens when you throw a third-party repository into this equation? You get /opt. The
FHS defines /opt as
the home for large packages from independent vendors. It used to be common for OpenOffice.org to
reside in /opt, and before that, desktop environments like GNOME and KDE. That's no longer the case,
though, as they're integrated enough in a modern Linux distro to belong in the main filesystem.
But third-party software from repositories doesn't fit anywhere else, and they are independent vendors.
Here is what I propose:
Every application project that offers independent downloads should package their RPMs to
install in /usr/local.
Third-party repositories should package their RPMs to install in /opt, under their own subdirectory.
Distros should stick fast to the FHS definition of /opt and /usr/local, and never touch
them.
I know, I know; it isn't that simple. I've discussed this ad nauseum and I know the criticisms.
For one thing, two repositories could both provide the same package, and you end up with two copies
in different directories. That's true, but it's really no worse than having both binaries try to
install to /usr; the only difference is that the user will see the conflict after installation instead
of before. It's broken either way.
For another, it doesn't necessarily solve the "fresh install" dilemma -- the only way that /usr/local
and /opt would be preserved through a fresh install is if they are not on the main disk partition.
Well, the solution to that is right there in the problem statement: put /usr/local and /opt on a
separate partition by default. If that strikes you as too many partitions, well, you could always
make /usr/local a symlink to a subdirectory in /opt and cut down a little. It even makes sense logically
if you consider /usr/local a "vendor" according to the FHS usage of /opt.
You can't stop a pathological user from changing a partition setting and causing his own problems,
but part of the distros' behavior modification needs to be acknowledging that their customers are
going to need add-on software, so they must plan for it. Far from keeping its hands off of
my /usr/local, Red Hat has even
officially decidednot to follow the FHS because it doesn't see the need. I say wake
up and stick to the standard whether you enjoy it or not.
Sadly, there is no way to enforce this good behavior. Even if major projects like Mplayer and
major repositories like DAG play by these new rules, others will not. So my final suggestion is
that package-management programs start building in functionality to override or rescue poorly built
packages. It'd be nice to see a flag in Synaptic when a package has hard-coded file paths -- and
when it doesn't, to let me choose where to install it.
The point is, we live in a world where more and more users keep their machines up-to-date through
live, over-the-wire package management. And no one vendor -- Linux distributions included -- provides
absolutely everything. If we don't find a way for the different vendors to coexist and cooperate
on one machine, then every increase in market share is going to bring with it an increasing number
of frustrated and confused new users.
In closing, I have some exercises for the reader. Look up an install or upgrade guide for the
distribution you are currently using. See how many packages it tells you you'll have to download
separately when you're finished. Count how many of these you already have installed.
When you're done with that one, see if there is anything in /opt. On my system, the only packages
that have installed themselves into /opt are Yahoo! Messenger and Quake 2. Kudos to the nice people
who brought us both of those. If only everyone else would play nice, too.
Last month's column looked at the basics of generating RPMs, including
the format of the all-important .spec file. In theory, those principles should be enough
to let you create .spec files and RPMs for a number of purposes. In practice, however, RPM
generation is complex enough that some examples are sure to help. So, this month's column presents
two examples: creating a non-program RPM and creating a program RPM.
short sighted (Score:1, Interesting)
by Anonymous Coward on Monday March 19, @10:47AM EST (#115)
Though I agree that this initially appears to fit well with RedHat's desire to make money off of
service, I think it is incredibility shortsighted. Most automated update tools are made because
they help offset service cost for known issues especially in consumer space where there the cost
overshadows the potential revenue.
RedHat is in the public eye as well and they need to ensure that people are upgrading promptly
when new security holes are found. The Ramen worm could have easily been avoided if people had kept
up with security updates. I personally don't have the time to keep up with security advisories and
also compare whats on my system with every new update.
I'll use red-carpet for now but I may consider switching back to Debian.
An anonymous user wrote in to tell us (and Timothy called RH and confirmed, this change was made
a few weeks ago) that you no longer can Freely and Anonymously use Red Hat's Update Agent to download
updated package DBs, and update packages. You must register, and pay $9.95 for the service. Of course
you can still update manually, but how long before other services pop up to take its place? And
Debian still does apt without me having to
tell them where I live. This is unfortunate, but not unsurprising. I want RH to make a buck too,
but this seems like a pretty crappy way to do it. Update: 03/19 03:21 PM by T: An unnamed reader points to
this FAQ on
the change, too.
Correct me if I'm wrong, but doesn't
Ximian's
Red Carpet utility
do the same this as Redhat's update agent? I don't see the problem, since someone else is
providing a _free_ means to the same end. Plus Red Carpet is a far more attractive, professional
looking utility, IMNSHO.
Because of its all in all crappy command line interface, I gave up
on up2date on my machines that don't have X.
I use rhup, a free (you
don't get charged ten bucks to use it) utility to download updates for you.
I've never gotten up2date to work well for me. Instead, I've been
using a script that parses rpmfind.net output and automagically installs stuff for me. Considering
this news, I'm releasing the script to the public (something I didn't want to do because
if rpmfind changes, the script breaks).
Here is the link to the
script. Please
mirror, etc, as this is a cable line, and my wife's website (the reptile shelter in my sig)
will go down if this site goes down.
I don't know why anyone is whining. You can still download Redhat
for free, so if you have to set up a box, no problem. Redhat is a company filled with people
who have to eat, pay rent, etc. $9.95 is not too bad when you consider the M$ option. If
you're going to use Redhat software and expect updates, don't be such a leech by demanding
everything free. If you don't like it, then use another distro.
Besides, I feel that if one actively supports open-source software, then
they'll be decent enough to put some money into it. Eventually, no money == no open-source
software.
Correct me if I'm wrong, but doesn't
Ximian's
Red Carpet utility
do the same this as Redhat's update agent? I don't see the problem, since someone else is
providing a _free_ means to the same end. Plus Red Carpet is a far more attractive, professional
looking utility, IMNSHO.
Updateme is free, and does the same basic function.
rpm -i foobar-1.0-1.i386.rpm
The next simplest command is to uninstall a package:
rpm -e foobar
One of the more complex but highly useful commands allows you to install packages via
FTP. If you are connected to the net and want to install a new package, all you need to do is specify
the file with a valid URL, like so:
I set up yum recently on Red Hat 8.0 and pointed it to the appropriate
repositories [duke.edu]
- a free way to get backported security fixes for 8.0. A shame that Red Hat never mentioned this
as an option in their e-mail to all the RHN subscribers...
This is a comparison of the deb, rpm, tgz, slp, and pkg package formats, as used in the Debian,
Red Hat, Slackware, and Stampede linux distributions respectively (pkg is the SVr4 package format,
used in Solaris). I've had some experience with each of the package formats, both building packages,
and later in my work on the Alien
package conversion program.
I've tried to keep this comparison unbiased, however for the record, I'm a fan of the deb format,
and a Debian developer. If you discover any bias or inaccuracy in this comparison, or any important
features of a package format I have left out, please
mail me so I can correct it. Several people
have already done so. I'm also looking for data to fill in the places marked by `?'.
This comparison deals only with the package formats, not with the various tools (dpkg, rpm, etc.),
that are used to deal with and install the packages. It also does not deal with source packages,
only binary packages.
I sometimes see a few rpm queries and questions that pop up over
time. I work a lot with RPM, and I have compiled a quick cheat sheet. It is by no means complete.
I am suprised a lot of people don't know that you can install rpms by wildcard, and also specify
multiple rpms on the command line (also with wildcards). (like rpm -i IBMJava2-SDK*.rpm IBMJava2-JRE*.rpm).
The neat thing here is rpm will work out the correct order to install the RPMS to satisfy dependencies
.. not you.
Install an RPM:
rpm -i rpmname.rpm - is the most basic use.
Remove an RPM:
rpm -e rpmname.rpm - is the most basic use
Note: When you remove an rpm, you should not specify the arch.rpm extensions (commonly it is
i386.rpm).
Upgrade an RPM:
rpm -U rpmname.rpm - is the most basic use (though common options are -Uvh)
All of these commands have many, many modifiers. Here are some of the ones I use most frequently
--excludedocs - will leave out man files, docs files, info files from the install
--test - mock install/remove/etc. Don't really do it, but see if it works.
-v --hash - draw a progress bar of the install/remove/etc
--force - force an installation (can really mess up the database)
--nodeps - Don't check for dependencies (can really mess up the database)
Querying an rpm
There are several ways to query an rpm:
List all rpms in the system:
rpm -qa
List all files in an rpm (in this case one that has been installed):
rpm -ql rpmname
Note: Again do not specify the .arch.rpm. Also this does not have to be the full name of the
rpm. Partial names work too.
List all the files in an rpm file that has not been installed on your system
rpm -qp rpmname.rpm -ql
List all the files in an rpm file that has not been installed on your system, but you have
on disk. Also print a brief summary of the package function:
rpm -qp rpmname.rpm -ql --info
List all the files in an rpm file that has not been installed on your system, and does not
exist on your system. Query over ftp. Also print a brief summary of the package function
RPM package is a powerful utility for managing the software packages of major Linux distributions.
RPM can be used to install and remove software packages, update packages and get an overview of all
installed packages.
Here are some useful commands to manipulate RPM packages:
== Query / Verify commands
Getting detailed information about the package wget:
rpm -qi wget
Determining which package installed the file /usr/bin/wget:
rpm -qf /usr/bin/wget
Showing all the files installed by the package wget:
rpm -ql wget
Viewing the documentation files for the command wget:
rpm -qd wget
Listing all files included in the not yet installed package wget by entering the following:
I sometimes see a few rpm queries and questions that pop up over
time. I work a lot with RPM, and I have compiled a quick cheat sheet. It is by no means complete.
I am suprised a lot of people don't know that you can install rpms by wildcard, and also specify
multiple rpms on the command line (also with wildcards). (like rpm -i IBMJava2-SDK*.rpm IBMJava2-JRE*.rpm).
The neat thing here is rpm will work out the correct order to install the RPMS to satisfy dependencies
.. not you.
Install an RPM:
rpm -i rpmname.rpm - is the most basic use.
Remove an RPM:
rpm -e rpmname.rpm - is the most basic use
Note: When you remove an rpm, you should not specify the arch.rpm extensions (commonly it is
i386.rpm).
Upgrade an RPM:
rpm -U rpmname.rpm - is the most basic use (though common options are -Uvh)
All of these commands have many, many modifiers. Here are some of the ones I use most frequently
--excludedocs - will leave out man files, docs files, info files from the install
--test - mock install/remove/etc. Don't really do it, but see if it works.
-v --hash - draw a progress bar of the install/remove/etc
--force - force an installation (can really mess up the database)
--nodeps - Don't check for dependencies (can really mess up the database)
Querying an rpm
There are several ways to query an rpm:
List all rpms in the system:
rpm -qa
List all files in an rpm (in this case one that has been installed):
rpm -ql rpmname
Note: Again do not specify the .arch.rpm. Also this does not have to be the full name of the
rpm. Partial names work too.
List all the files in an rpm file that has not been installed on your system
rpm -qp rpmname.rpm -ql
List all the files in an rpm file that has not been installed on your system, but you have
on disk. Also print a brief summary of the package function:
rpm -qp rpmname.rpm -ql --info
List all the files in an rpm file that has not been installed on your system, and does not
exist on your system. Query over ftp. Also print a brief summary of the package function
AutoRPM (http://www.kaybee.org/~kirk/html/linux.html)
- Written by Kirk Bauer, it is an automation tool for syncing your OS with patches stored on an FTP
site. It can also be used to sync a network or cluster. It works by checking a list of FTP sites specified
in its configuration file for upgrades. If any upgrades are found it will automatically or manually
install the upgrades. It is one of the best utilities for the Red Hat Package Manager system.
Red Hat Network (http://www.redhat.com/network)
- Red Hat has their own automation tool for package management and deployment. Its called Red Hat Network
and it works by syncing your system to a profile that you set up. First you sign up for an account (Which
costs a fee a month, free trial though) and send your hardware/software configuration to Red Hat. Then
when updates are available it automatically installs them. One drawback is that it can only update packages
from the Red Hat distribution and power tools collection.
YUP (http://devel.yellowdoglinux.com/rp_yup.shtml)
- YUP is a program similar to apt-get in functionality. It will automatically scan a site for update
packages and install them. In addition, it offers the ability to remove and install new packages specified.
Glyphic RPM Updater (http://www.glyphic.com/free/RpmReadMe.html)
- Glyphic RPM Updater is a utility good for updating packages from update CD-ROMs. It works by creating
a list of RPM files off a CD-ROM (or other media) and installs newer versions of packages it detects.
If you get monthly update CD-ROMs this utility can come in handy.
Debian Package Manager (DPKG)
Apt (http://www.debian.org) -
APT is part of the Debian distribution and it is the best utility for package management and deployment.
It works by checking FTP sites specified in its configuration file for updates, and if available it
installs them. In addition, it can automatically install the package dependencies needed for the updates
to run, and gives you the ability to remove, install, and upgrade packages. It can update specific packages
or do system-wide software updates. It is also a joy to use.
The stated early (10 November 2002) roadmap for that new rpm-4.2 release is to
include:
a) file classes (think: sanitized file (1) output in dictionary, per-file
index).
b) file color bits (think: 1=elf32, 2=elf64).
c) attaching dependencies to files, so that a refcount is computible.
d) replacing find-{provides,requires} with internal elfutils/file-3.39.
e) install policy based on file color bits
f) --excludeconfig like --excludedocs with the added twist that an internal
Provides: will be turned off, exposing a Requires:. This will provide a means to install all %config
files from a separate package if/when necessary.
and teaching tripwire to read file MD5's from an rpm database.
rpm-4.2 will be the next release of rpm.
One nice feature of the RPM system is the -V (verify) option which allows you to get
a handy list of which files differ between the package database records and their actual nodes in the
filesystem. Thus you can see size, MD5 checksum, and especially ownership and permission differences
which might be causing problems. Naturally it will also warning of any missing files.
If you suspect that your system is compromised, you can use the command:
# rpm -Va
to verify each file on the system. See the RPM man page, as there are a few other options that can
be included to make it less verbose. Keep in mind you must also be sure your RPM binary has not been
compromised. RPM can also be combined with PGP to check a package's signature. Typical output might
look like the following:
..5....T /bin/login
should sound alarm bells. RPM produces the following useful output fields:
S- file size changed
M - file mode changed
5 - MD5 checksum failed
U - file owner changed
G - group changed
This means that every time a new RPM is added to the system, the RPM database will need to be re-archived.
You will have to decide the advantages versus drawbacks. Also, keep in mind that it won't verify programs
that RPM did not install.
Specifically, the files /var/lib/rpm/fileindex.rpm and /var/lib/rpm/packages.rpm
most likely won't fit on a single floppy. Compressed, each should fit on a separate floppy. Consider
storing this (as well as the actual /bin/rpm executable!!) on a Zip cartrige.
The Last but not LeastTechnology is dominated by
two types of people: those who understand what they do not manage and those who manage what they do not understand ~Archibald Putt.
Ph.D
FAIR USE NOTICEThis site contains
copyrighted material the use of which has not always been specifically
authorized by the copyright owner. We are making such material available
to advance understanding of computer science, IT technology, economic, scientific, and social
issues. We believe this constitutes a 'fair use' of any such
copyrighted material as provided by section 107 of the US Copyright Law according to which
such material can be distributed without profit exclusively for research and educational purposes.
This is a Spartan WHYFF (We Help You For Free)
site written by people for whom English is not a native language. Grammar and spelling errors should
be expected. The site contain some broken links as it develops like a living tree...
You can use PayPal to to buy a cup of coffee for authors
of this site
Disclaimer:
The statements, views and opinions presented on this web page are those of the author (or
referenced source) and are
not endorsed by, nor do they necessarily reflect, the opinions of the Softpanorama society.We do not warrant the correctness
of the information provided or its fitness for any purpose. The site uses AdSense so you need to be aware of Google privacy policy. You you do not want to be
tracked by Google please disable Javascript for this site. This site is perfectly usable without
Javascript.