Serial Console on Sun UltraSparc servers
First of all you need null model cable. Specialists of old school can solder their own, but this art is essentially lost :-).
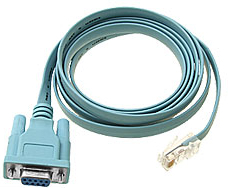
Sun server usually come with one crossover 9-pin connector (silver colored, Sun Part No. 530-3100-01). Don't throw it out
when you get with the server ;-). This connector can be used with a regular Ethernet cable. That's the most convenient solution for
server rooms as you can use cable of any necessary length to position your laptop conveniently or get to the desktop or workstation
(if connecting to a Sun workstation or server, use 25 pin connector --- Sun Part No. 530-2889-03 or equivalent). You can also
create your own or buy ready made cable
Sun servers have two management port: one serial management (marked SER MGT) and one Net management ( marked NET MGT).
You need to use serial management port. It has Ethernet connector.
You can use iether sun connector or cables used for managing network devices like Cisco.
Cisco "blue cable" is probably the most common cable of this type.
Net management port is used to connect to
ALOM (ILOM on newer Sun servers like
SPARC T4-1 Server) and you need to configure
it before that.
There are several ways to use serial console for connecting to Sun servers
- Use nearby unix server, and put the cable from seriat port of this server to the SER
MGT port on you Sun server, You can use terminal emulator (tip) on Unix machine or if you have a laptop with
Linux installed you can use it too.
- Use nearby Windows server. In this case you can install some Windows terminal emulator ( Teraterm or
Putty are perfect for that). It is not necessary
to be administrator to access serial port so any user account suffice.
- Use your laptop. The problem here is the many modern laptops do not have serial port.
So one way out is to use some older model that that has such a port, for example Dell620.
Actually its cost ($40-$60 on eBay) is not much higher that cost of good USB to serial cable
;-). And it will work much better. In this case you need to find iether docking station with serial port in it, or buy a USB cable
that has convertor from USB to serial interface. Those convertors are notoriously unreliable. Try
using only a high quality USB to "RS232" converter with the Windows machine,
especially Windows 7.
Installing Prolific USB-to-Serial Driver might help. Click
here to download it... Often connection simplyfreeze (Putty
Serial Connection problems Unix Linux Forums Solaris)
Q: The serial connection freezes on my Windows 7 64 and 32 Bit machines.
I unplug and plug it back in and try to reconnect the connection only to get an error
message "Unable to open connection" .
The only remedy was to force restart my Windows 7 machine.
Is there any processes or services I can force it to shut down rather than force rebooting
my Windows machine every time this happens?
I also notice in my device manager when the Serial connection freezes the "COM4 serial to
Bridge" device is no where to be seen.
I am using putty version .62
Serial: COM4
Speed: 9600
Data bits: 8
Stop bits: 1
Parity: None
Flow control: XON/XOFF
I was wondering if any of you have faced this problem that I have been having for
quite some time now regarding serial connection with putty to my Solaris Box Sunfire
v250 and Sun v220 and sun v440.
A:
I am assuming here that the Windows side uses a USB to "RS232"-Serial converter.
These can be notoriously unreliable.
I am also assuming the the V250 has a _standard_ 9 pin RS232 port.
Try using a high quality USB to "RS232" converter with the Windows machine...
I would suggest changing the speed from 9600 to 1200 and observing whether reliability
improves after the change.
Also XON/XOFF can be disabled at the slower speed just in case handshaking is giving
grief.
- Use modem. Many older laptops have built-in modem. If you have spare external modem
you can connect both and connect them via a regular phone cable. This trick requires
understanding of modem commands ;-), If the buildings has "old" analog phone network or
you can switch PBX connections to analog mode you can also use this as extra remote connection.
No keyboard should be connected to Sun server/workstation on which you plan to use serial console. Sun machines on power-up check
the presence of the keyboard. If something is plugged in, they assume the console input device is the keyboard. If it doesn't see any
keyboard, it redirects console input/output to serial port "A".
Whether or not the Sun server has a videocard ("framebuffer" card) installed is irrelevant.
Modern Sun workstations have a framebuffer
built in. That's why the test is always done for the keyboard presence.
If you use USB to serial convertor you need to test it first with some workstation to
be sure that it works. Many of them don't. Problem can be Windows 7 driver (especially on
Windows 64) or the quality of cable. Often you can borrow such cable from network engineers, who use
then for connecting to CISCO routers. In this case you can consider the cable tested and it should
work for you as well. If you need to buy such a cable it is also prudent to buy the same as
network engineers use, even if it cost slightly more.
Do not connect a keyboard to the Sun machine if you want to use serial console
If you SHUT OFF YOUR TERMINAL, while it is connected to a running Sun machine, you send a "break" signal via the serial line and
the Sun will jump back into the OK prompt, halting the OS. This can cause considerable confusion.
Note: you can upgrade to free version 6.3 (non-commercial use)
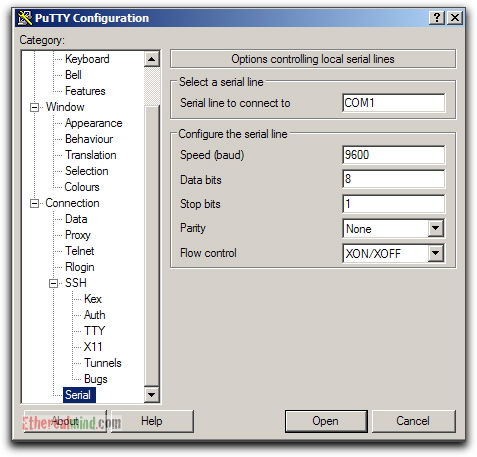
Try these COM1 port settings:
- Bits per second: 9600
- Data bits: 8
- Parity: None
- Stop bits: 1
- Flow Control: None
I'm going to use a Dell C600 laptop an an example. The laptop has a 9pin serial port at the back that corresponds to Serial port
1 (SER 1). In other cases you need first to verify that you're "speaking" to the correct port (you can do this using for example serial
mouse and disconnecting your current mouse).
Using windows terminal you can use VT-100 or better.
You can connect to Sun server that has no keyboard or display attached anytime. sometimes you need to press enter one of two times
to see the output. You can disconnect anytime by disconnecting cable (do not close you terminal).
Note: tip is available in SFU and Solaris as well as HP-UX and AIX. It uses
configuration file /etc/remote. Connect the appropriate serial cable from serial port on laptop (usually serial port 1) to serial port A
or SER MGT on target
Sun system.
Use "tip hardwire" (not "hardware") to open a connection to the headless box before booting it: From a
Solaris shell prompt on the local system, issue the command:
tip hardwire
OR
tip ser1
Notes
- This is "tip hardwire" (not "tip hardware").
- ser1 should be defined in /etc/remote
(see below)
hardwire is defined on Solaris in the /etc/remote
to use port B (for laptop you need to correct this or add another line, see below):
cuab:dv=/dev/cua/b:br#2400
dialup1|Dial-up system:\
:pn=2015551212:tc=UNIX-2400:
hardwire:\
:dv=/dev/term/b:br#9600:el=^C^S^Q^U^D:ie=%$:oe=^D:
tip300:tc=UNIX-300:
tip1200:tc=UNIX-1200:
tip0|tip2400:tc=UNIX-2400:
tip9600:tc=UNIX-9600:
tip19200:tc=UNIX-19200:
UNIX-300:\
If you need to connect from serial port A you need to modify this entry in /etc/remote
or better add another entry, for example ser1 :
ser1:\
:dv=/dev/term/a:br#9600:el=^C^S^Q^U^D:ie=%$:oe=^D:
After tip session established you can boot the server. This tip session should be kept
active as long as server remains online.
You should be connected. Press enter a few times to see if you are getting a response. If you are not, check your connections and make
sure you have the right cable.
From within tip, you can access a tip menu by pressing ~? after a carriage return. To quit the tip session, press ~. and to send
a break character, type ~#
|
To send a break character, type ~#
|
The hardwire parameter in the tip command refers to an entry in the file /etc/remote which describes the serial port connections.
By default, hardwire specifies port B with 9600 baud, 8 data bits, no stop bits, and 1 parity bit. Connect, via a null modem,
serial port "A" of the Sun to your terminal's serial port. Your terminal settings should be 9600 8N1, which are the default serial settings
of the Sun.
If you use tip, if possible, emulate a SUNTERM.
PuTTY is a free and open source gui X based terminal emulator client for the SSH, Telnet, rlogin,
and raw TCP computing protocols and as a serial console client. It works under Linux, Unix, Mac OS
X, MS-Windows and few other operating systems. You just need to set port parameters and you are in
business:
Using Teraterm is similar to using Putty. You just need to set correct parameters for serial port and you are in business
This can be recommended only to heavy screen users who already know GNU
screen very well.
The first parameter to the screen command defines which type of window is
created. If a tty name (e.g. "/dev/ttyS0") is specified as the first
parameter to the screen command, then the window is directly connected to
this device. An optional parameter is allowed consisting of a comma
separated list of flags in the notation as follows:
screen /dev/ttySX baud_rate,cs8|cs7,ixon|-ixon,ixoff|-ixoff,istrip|-istrip
Where,
- /dev/ttySX: Linux serial port (e.g., /dev/ttyS0
[COM1] )
- baud_rate: Usually 300, 1200, 9600 or 19200. This
affects transmission as well as receive speed.
- cs8 or cs7: Specify the
transmission of eight (or seven) bits per byte.
- ixon or -ixon: Enables (or
disables) software flow-control (CTRL-S/CTRL-Q) for sending data.
- ixoff or -ixoff: Enables (or
disables) software flow-control for receiving data.
- istrip or -istrip: Clear (or keep)
the eight bit in each received byte.
In this example, I'm connecting to my Soekris based embedded router using
/dev/ttyS0 with 19200 baud rate and cs8:
$ screen /dev/ttyS0 19200,cs8
Another common application for connecting to a serial console is UUCP. Most Linux and Unix
distributions include the UUCP application. Start UUCP with the command "cu -l [device] -s
[speed]", where [device] is the serial port you are using, such as ttyS0 (COM1) or
ttyS1 (COM2), and [speed] is the speed of the serial console that you are connecting to.
Here is an example:
# cu -l /dev/ttyS0 -s 9600
|
You may need to hit enter before you see the login prompt. If you see a bunch of weird
characters, then you probably specified the wrong speed.
To exit, just type "~.".
Now, depending upon the machine you have, and the revision of your PROM, you'll either be greeted by a ">" prompt or an "ok" prompt.
Machines that have everything configured properly and a working OS will of course, begin to boot by themselves rather than displaying
a prompt.
If you want to stop the boot from happening so you can wipe out the OS to install something else (or just perform maintenance) or
make changes to the NVRAM, then, before the OS starts to load from the HD, (essentially, right after it tells you the hardware Ethernet
address, but before it says "boot device"), you need to send a "break" signal.
- On a PC, this is done by holding down the CTRL key and tapping the "Break" key (Pause/Break on most PC keyboards).
-
tip sends break via
"~#"
Once you've sent a break, as above, you'll be greeted by "OK" prompt (FORTH interpreter prompt).
Hi all,
I have just replaced the HDD on a Ultra 5 Spark machine, now I need to reinstall Solaris 9.
The problem is: how do I get to the OK prompt without a Sun keyboard in order to boot from CD?
At moment when I power on the machine I get the following error:
Timeout Waiting for ARP/RARP Packet
Probably because it's trying to boof off the network.
What are you using to connect to the server?
If using a laptop on the serial connection of the server, Control Break should get you to the ok prompt - but only if break
is allowed.
Ctrl-Break in Serial Console
Author: KurtGuenther
Posts: 5 Registered: 8/1/05 |
|
Nov 30, 2005 8:54 AM |
|
I can't seem to get Ctrl-Break to work in a serial console. I'm using Linux minicom, and I've tried two different keyboards.
Any ideas? Is there a "~break" command?
Re: Ctrl-Break in Serial Console
Author: rajanikk Posts:
9 Registered: 12/23/05 |
|
Dec 23, 2005 10:08 AM (reply 2 of 3) |
|
try putty, using it u can send ctrl-break to serial console using mouse. no need for keyboard.
Using Serial Consoles - (Solaris / Linux) by Jeff Hunter, Sr. Database Administrator
The following article documents some of the tips for connecting the serial port of a UNIX Server (Sun SPARC / Linux) to the serial
port (console) of a Sun Server. This is often helpful and even necessary when performing routine administrative tasks or initiating
critical and/or long running processes. Access to the serial console for many Sun servers is the only way to perform administrative
tasks given these servers do not come with a frame buffer (i.e. video card).
There are times when I need to initiate a long running job but cannot remain connected to the network for the duration of its
execution. In cases like this, I can connect to the serial console of the Sun server, initiate the job and disconnect. The job will
remain running even when I drop my connection to the serial port. I can, at a later time, reconnect to the serial console to determine
the results.
The first two sections of this article explain the applications (programs) used from a Sun SPARC server and then a Linux server
for obtaining a serial console connection. The remainder of this article attempts to describe the details (cables, connections,
adapters) of obtaining a serial console connection to/from different Sun SPARC servers.
Connect From Sun SPARC Serial Port
From a Sun machine, if you wanted to access the serial console of another computer (ie. Linux, Sun, etc.), you would use the
tip command. The configuration file for tip is /etc/remote. In most cases, you
will be concerned with the hardwire entry in this file. First, connect the two machines by their serial
ports (null modem if required), and from the Sun SPARC (Solaris) machine, type the following at the command-line to connect to the
serial console of the other machine (Solaris / Linux):
# tip hardwire
Below is an example /etc/remote file from the Sun SPARC (Solaris) machine that contains the hardwire
entry to go through serial port B (/dev/term/b). If you wanted to change this entry to go out through serial port A instead,
change "/dev/term/b" to "/dev/term/a".
cuab:dv=/dev/cua/b:br#2400
dialup1|Dial-up system:\
        :pn=2015551212:tc=UNIX-2400:
hardwire:\
        :dv=/dev/term/b:br#9600:el=^C^S^Q^U^D:ie=%$:oe=^D:
tip300:tc=UNIX-300:
tip1200:tc=UNIX-1200:
tip0|tip2400:tc=UNIX-2400:
tip9600:tc=UNIX-9600:
tip19200:tc=UNIX-19200:
UNIX-300:\
        :el=^D^U^C^S^Q^O@:du:at=hayes:ie=#$%:oe=^D:br#300:tc=dialers:
UNIX-1200:\
        :el=^D^U^C^S^Q^O@:du:at=hayes:ie=#$%:oe=^D:br#1200:tc=dialers:
UNIX-2400:\
        :el=^D^U^C^S^Q^O@:du:at=hayes:ie=#$%:oe=^D:br#2400:tc=dialers:
UNIX-9600:\
        :el=^D^U^C^S^Q^O@:du:at=hayes:ie=#$%:oe=^D:br#9600:tc=dialers:
UNIX-19200:\
        :el=^D^U^C^S^Q^O@:du:at=hayes:ie=#$%:oe=^D:br#19200:tc=dialers:
VMS-300|TOPS20-300:\
        :el=^Z^U^C^S^Q^O:du:at=hayes:ie=$@:oe=^Z:br#300:tc=dialers:
VMS-1200|TOPS20-1200:\
        :el=^Z^U^C^S^Q^O:du:at=hayes:ie=$@:oe=^Z:br#1200:tc=dialers:
dialers:\
        :dv=/dev/cua/b:
--------------------------------------------------------------------
The attributes are:

dv      device to use for the tty
el      EOL marks (default is NULL)
du      make a call flag (dial up)
pn      phone numbers (@ =>'s search phones file; possibly taken from
                              PHONES environment variable)
at      ACU type
ie      input EOF marks (default is NULL)
oe      output EOF string (default is NULL)
cu      call unit (default is dv)
br      baud rate (defaults to 300)
fs      frame size (default is BUFSIZ) -- used in buffering writes
          on receive operations
tc      to continue a capability
Connect to a Sun Serial Console from Linux
Linux provides two methods (programs) that can be used to connect to a serial console of a Sun server.
Connecting Using minicom
The first application I'll talk about is "minicom". Most Linux distributions (i.e. Red Hat) already include minicom. If your
particular distribution does not include minicom, you can download it from the following URL:
http://www.pp.clinet.fi/~walker/mcdevel.html.
Once you have Minicom installed, start it up with the command "minicom". Press "Ctrl-A Z" to get to
the main menu. Press "o" to configure minicom. Go to "Serial port setup" and make sure that you are set to the correct "Serial
Device" and that the speed on line E matches the speed of the serial console you are connecting to. (In most cases with Sun,
this is 9600.) Here are the settings I made when using my Serial A / COM1 port on my Linux box:
+-----------------------------------------------------------------------+
| A -    Serial Device      : /dev/ttyS0                                |
| B - Lockfile Location     : /var/lock                                 |
| C -   Callin Program      :                                           |
| D -  Callout Program      :                                           |
| E -    Bps/Par/Bits       : 9600 8N1                                  |
| F - Hardware Flow Control : Yes                                       |
| G - Software Flow Control : No                                        |
|                                                                       |
|    Change which setting?                                              |
+-----------------------------------------------------------------------+
After making all necessary changes, hit the ESC key to go back to the "configurations" menu. Now go to "Modem and dialing".
Change the "Init string" to "~^M~". Save the settings (as dflt), and then restart Minicom. You should now see a login
prompt.
Connecting Using UUCP
Another common application to use in Linux for connecting to a serial console is UUCP. Most Linux distributions include the
UUCP application. Start UUCP with the command "cu -l [device] -s [speed]", where [device] is the serial port you
are using, such as ttyS0 (COM1) or ttyS1 (COM2), and [speed] is the speed of the serial console that you are
connecting to.
Here is an example:
# cu -l /dev/ttyS0 -s 9600
You may need to hit enter before you see the login prompt. If you see a bunch of weird characters, then you probably specified
the wrong speed.
To exit, just type "~.".
Sun Blade 100/150
- Connecting to a Blade 100/150
To obtain a serial console connection to a Sun Blade 100/150 you will need the following (These procedures will work to
an Ultra 5/10 as well):
- Connect the serial port of your local PC/workstation to the DB9 Serial port on the back of the Sun Blade (or Ultra 5/10)
using a serial cable (straight through).
- You will need to use a null modem adapter.
- Communication settings:
| Bits per second: |
9600 |
| Data bits: |
8 |
| Parity: |
None |
| Stop bits: |
1 |
| Flow Control: |
Hardware |
| NOTE: You will not be able to make use of the serial console if the Sun server
was booted with the keyboard/mouse plugged in. In order to make use of the serial console, you will need to disconnect
the keyboard/mouse and reboot the Sun server. On the Sun Blade 100/150, if the keyboard/mouse are plugged in during
the boot phase, all console output will be redirected to the VGA console. |
- Connecting from a Blade 100/150
To obtain a serial connection from a Sun Blade 100/150 to another server (possibly another Sun SPARC machine) you will need
the following (These procedures will work from an Ultra 5/10 as well):
- On the back of a Sun Blade 100/150 (or Ultra 5/10) there is only one serial port that is dedicated to serial A (/dev/ttya).
This serial port is typically being used by the console and will often require you to use Serial B (/dev/ttyb).
This is where it gets fun. There is a second serial port connector located on the motherboard (actually the PCI riser card)
labeled J13. The PCI riser card is a PWA-GROVER-PLUS_RISERCARD 411707500011 and requires a special cable. The special cable
connects to the PCI riser card (J13) on one end while the other end is a DB9 male port that will use one of your available
PCI dust cover slots. This is the only way I have found to make a connection from a Sun Blade (or Ultra 5/10); using serial
port B out which requires this special cable to be installed in order to have access to serial port B.
Click here or
here to see an exploded view of an
Ultra 10 Workstation - System Breakdown. The special cable I am refering to is Sun Manufacturing Part# 370-3165 - Serial
B and Parallel Cable Assembly - (Code 3a) in the Ultra 10 Workstation System Breakdown. I needed to order the Ultra
10 Cable Service Kit/FRU (370-3267) in order to obtain this cable. You can order this kit from
Ajava,
Partsolver,
Trident Computer Resources,
Inc., Asset Conversion Specialists, Inc.,
or Sun Microsystems.
- After installing the the Serial B and Parallel Cable Assembly in your Sun Blade, you will have access to serial
port B (/dev/ttyb). Connect the new DB9 serial port (serial B) from the Sun Blade to the back of the server (Sun,
Linux) you want to make a serial console connection to. In most cases, this will be using a straight through serial
cable.
- For most connections to a Sun SPARC, you will need to use a null modem adapter.
- From the Sun Blade (or Ultra 5/10) use the tip program to initiate the serial console connection
to the other server. Ensure that you edit the /etc/remote file from the Sun Blade you are connecting from
and change the hardwire entry to use serial B - /dev/term/b.
# tip hardwire
Sun E450
- Connecting to a Sun E450
To obtain a serial console connection to a Sun E450 you will need the following:
- Connect the serial port of your local PC/workstation to the DB25 Serial A/B port on the back of the Sun E450 using a
serial cable (straight through). There is only one serial port on the back of an E450 that contains both Serial A
and Serial B. When you plug directly into the serial port on the back of the E450, you are accessing Serial A.
- You will need to use a null modem adapter.
- Communication settings:
| Bits per second: |
9600 |
| Data bits: |
8 |
| Parity: |
None |
| Stop bits: |
1 |
| Flow Control: |
Hardware |
- Connecting from a Sun E450
To obtain a serial connection from a Sun E450 to another server (possibly another Sun SPARC machine) you will need the following:
- On the back of a Sun E450, there is only one DB25 (female) serial port (labeled Serial A/B) that is used to contain
wiring for both Serial A and Serial B. The system provides two serial communications ports through a single, shared DB25
connector located on the rear panel. If you are to plug a serial cable directly into the DB25 serial port on the back of
an E450, you will only be accessing the primary port (Serial A). This will not work to get a serial connection out from
since it is reserved for the console of the machine. You will need to obtain access to Serial B (which is contained within
the shared Serial A/B port) by using a special Y-Cable (serial splitter). In order to access the secondary port (Serial
B), a serial port splitter cable (Sun Part#: X985A or 530-1869) must be attached to the rear panel serial port A/B connector.
The serial splitter connects to the Serial A/B - DB25 (female) connection on the back of the E450 to give you two DB25 (female)
connections - one for Serial A and the other for Serial B. Here are several places where I found the serial splitter:
You will need to use Serial Port B to make a connection from the E450 to another server. Connect the Sun E450 from its
Serial B to the back of the other server (Sun, Linux) you want to make a serial console connection to. In most cases, this
will be using a straight through serial cable.
If you are connecting from the Sun E450 to another machine (i.e. Sun Blade, Sun Ultra, etc) that has a normal DB9 male
port, you can use a Belkin F2L088-06 DB9 Female/DB25 Male Modem Cable (often with a null modem adapter):
- For most connections to a Sun SPARC, you will need to use a null modem adapter.
- From the E450 use the tip program to initiate the serial console connection to the other server.
Ensure that you edit the /etc/remote file from the machine you are connecting from (the E450) and change
the hardwire entry to use serial B - /dev/term/b.
# tip hardwire
Sun E250
- Connecting to a Sun E250
To obtain a serial console connection to a Sun E250 you will need the following:
- Connect the serial port of your local PC/workstation to the DB25 Serial A port on the back of the Sun E250 using a serial
cable (straight through). There are two DB25 serial ports on the back of an E250. Make sure you connect to Serial
A.
- You will need to use a null modem adapter.
- Communication settings:
| Bits per second: |
9600 |
| Data bits: |
8 |
| Parity: |
None |
| Stop bits: |
1 |
| Flow Control: |
Hardware |
- Connecting from a Sun E250
To obtain a serial connection from a Sun E250 to another server (possibly another Sun SPARC machine) you will need the following:
- On the back of a Sun E250, there are two DB25 (female) Serial Ports for Serial A and Serial B. Serial A is used for
other machines to obtain a serial console connection into the E250. You will need to use Serial Port B to make a connection
from the E250 to another server. Connect the Sun E250 from its second serial port (serial B) to the back of the server (Sun,
Linux) you want to make a serial console connection to. In most cases, this will be using a straight through serial
cable.
If you are connecting from the Sun E250 to another machine (i.e. Sun Blade, Sun Ultra, etc) that has a normal DB9 male
port, you can use a Belkin F2L088-06 DB9 Female/DB25 Male Modem Cable (often with a null modem adapter):
- For most connections to a Sun SPARC, you will need to use a null modem adapter.
- From the E250 use the tip program to initiate the serial console connection to the other server.
Ensure that you edit the /etc/remote file from the machine you are connecting from (the E250) and change
the hardwire entry to use serial B - /dev/term/b.
# tip hardwire
Sun V100
- Connecting to a Sun V100
To obtain a serial console connection to a Sun V100 you will need the following:
- Connect the serial port of your local PC/workstation to the serial port (serial port B) on the back of the Sun V100.
The Sun V100 has two serial ports on the back of it. To make a serial connection to the Sun V100, you will be connecting
to Serial A (LOM A). This is the "Lights Out Management" port used for issuing LOM commands.
Depending on the type of device you use to connect to the Sun V100 server, you may need to use either a DB25 or DB9 serial
adapter (both included with the Sun V100).
- Connecting Sun SPARC to Sun V100
To connect to a Solaris tip session or to a VT100 terminal, you need to use either the DB25 (25-Pin
DSUB Male to 8-POS RJ-45 Female) adapter that is supplied by Sun (Sun Part# 530-2889) with the V100, or an alternative adapter
that performs the same pin crossovers. The Sun-supplied DB25 adapter (530-2889) enables you to connect to any Sun system.
Insert one end of the standard RJ-45 patch cable supplied with the Sun Fire V100 server into Serial A (LOM). Insert the
other end of the RJ-45 patch cable into the supplied DB25 adapter. Finally, attach the adapter to the appropriate port in
your serial device.
| Pin Crossovers in the Sun DB-25 (25-Pin) Adapter |
| Serial Port (RJ-45 Connector) Pin |
25-Pin Connecter |
| Pin 1 (RTS) |
Pin 5 (CTS) |
| Pin 2 (DTR) |
Pin 6 (DSR) |
| Pin 3 (TXD) |
Pin 3 (RXD) |
| Pin 4 (Signal Ground) |
Pin 7 (Signal Ground) |
| Pin 5 (Signal Ground) |
Pin 7 (Signal Ground) |
| Pin 6 (RXD) |
Pin 2 (TXD) |
| Pin 7 (DSR) |
Pin 20 (DTR) |
| Pin 8 (CTS) |
Pin 4 (RTS) |
- Connecting PC, Laptop or handheld computer to Sun V100
Some devices, such as a PC, laptop or handheld computer, require you to use either a male or female DB-9 adapter. The
Sun DB9 adaptor (Sun Part: 530-3100-xx) is a 9-Pin DSUB female to 8-POS RJ-45 female adapter included with the Sun V100.
The following table is the pin crossovers:
Insert one end of the standard RJ-45 patch cable supplied with the Sun Fire V100 server into Serial A (LOM). Insert the
other end of the RJ-45 patch cable into the supplied DB9 adapter. Finally, attach the adapter to the appropriate port in
your serial device.
| Pin Crossovers in the DB-9 (9-Pin) Adapter |
| Serial Port (RJ-45 Connector) Pin |
9-Pin Connector |
| Pin 1 (RTS) |
Pin 8 (CTS) |
| Pin 2 (DTR) |
Pin 6 (DSR) |
| Pin 3 (TXD) |
Pin 2 (RXD) |
| Pin 4 (Signal Ground) |
Pin 5 (Signal Ground) |
| Pin 5 (Signal Ground) |
Pin 5 (Signal Ground) |
| Pin 6 (RXD) |
Pin 3 (TXD) |
| Pin 7 (DSR) |
Pin 4 (DTR) |
| Pin 8 (CTS) |
Pin 7 (RTS) |
- You will NOT need to use a null modem adapter for either the DB25 or DB9 connections.
- Communication settings for both DB25 and DB9 connections:
| Bits per second: |
9600 |
| Data bits: |
8 |
| Parity: |
None |
| Stop bits: |
1 |
| Flow Control: |
Hardware |
- Connecting from a Sun V100
To obtain a serial connection from a Sun V100 to another server (possibly another Sun SPARC machine) you will need the following:
Softpanorama Recommended
SunHELP UNIX Serial Port Resources
Using Serial Consoles
- (Solaris - Linux)
- To obtain a serial console connection to a Sun Blade 100/150 you will need the following (These procedures will work
to an Ultra 5/10 as well):
| NOTE: You will not be able to
make use of the serial console if the Sun server was booted with the keyboard/mouse plugged in. In order to make use
of the serial console, you will need to disconnect the keyboard/mouse and reboot the Sun server. On the Sun Blade 100/150,
if the keyboard/mouse are plugged in during the boot phase, all console output will be redirected to the VGA console.
|
Disabling BREAK on Sun console
serial ports
Gentoo Linux Documentation -- Gentoo Linux-SPARC Frequently
Asked Questions
Sun Serial Port & Cable Pinouts
Complete pinouts guide to Parallel, Serial,
Network and Monitor Cables for the IBM PC
Ultraspec Workstation Cables
Null modem - Wikipedia, the free encyclopedia
Amazon.com
Tripp Lite Null Modem Cable Db9f-db9m Gold Connections (6 FT) Electronics
SunHELP Serial
Port & Cable Pinouts
RJ45 - DB25 RS232 serial converter cable, RJ45 - DB9 serial cable: Below are pinouts for an RJ45 - DB25
RS232 serial converter cable, part number 530-2889-01 and a RJ45 - DB9 serial cable, part number 530-3100-01.
(There is also an unknown part number which has the same pinout except that the RJ45 BODY (black) is wired to RS232 pin
1 GND.)
Note that these are wired DCE. If you use the supplied RJ45 to DB25 RS232 adapter, you get a null-modem cable, suitable
for a terminal connection.
Machine            Sun serial DB25              Machine            DB9 adapter
RJ45               RS-232 adapter               RJ45               RS-232 Pin
Pin                part # 530-2889-01           Pin                part # 530-3100-xx
1 (RTS) blue   - 5  (CTS)                     1 (RTS) blue   - 8 (CTS)
2 (DTR) orange - 6  (DSR)                     2 (DTR) orange - 6 (DSR)
3 (TXD) black  - 3  (RXD)                     3 (TXD) black  - 2 (RXD)
4 (GND) red    - 7  (GND)                     4 (GND) red    - 5 (GND)
5 (GND) green  - 7  (GND)                     5 (GND) green  - 5 (GND)
6 (RXD) yellow - 2  (TXD)                     6 (RXD) yellow - 3 (TXD)
7 (DSR) brown  - 20 (DTR)                     7 (DSR) brown  - 4 (DTR)
8 (CTS) gray   - 4  (RTS)                     8 (CTS) gray   - 7 (RTS)
How To: Build a Null-Modem Serial Cable
Connect Pin to Pin on each end.
25-pin 25-pin 2 --------------- 3 3 --------------- 2 4 --------------- 5 5 --------------- 4 7 --------------- 7 6 ---+ +----------- 20 8 ---+ +--- 6 20 ----------+ +--- 8
This is the traditional "full handshaking" null modem cable. Adapters wired like this are available in most of the computer stores
I've been in.
Now, if you want to convert straight to a 9pin connector Greg LeBlanc offers the following insight: "You need to have full duplex,
otherwise, you just get output, but no return. (or, if you reverse the cable, you see nothing and can't tell that your keystrokes
are going through.) simply checking three pins with a multimeter isn't cutting it. you need the following connections to have a
fully compliant cable...
25 pin 9 pin pin 1 GND - pin 1 GND pin 2 TXD - pin 3 RXD pin 3 RXD - pin 3 TXD pin 4 RTS - pin 8 CTS pin 5 CTS - pin 7 RTS pin 7 gnd - pin 5 gnd pin 6 DSR - pin 4 DTR pin 20 DTR - pin 6 DSR
Note that GND is frame ground and 'gnd' is Signal ground and the two should not be tied together...
Some Null modem cables tie 6/20 together on the 25 pin side, this doesn't always work with all equipment.
I included the 9-25 pin arrangement because most PCs use 9 pin mouse ports as the serial port, and most Sun's use real 25 pin
serial connections
Null Modem
Null Modem Cable Wiring Diagram
RS232 serial null modem cable wiring and tutorial
Society
Groupthink :
Two Party System
as Polyarchy :
Corruption of Regulators :
Bureaucracies :
Understanding Micromanagers
and Control Freaks : Toxic Managers :
Harvard Mafia :
Diplomatic Communication
: Surviving a Bad Performance
Review : Insufficient Retirement Funds as
Immanent Problem of Neoliberal Regime : PseudoScience :
Who Rules America :
Neoliberalism
: The Iron
Law of Oligarchy :
Libertarian Philosophy
Quotes
War and Peace
: Skeptical
Finance : John
Kenneth Galbraith :Talleyrand :
Oscar Wilde :
Otto Von Bismarck :
Keynes :
George Carlin :
Skeptics :
Propaganda : SE
quotes : Language Design and Programming Quotes :
Random IT-related quotes :
Somerset Maugham :
Marcus Aurelius :
Kurt Vonnegut :
Eric Hoffer :
Winston Churchill :
Napoleon Bonaparte :
Ambrose Bierce :
Bernard Shaw :
Mark Twain Quotes
Bulletin:
Vol 25, No.12 (December, 2013) Rational Fools vs. Efficient Crooks The efficient
markets hypothesis :
Political Skeptic Bulletin, 2013 :
Unemployment Bulletin, 2010 :
Vol 23, No.10
(October, 2011) An observation about corporate security departments :
Slightly Skeptical Euromaydan Chronicles, June 2014 :
Greenspan legacy bulletin, 2008 :
Vol 25, No.10 (October, 2013) Cryptolocker Trojan
(Win32/Crilock.A) :
Vol 25, No.08 (August, 2013) Cloud providers
as intelligence collection hubs :
Financial Humor Bulletin, 2010 :
Inequality Bulletin, 2009 :
Financial Humor Bulletin, 2008 :
Copyleft Problems
Bulletin, 2004 :
Financial Humor Bulletin, 2011 :
Energy Bulletin, 2010 :
Malware Protection Bulletin, 2010 : Vol 26,
No.1 (January, 2013) Object-Oriented Cult :
Political Skeptic Bulletin, 2011 :
Vol 23, No.11 (November, 2011) Softpanorama classification
of sysadmin horror stories : Vol 25, No.05
(May, 2013) Corporate bullshit as a communication method :
Vol 25, No.06 (June, 2013) A Note on the Relationship of Brooks Law and Conway Law
History:
Fifty glorious years (1950-2000):
the triumph of the US computer engineering :
Donald Knuth : TAoCP
and its Influence of Computer Science : Richard Stallman
: Linus Torvalds :
Larry Wall :
John K. Ousterhout :
CTSS : Multix OS Unix
History : Unix shell history :
VI editor :
History of pipes concept :
Solaris : MS DOS
: Programming Languages History :
PL/1 : Simula 67 :
C :
History of GCC development :
Scripting Languages :
Perl history :
OS History : Mail :
DNS : SSH
: CPU Instruction Sets :
SPARC systems 1987-2006 :
Norton Commander :
Norton Utilities :
Norton Ghost :
Frontpage history :
Malware Defense History :
GNU Screen :
OSS early history
Classic books:
The Peter
Principle : Parkinson
Law : 1984 :
The Mythical Man-Month :
How to Solve It by George Polya :
The Art of Computer Programming :
The Elements of Programming Style :
The Unix Hater’s Handbook :
The Jargon file :
The True Believer :
Programming Pearls :
The Good Soldier Svejk :
The Power Elite
Most popular humor pages:
Manifest of the Softpanorama IT Slacker Society :
Ten Commandments
of the IT Slackers Society : Computer Humor Collection
: BSD Logo Story :
The Cuckoo's Egg :
IT Slang : C++ Humor
: ARE YOU A BBS ADDICT? :
The Perl Purity Test :
Object oriented programmers of all nations
: Financial Humor :
Financial Humor Bulletin,
2008 : Financial
Humor Bulletin, 2010 : The Most Comprehensive Collection of Editor-related
Humor : Programming Language Humor :
Goldman Sachs related humor :
Greenspan humor : C Humor :
Scripting Humor :
Real Programmers Humor :
Web Humor : GPL-related Humor
: OFM Humor :
Politically Incorrect Humor :
IDS Humor :
"Linux Sucks" Humor : Russian
Musical Humor : Best Russian Programmer
Humor : Microsoft plans to buy Catholic Church
: Richard Stallman Related Humor :
Admin Humor : Perl-related
Humor : Linus Torvalds Related
humor : PseudoScience Related Humor :
Networking Humor :
Shell Humor :
Financial Humor Bulletin,
2011 : Financial
Humor Bulletin, 2012 :
Financial Humor Bulletin,
2013 : Java Humor : Software
Engineering Humor : Sun Solaris Related Humor :
Education Humor : IBM
Humor : Assembler-related Humor :
VIM Humor : Computer
Viruses Humor : Bright tomorrow is rescheduled
to a day after tomorrow : Classic Computer
Humor
The Last but not Least Technology is dominated by
two types of people: those who understand what they do not manage and those who manage what they do not understand ~Archibald Putt.
Ph.D
Copyright © 1996-2021 by Softpanorama Society. www.softpanorama.org
was initially created as a service to the (now defunct) UN Sustainable Development Networking Programme (SDNP)
without any remuneration. This document is an industrial compilation designed and created exclusively
for educational use and is distributed under the Softpanorama Content License.
Original materials copyright belong
to respective owners. Quotes are made for educational purposes only
in compliance with the fair use doctrine.
FAIR USE NOTICE This site contains
copyrighted material the use of which has not always been specifically
authorized by the copyright owner. We are making such material available
to advance understanding of computer science, IT technology, economic, scientific, and social
issues. We believe this constitutes a 'fair use' of any such
copyrighted material as provided by section 107 of the US Copyright Law according to which
such material can be distributed without profit exclusively for research and educational purposes.
This is a Spartan WHYFF (We Help You For Free)
site written by people for whom English is not a native language. Grammar and spelling errors should
be expected. The site contain some broken links as it develops like a living tree...
Disclaimer:
The statements, views and opinions presented on this web page are those of the author (or
referenced source) and are
not endorsed by, nor do they necessarily reflect, the opinions of the Softpanorama society. We do not warrant the correctness
of the information provided or its fitness for any purpose. The site uses AdSense so you need to be aware of Google privacy policy. You you do not want to be
tracked by Google please disable Javascript for this site. This site is perfectly usable without
Javascript.
Last modified: July 28, 2019