The key problem with Unix security is not that root is all-powerful, but that
regular accounts are not powerful enough to be useful
for many common tasks. One way to solve this Unix problem was
sudo, the utility that can grant to non-root account root access on "per-command"
basis. Essentially sudo is a rudimentarily implementation of RBAC (see, for
example Solaris RBAC)
in a completely portable Unix-flavor independent way. All problem related
to proper structuring of roles are present in sudo, as soon as it is used for anything
else then access of root account by non-root but privileged (typically members of
Wheel Group) users.
Sudo (superuser do) is an extension of the classic Unix command su
(introduced in BSD). It allows a system administrator to work using his own account
and switch to root or other user identity available on the system only for commands
that need it. In most cases it is used to as "one command switch to root". It also
protect system administrators from horrible mistakes that can happen when you work
as root all the time. In case you are tired you can do a lot of damage with just
one "subconscious" mistake. For example, if you accidentally type rm /etc*
instead of rm etc*. See Admin
Horror Stories for a overview of typical "horrors" of this time. In other words
working in your own account all the time and using sudo prefix when you need to
execute commands as root is much safer way of working for sysadmins. Here the value
of sudo is undisputable.
In addition sudo provides logging of commands which you submitted. That also
has value when, say, two people administer the same server. Otherwise to understand
what was done by your partner is not easy, as sysadmin typically are in a hurry
and seldom completely document their actions. Sometimes people lie and try to hide
their mistakes. Here you have some chances to recreate the set of actions of your
partner.
Sudo is useful on all version and flavors of Unix, with possible exception of
Solaris 10 were native OS mechanisms (RBAC)
are superior. For a brief history of Sudo see history section
Sudo is integrated in OpenBSD and Ubuntu and pre-installed on enterprise linux
distributions (RHEL and Suse). It is not installed on AIX and HP-UX but it is available
in "vendor-precompiled", "vendor-unsupported" form. See
The great advantage of sudo is that it can (and should) be deployed on all Unix
systems under administration (it's pretty simple to deploy if via SSH). This
universal availability is a huge advantage over other similar packages.
Suse has a turbulent history with many vulnerabilities fixed at different periods
of time. While sudo provide an elegant way to provide to users temporary root capabilities
without communicating to the user root password, there is no easy way to prevent
a user from gaining a root shell if that user is allowed to run commands with shell
escape via sudo. Many programs (such as editors) allow the user to run commands
via shell escapes, thus avoiding sudo's checks. Some Unix utilities such
as find and xarg, allow execution or arbitrary commands.
However, on most systems it is possible to prevent shell escapes with sudo's
noexec functionality.
The current version as of April 2013 is 1.8.6p8,
but most linux distros provide only much older (but adequate) version 1.7.6p2
(called
Maintenance release on sudo site). It's now pretty complex product which
is the major deficiency. Security vulnerabilities are periodically discovered and
for open source program of such complexity its presence in the system is essentially
a free backdoor to root as it is reasonable to assume that for any version there
is at lease one unknown zero-day exploit. There is a great need for simpler
and more secure "sudo-light"...
In some organizations and flavors on Linux (such as Ubuntu) root account has
password disabled and the only way to access root is via sudo. This concept
is called Rootsudo
in Ubuntu
The most difficult part of sudo is the /etc/sudoers syntax. The most important
linesin it are so access right specifications. The special command '"sudoedit"' allows users to run sudo with the -e
flag to edit this file.
The basic syntax of access rights specification is as following (in each list multiple entries
should be separated by comma):
USER_LIST can be any : existing user(s) , user ID, User_Alias, unix group, etc, or
ALL
HOST_LIST can be any combinations of : hostname, domain_name, IP addresses,
wildcards, or ALL
(AS_USER) can be any : existing user(s) , user ID, Runas_Alias, or ALL. This
optional clause controls the target user (and group) sudo will run the Command as. In other
words, which combinations of the -u and -g arguments it will accept. If the clause is
omitted, the user will be permitted to run commands only as root. If you specify a username,
e.g., (postgres), sudo will accept “-u postgres” and run commands as that user. In both cases,
sudo will not accept -g. If you also specify a target group, e.g., (postgres:postgres),
sudo will accept any combination of the listed users and groups (see the section on aliases
below). If you specify only a target group, e.g., (:postgres), sudo will accept and act on “-g
postgres” but run commands only as the invoking user.
This is why you sometimes see (ALL:ALL) in the 90% example.
COMMAND_LIST can be any : existing command(s), COMMAND_ALIASES, or ALL. Multiple
command are separated by comma.
[NOPASSWD:] is one of the tags (there are other, but ther are rarely used (still
more correct would be to define this field ad TAG_LIST). is use to specify that the
following commands can be run WITHOUT being prompted for a password ! (quite dangerous : use at
your own risk). You can use PASSWD and NOPASSWD to specify whether the user has to enter a
password or not and you can also use NOEXEC to prevent any programs launching shells themselves
(as once a program is running with sudo it has full root privileges so could launch a root shell
to circumvent any restrictions in the sudoers file.
But the devil is in details. Here are some simple examples (using the aliases (in capital
letters, such as WEBMASTERS, ADMINS, which are expalined abd defined below):
 # This lets the webmasters run all the web commands on the machine
 # "webserver" provided they give a password
 WEBMASTERS webserver= WEB_CMDS
Here we have
WEBMASTER -- this a single entry in USER_LIST field. In this case this is a so called
alias.
webserver -- this is hostname of particular server.
(AS_USER) field is abesen (itr is optional). Root is assume in such a case.
WEB_CMDS -- is an alas that corresponds to COMMAND_LIST. It defines the set of command
that the user can execute as root.
Some more examples in the same style:
 # users are allowed to assume identity of root on workstation
 USERS WORKSTATIONS=(root) ADMIN_CMDS
This example has field
(AS_USER) That means that all users defined in the alias USERS can assume identity of
or root
 # This lets "harry" shutdown his own machine without a password
 harry harrys-machine= NOPASSWD: SHUTDOWN_CMDS
 # And this lets everybody print without requiring a password
 ALL ALL=(ALL) NOPASSWD: PRINTING_CMDS
The user name can also be substituted with a group name - in this case you should start the
group name with a % sign. For example:
In addition you can also specify a precise command and not only the tool itself.
oracle localhost = /usr/bin/crontab -u oracle
This is useful to restrict the use of a certain tool to a specified set of command options. The
sudo allows shell-style wildcards (AKA meta or glob characters)
to be used in pathnames as well as command line arguments in the sudoers file.
Note that these are not regular expressions.
The password that sudo requires is the user's own password. This is to make
sure that no terminal that you accidentally left open to others is abused for
malicious purposes.
You should know that sudo does not alter the ${PATH} variable: any command
you place after sudo is executed using your current environment.
In larger environments having to enter all users over and over again (or
hosts, or commands) can be a time consuming and error prone task. To ease the administration of
/etc/sudoers
you typically define a set of aliases. By convention, aliases are defined as names
in all capital letters.
Each alias definition is of the form:
Alias_Type NAME = item1, item2, ...
The format to declare aliases is quite simple and can deducted from the following examples:
One alias that always works, for any position, is the ALL alias (again, to make a good
distinction between aliases and non-aliases it is highly recommended to use
capital letters for aliases). the ALL alias is an alias to all possible settings similar to
wildcard * in shell.
Here is an example that uses ALL alias to allow any user to execute the shutdown command
if he is logged on locally is:
ALL localhost = /sbin/shutdown
Another example is to allow the user defined by an alias RESERACHERS to execute the yum command
as root, regardless of where they are logged in:
RESEARCHERS ALL = /sbin/yum
More interesting is to define a set of users who can run software administrative
applications (such as emerge and ebuild) on the system and a group of administrators
who can change the password of any user, except root!
User aliases are used to specify groups of users. You can specify usernames,
system groups (prefixed by a %) and netgroups (prefixed by a +) as follows:
 # Everybody in the system group "admin" is covered by the alias ADMINS
 User_Alias ADMINS = %admin
 # The users "tom", "dick", and "harry" are covered by the USERS alias
 User_Alias USERS = tom, dick, harry
 # The users "tom" and "mary" are in the WEBMASTERS alias
 User_Alias WEBMASTERS = tom, mary
 # You can also use ! to exclude users from an alias
 # This matches anybody in the USERS alias who isn't in WEBMASTERS or ADMINS aliases
 User_Alias LIMITED_USERS = USERS, !WEBMASTERS, !ADMINS
Runas Aliases are almost the same as user aliases but you are allowed to specify
users by uid's. This is helpful as usernames and groups are matched as strings so two users with the
same uid but different usernames will not be matched by entering a single username but can be
matched with a uid. For example:
 # UID 0 is normally used for root
 # Note the hash (#) on the following line indicates a uid, not a comment.
 Runas_Alias ROOT = #0
 # This is for all the admin users similar to the User_Alias of ADMINS set earlier
 # with the addition of "root"
 Runas_Alias ADMINS = %admin, root
A host alias is a list of hostname, ip addresses, networks and netgroups
(prefixed with a +). If you do not specify a netmask with a network the netmask of the hosts
ethernet interface(s) will be used when matching.
 # This is all the servers
 Host_Alias SERVERS = 192.168.0.1, 192.168.0.2, server1
 # This is the whole network
 Host_Alias NETWORK = 192.168.0.0/255.255.255.0
 # And this is every machine in the network that is not a server
 Host_Alias WORKSTATIONS = NETWORK, !SERVER
 # This could have been done in one step with
 # Host_Alias WORKSTATIONS = 192.168.0.0/255.255.255.0, !SERVERS
 # but I think this method is clearer.
Command Aliases
Command aliases are lists of commands and directories. You can use this to
specify a group of commands. If you specify a directory it will include any file within that
directory but not in any subdirectories.
If you include command line arguments in a command in an alias these must exactly
match what the user enters on the command line. If you include any of the following symbols they will need to be escaped with a backslash (\): ",", "\", ":", "=".
It is also possible to have a user run an application as a different, non-root
user. This can be very interesting if you run applications as a different user
(for instance apache for the web server) and want to allow certain users to
perform administrative steps as that user (like killing zombie processes).
Inside /etc/sudoers you list the user(s) in between ( and ) before the command
listing:
users hosts = (run-as) commands
For instance, to allow users defined as WEBMASTERS to run the kill tool as the apache or gorg user:
With this set, the user can run sudo -u to select the user he wants to run
the application as:
$ sudo -u apache pkill apache
You can set an alias for the user to run an application as using the Runas_Alias
directive. Its use is identical to the other _Alias directives we have seen
before.
By default, sudo asks the user to identify himself using his own password.
Once a password is entered, sudo remembers it for 5 minutes, allowing the user
to focus on his tasks and not repeatedly re-entering his password.
Of course, this behavior can be changed: you can set the Defaults: directive
in /etc/sudoers to change the default behavior for a user.
For instance, to change the default 5 minutes to 0 (never remember):
Defaults:swift timestamp_timeout=0
A setting of -1 would remember the password indefinitely (until the system
reboots).
A different setting would be to require the password of the user that the
command should be run as and not the users' personal password. This is accomplished
using runaspw. In the following example we also set the number of retries (how
many times the user can re-enter a password before sudo fails) to 2 instead
of the default 3:
Defaults:john runaspw, passwd_tries=2
Another interesting feature is to keep the DISPLAY variable set so that you
can execute graphical tools:
Defaults:john env_keep=DISPLAY
You can change dozens of default settings using the Defaults: directive.
Fire up the sudo manual page and search for Defaults.
If you however want to allow a user to run a certain set of commands without
providing any password whatsoever, you need to start the commands with NOPASSWD:,
like so:
If you have an entry in your sudoers file that contains something
like this:
admin ALL=(ALL) ALL
then sudo will require you to enter a password when running a command with sudo.
This is the user password (and not the root password), in
this case the password of the user “admin”.
targetpw
If for some reason you want to change this behavior, then you can use the sudo
global flag targetpw. This is by default OFF, and
if you set it like show bellow then the password you will be asked while running sudo
will be the password of the target user (in our case the root
password).
Defaults targetpw
Personally, I don’t see the use of this parameter and never used it myself… But
maybe someone else will find it useful.
NOPASSWD
If you don’t want to be prompted for any password while running sudo then we can
use the NOPASSWD parameter on a particular entry:
admin ALL = NOPASSWD: ALL
this parameter is the opposite of the default PASSWD and will
no longer require any password for the user “admin” while running sudo. This can
be of useful while running scripts that will launch sudo (in this case I would
recommend to enable NOPASSWD only for the needed commands), or just if you don’t
want to keep typing the password. Obviously with this commodity, you will reduce the
security of sudo: if someone hacks the “admin” account then this can be easily used
to gain root privileges.
authenticate
Another sudo option that can be used to control the prompt for a password is the
global flag: authenticate. This is by default ON
and this means that it will ask the user to authenticate with a password. This can be
overwritten as seen above with the NOPASSWD on a particular entry.
If we want to disable it globally, this can be done with:
Defaults !authenticate
Once set, this will disable authentication for all users that use the
defaults like our “admin” sample from above. It can be overwritten on particular
definition by setting the PASSWD parameter:
admin ALL=(ALL) PASSWD: ALL
Note: this post doesn’t recommend you to disable the passwords
usage in sudo (this is not a good idea, by the way), but just to show you what
options are available and how you can use them. Knowing the security implications of
disabling password usage in sudo, use them wisely based on your particular needs.
There are times where you need to have both NOPASSWD and NOEXEC
or other tags on the same configuration line. The man page for sudoers is less than
clear, so here is an example of how this is done:
%staff ALL = (root) NOPASSWD:NOEXEC: /usr/bin/vim
This example lets the user "myuser" run as root the "vim" binary without a password,
and without letting vim shell out (the :shell command).
A Runas_Spec determines the user and/or the group that a command may
be run as. A fully-specified Runas_Spec consists of two Runas_Lists
(as defined above) separated by a colon (‘:’) and enclosed in a set
of parentheses. The first Runas_List indicates which users the command
may be run as via sudo's ‑u option. The second defines a list of groups
that can be specified via sudo's ‑g option. If both Runas_Lists
are specified, the command may be run with any combination of users and groups listed
in their respective Runas_Lists. If only the first is specified, the
command may be run as any user in the list but no ‑g option may be specified.
If the first Runas_List is empty but the second is specified, the command
may be run as the invoking user with the group set to any listed in the Runas_List.
If both Runas_Lists are empty, the command may only be run as the invoking
user. If no Runas_Spec is specified the command may be run as root
and no group may be specified.
A Runas_Spec sets the default for the commands that follow it. What
this means is that for the entry:
Note that while the group portion of the Runas_Spec permits the
user to run as command with that group, it does not force the user to do so. If
no group is specified on the command line, the command will run with the group listed
in the target user's password database entry. The following would all be permitted
by the sudoers entry above:
Note that in this example only the group will be set, the command still runs
as user tcm. E.g.
$ sudo -g dialer /usr/bin/cu
Multiple users and groups may be present in a Runas_Spec, in which
case the user may select any combination of users and groups via the ‑u and
‑g options. In this example:
alan ALL = (root, bin : operator, system) ALL
user alan may run any command as either user root or bin, optionally setting
the group to operator or system.
To inform yourself what your capabilities are, run sudo -l:
$ sudo -l
If you have any command in /etc/sudoers that does not require you to enter a
password, it will not require a password to list the entries either. Otherwise you might be
asked for your password if it isn't remembered.
By default, if a user has entered his password to authenticate himself to sudo, it is
remembered for 5 minutes. If the user wants to prolong this period, he can run sudo -v to reset
the time stamp so that it will take another 5 minutes before sudo asks for the password again.
$ sudo -v
The inverse is to kill the time stamp using sudo -k.
sudo !!will repeat the last command entered, except with
sudo prepended to it.
Special group (for example tempadm) can be used for temporary granting a specific user access to root:
you enroll him to the tempadm group and submit at command that deletes him from this
group at the end of the specified period. This way you do not need to communicate
the password to the user at all and thus do not need change it back after the period
for which the user was granted temp root access expire...
Linux users should immediately patch a serious vulnerability to the sudo
command that, if exploited, can allow unprivileged users gain root privileges on the host
machine.
Called Baron Samedit, the flaw has been "hiding in plain sight" for about 10 years, and was
discovered earlier this month by researchers at Qualys and reported to sudo developers, who
came up with patches Jan. 19, according to
a Qualys blog . (The blog includes a video of the flaw being exploited.)
A new version of sudo -- sudo v1.9.5p2 -- has been created to patch the
problem, and notifications have been posted for many Linux distros including Debian, Fedora,
Gentoo, Ubuntu, and SUSE, according to Qualys.
According to the common vulnerabilities and exposures (CVE) description of Baron Samedit (
CVE-2021-3156 ), the flaw can
be exploited "via 'sudoedit -s' and a command-line argument that ends with a single backslash
character."
According to Qualys, the flaw was introduced in July 2011 and affects legacy versions from
1.8.2 to 1.8.31p2 as well as default configurations of versions from 1.9.0 to 1.9.5p1.
In part one, How to setup Linux chroot jails,
I covered the chroot command and you learned to use the chroot wrapper in sshd to isolate the sftpusers
group. When you edit sshd_config to invoke the chroot wrapper and give it matching characteristics, sshd
executes certain commands within the chroot jail or wrapper. You saw how this technique could potentially be useful to implement
contained, rather than secure, access for remote users.
Expanded example
I'll start by expanding on what I did before, partly as a review. Start by setting up a custom directory for remote users. I'll
use the sftpusers group again.
Start by creating the custom directory that you want to use, and setting the ownership:
This time, make root the owner, rather than the sftpusers group. This way, when you add users, they don't start out
with permission to see the whole directory.
Next, create the user you want to restrict (you need to do this for each user in this case), add the new user to the sftpusers
group, and deny a login shell because these are sftp users:
Match Group sftpusers
ChrootDirectory /sftpusers/chroot/
ForceCommand internal-sftp
X11Forwarding no
AllowTCPForwarding no
Note that you're back to specifying a directory, but this time, you have already set the ownership to prevent sanjay
from seeing anyone else's stuff. That trailing / is also important.
Then, restart sshd and test:
[skipworthy@milo ~]$ sftp sanjay@showme
sanjay@showme's password:
Connected to sanjay@showme.
sftp> ls
sanjay
sftp> pwd
Remote working directory: /
sftp> cd ..
sftp> ls
sanjay
sftp> touch test
Invalid command.
So. Sanjay can only see his own folder and needs to cd into it to do anything useful.
Isolating a service or specific user
Now, what if you want to provide a usable shell environment for a remote user, or create a chroot jail environment for a specific
service? To do this, create the jailed directory and the root filesystem, and then create links to the tools and libraries that you
need. Doing all of this is a bit involved, but Red Hat provides a script and basic instructions that make the process easier.
Note: I've tested the following in Red Hat Enterprise Linux 7 and 8, though my understanding is that this capability was available
in Red Hat Enterprise Linux 6. I have no reason to think that this script would not work in Fedora, CentOS or any other Red Hat distro,
but your mileage (as always) may vary.
First, make your chroot directory:
# mkdir /chroot
Then run the script from yum that installs the necessary bits:
# yum --releasever=/ --installroot=/chroot install iputils vim python
The --releasever=/ flag passes the current local release info to initialize a repo in the new --installroot
, defines where the new install location is. In theory, you could make a chroot jail that was based on any version of the
yum or dnf repos (the script will, however, still start with the current system repos).
With this tool, you install basic networking utilities like the VIM editor and Python. You could add other things initially if
you want to, including whatever service you want to run inside this jail. This is also one of the cool things about yum
and dependencies. As part of the dependency resolution, yum makes the necessary additions to the filesystem tree
along with the libraries. It does, however, leave out a couple of things that you need to add next. I'll will get to that in a moment.
By now, the packages and the dependencies have been installed, and a new GPG key was created for this new repository in relation
to this new root filesystem. Next, mount your ephemeral filesystems:
# mount -t proc proc /chroot/proc/
# mount -t sysfs sys /chroot/sys/
And set up your dev bindings:
# mount -o bind /dev/pts /chroot/dev/pts
# mount -o bind /dev/pts /chroot/dev/pts
Note that these mounts will not survive a reboot this way, but this setup will let you test and play with a chroot jail
environment.
Now, test to check that everything is working as you expect:
# chroot /chroot
bash-4.2# ls
bin dev home lib64 mnt proc run srv tmp var boot etc lib media opt root sbin sys usr
You can see that the filesystem and libraries were successfully added:
bash-4.2# pwd
/
bash-4.2# cd ..
From here, you see the correct root and can't navigate up:
bash-4.2# exit
exit
#
Now you've exited the chroot wrapper, which is expected because you entered it from a local login shell as root. Normally, a remote
user should not be able to do this, as you saw in the sftp example:
Note that these directories were all created by root, so that's who owns them. Now, add this chroot to the sshd_config
, because this time you will match just this user:
Match User leo
ChrootDirectory /chroot
Then, restart sshd .
You also need to copy the /etc/passwd and /etc/group files from the host system to the /chroot
directory:
Note: If you skip the step above, you can log in, but the result will be unreliable and you'll be prone to errors related to conflicting
logins
Now for the test:
[skipworthy@milo ~]$ ssh leo@showme
leo@showme's password:
Last login: Thu Jan 30 19:35:36 2020 from 192.168.0.20
-bash-4.2$ ls
-bash-4.2$ pwd
/home/leo
It looks good. Now, can you find something useful to do? Let's have some fun:
You could drop the releasever=/ , but I like to leave that in because it leaves fewer chances for unexpected
results.
[root@showme1 ~]# chroot /chroot
bash-4.2# ls /etc/httpd
conf conf.d conf.modules.d logs modules run
bash-4.2# python
Python 2.7.5 (default, Aug 7 2019, 00:51:29)
So, httpd is there if you want it, but just to demonstrate you can use a quick one-liner from Python, which you also
installed:
bash-4.2# python -m SimpleHTTPServer 8000
Serving HTTP on 0.0.0.0 port 8000 ...
And now you have a simple webserver running in a chroot jail. In theory, you can run any number of services from inside the chroot
jail and keep them 'contained' and away from other services, allowing you to expose only a part of a larger resource environment
without compromising your user's experience.
New to Linux containers? Download the
Containers Primer and
learn the basics.
A few months ago, I read a very interesting article that contained some good information
about a Linux feature that I wanted to learn more about. I won't tell you the name of the
article, what it was about, or even the web site on which I read it, but the article just made
me shudder.
The reason I found this article so cringe-worthy is that it prefaced every command with the
sudo command. The issue I have with this is that the article is allegedly for
sysadmins, and real sysadmins don't use sudo in front of every command they issue.
To do so is a gross misuse of the sudo command. I have written about this type of
misuse in my book, "The Linux Philosophy for SysAdmins." The following is an excerpt from
Chapter 19 of that book.
In this article, we explore why and how the sudo tool is being misused and how
to bypass the configuration that forces one to use sudo instead of working
directly as root.
sudo or not sudo
Part of being a system administrator and using your favorite tools is to use the tools we
have correctly and to have them available without any restrictions. In this case, I find that
the sudo command is used in a manner for which it was never intended. I have a
particular dislike for how the sudo facility is being used in some distributions,
especially because it is employed to limit and restrict access by people doing the work of
system administration to the tools they need to perform their duties.
"[SysAdmins] don't use sudo."
– Paul Venezia
Venezia explains in his InfoWorld article that sudo is used as a crutch for
sysadmins. He does not spend a lot of time defending this position or explaining it. He just
states this as a fact. And I agree with him – for sysadmins. We don't need the training
wheels in order to do our jobs. In fact, they get in the way.
Some distros, such as Ubuntu, use the sudo command in a manner that is intended
to make the use of commands that require elevated (root) privileges a little more difficult. In
these distros, it is not possible to login directly as the root user so the sudo
command is used to allow non-root users temporary access to root privileges. This is supposed
to make the user a little more careful about issuing commands that need elevated privileges
such as adding and deleting users, deleting files that don't belong to them, installing new
software, and generally all of the tasks that are required to administer a modern Linux host.
Forcing sysadmins to use the sudo command as a preface to other commands is
supposed to make working with Linux safer.
Using sudo in the manner it is by these distros is, in my opinion, a horrible
and ineffective attempt to provide novice sysadmins with a false sense of security. It is
completely ineffective at providing any level of protection. I can issue commands that are just
as incorrect or damaging using sudo as I can when not using it. The distros that
use sudo to anesthetize the sense of fear that we might issue an incorrect command
are doing sysadmins a great disservice. There is no limit or restriction imposed by these
distros on the commands that one might use with the sudo facility. There is no
attempt to actually limit the damage that might be done by actually protecting the system from
the users and the possibility that they might do something harmful – nor should there
be.
So let's be clear about this -- these distributions expect the user to perform all of the
tasks of system administration. They lull the users -- who are really System Administrators --
into thinking that they are somehow protected from the effects of doing anything bad because
they must take this restrictive extra step to enter their own password in order to run the
commands.
Bypass sudo
Distributions that work like this usually lock the password for the root user (Ubuntu is one
of these distros). This way no one can login as root and start working unencumbered. Let's look
at how this works and then how to bypass it.
Let me stipulate the setup here so that you can reproduce it if you wish. As an example, I
installed Ubuntu 16.04 LTS1 in a VM using VirtualBox. During the installation, I created a
non-root user, student, with a simple password for this experiment.
Login as the user student and open a terminal session. Let's look at the entry for root in
the /etc/shadow file, which is where the encrypted passwords are stored.
Permission is denied so we cannot look at the /etc/shadow file . This is common
to all distributions so that non-privileged users cannot see and access the encrypted
passwords. That access would make it possible to use common hacking tools to crack those
passwords so it is insecure to allow that.
Now let's try to su – to root.
student@machine1:~$ su -
Password:
su: Authentication failure
This attempt to use the su command to elevate our user to root privilege fails
because the root account has no password and is locked out. Let's use sudo to look
at the /etc/shadow file.
student@machine1:~$ sudo cat /etc/shadow
[sudo] password for student: <enter the user password>
root:!:17595:0:99999:7:::
<snip>
student:$6$tUB/y2dt$A5ML1UEdcL4tsGMiq3KOwfMkbtk3WecMroKN/:17597:0:99999:7:::
<snip>
I have truncated the results to only show the entry for the root and student users. I have
also shortened the encrypted password so that the entry will fit on a single line. The fields
are separated by colons ( : ) and the second field is the password. Notice that
the password field for root is a "bang," known to the rest of the world as an exclamation point
( ! ). This indicates that the account is locked and that it cannot be used.
Now, all we need to do to use the root account as proper sysadmins is to set up a password
for the root account.
student@machine1:~$ sudo su -
[sudo] password for student: <Enter password for student>
root@machine1:~# passwd root
Enter new UNIX password: <Enter new root password>
Retype new UNIX password: <Re-enter new root password>
passwd: password updated successfully
root@machine1:~#
Now we can login directly on a console as root or su – directly to root
instead of having to use sudo for each command. Of course, we could just use
sudo su – every time we want to login as root – but why bother?
Please do not misunderstand me. Distributions like Ubuntu and their up- and down-stream
relatives are perfectly fine and I have used several of them over the years. When using Ubuntu
and related distros, one of the first things I do is set a root password so that I can login
directly as root.
Valid uses for sudo
The sudo facility does have its uses. The real intent of sudo is
to enable the root user to delegate to one or two non-root users, access to one or two specific
privileged commands that they need on a regular basis. The reasoning behind this is that of the
lazy sysadmin; allowing the users access to a command or two that requires elevated privileges
and that they use constantly, many times per day, saves the SysAdmin a lot of requests from the
users and eliminates the wait time that the users would otherwise experience. But most non-root
users should never have full root access, just to the few commands that they need.
I sometimes need non-root users to run programs that require root privileges. In cases like
this, I set up one or two non-root users and authorize them to run that single command. The
sudo facility also keeps a log of the user ID of each user that uses it. This
might enable me to track down who made an error. That's all it does; it is not a magical
protector.
The sudo facility was never intended to be used as a gateway for commands
issued by a sysadmin. It cannot check the validity of the command. It does not check to see if
the user is doing something stupid. It does not make the system safe from users who have access
to all of the commands on the system even if it is through a gateway that forces them to say
"please" – That was never its intended purpose.
"Unix never says please."
– Rob Pike
This quote about Unix is just as true about Linux as it is about Unix. We sysadmins login as
root when we need to do work as root and we log out of our root sessions when we are done. Some
days we stay logged in as root all day long but we always work as root when we need to. We
never use sudo because it forces us to type more than necessary in order to run
the commands we need to do our jobs. Neither Unix nor Linux asks us if we really want to do
something, that is, it does not say "Please verify that you want to do this."
Yes, I dislike the way some distros use the sudo command. Next time I will
explore some valid use cases for sudo and how to configure it for these cases.
[ Want to test your sysadmin skills? Take a skills assessment
today. ]
The sudo command comes with a huge set of defaults. Still, there are situations when you
want to override some of these. This is when you use the Defaults statement in the
configuration. Usually, these defaults are enforced on every user, but you can narrow the
setting down to a subset of users based on host, username, and so on. Here is an example that
my generation of sysadmins loves to hear about: insults. These are just some funny messages for
when someone mistypes a password:
czanik @ linux-mewy:~ > sudo ls
[ sudo ] password for root:
Hold it up to the light --- not a brain in sight !
[ sudo ] password for root:
My pet ferret can type better than you !
[ sudo ] password for root:
sudo: 3 incorrect password attempts
czanik @ linux-mewy:~ >
Because not everyone is a fan of sysadmin humor, these insults are disabled by default. The
following example shows how to enable this setting only for your seasoned sysadmins, who are
members of the wheel group:
Defaults !insults
Defaults:%wheel insults
I do not have enough fingers to count how many people thanked me for bringing these messages
back.
Digest verification
There are, of course, more serious features in sudo as well. One of them is digest
verification. You can include the digest of applications in your configuration:
peter ALL = sha244:11925141bb22866afdf257ce7790bd6275feda80b3b241c108b79c88 /usr/bin/passwd
In this case, sudo checks and compares the digest of the application to the one stored in
the configuration before running the application. If they do not match, sudo refuses to run the
application. While it is difficult to maintain this information in your configuration -- there
are no automated tools for this purpose -- these digests can provide you with an additional
layer of protection.
Session recording
Session recording is also a lesser-known feature of sudo . After my demo, many people leave
my talk with plans to implement it on their infrastructure. Why? Because with session
recording, you see not just the command name, but also everything that happened in the
terminal. You can see what your admins are doing even if they have shell access and logs only
show that bash is started.
There is one limitation, currently. Records are stored locally, so with enough permissions,
users can delete their traces. Stay tuned for upcoming features. New features
There is a new version of sudo right around the corner. Version 1.9 will include many
interesting new features. Here are the most important planned features:
A recording service to collect session recordings centrally, which offers many advantages
compared to local storage:
It is more convenient to search in one place.
Recordings are available even if the sender machine is down.
Recordings cannot be deleted by someone who wants to delete their tracks.
The audit plugin does not add new features to sudoers , but instead provides an API for
plugins to easily access any kind of sudo logs. This plugin enables creating custom logs from
sudo events using plugins.
The approval plugin enables session approvals without using third-party plugins.
And my personal favorite: Python support for plugins, which enables you to easily extend
sudo using Python code instead of coding natively in C.
Conclusion
I hope this article proved to you that sudo is a lot more than just a simple prefix. There
are tons of possibilities to fine-tune permissions on your system. You cannot just fine-tune
permissions, but also improve security by checking digests. Session recordings enable you to
check what is happening on your systems. You can also extend the functionality of sudo using
plugins, either using something already available or writing your own. Finally, given the list
of upcoming features you can see that even if sudo is decades old, it is a living project that
is constantly evolving.
If you want to learn more about sudo , here are a few resources:
"... the function which converts user id into its username incorrectly treats -1, or its unsigned equivalent 4294967295, as 0, which is always the user ID of root user. ..."
The vulnerability, tracked as CVE-2019-14287 and discovered by Joe Vennix of Apple
Information Security, is more concerning because the sudo utility has been designed to let
users use their own login password to execute commands as a different user without requiring
their password. \
What's more interesting is that this flaw can be exploited by an attacker to
run commands as root just by specifying the user ID "-1" or "4294967295."
That's because the function which
converts user id into its username incorrectly treats -1, or its unsigned equivalent
4294967295, as 0, which is always the user ID of root user.
The vulnerability affects all Sudo versions prior to the latest released version 1.8.28,
which has been released today.
If
you have been blessed with the power to run commands as ANY user you want, then you are still
specially privileged, even though you are not fully privileged.
Its a rare/unusual configuration to say (all, !root) --- the people using this configuration
on their systems should probably KNOW there are going to exist some ways that access can be
abused to ultimately circumvent the intended !root rule - If not within sudo itself, then by
using sudo to get a shell as a different user UID that belongs to some person or program who
DOES have root permissions, and then causing crafted code to run as that user --- For example,
by installing a
Trojanned version of the screen command and modifying files in the home directory of a
legitimate root user to alias the screen command to trojanned version that will log the
password the next time that Other user logs in normally and uses the sudo command.
93 Escort Wagon( 326346 )#59307592)
/etc/sudoers at all - and therefore can't
exploit this bug. And in the simplest configuration (what you're referring to, I imagine),
people who are in/etc/sudoers will have root access already - rendering
this bug pointless for them.
However (assuming I've interpreted this correctly) if you've
given someone only limited sudo permissions, this bug can be exploited by those users to
basically get full root access.
I'm not sure how common that sort of limited sudo access is used, though. I haven't seen
it first hand, but then I've never worked as part of a large group of admins.
Or read TFS carefully. What the bug does is allow someone to choose root as
the uid - even of noroot is set. That doesn't have anything to do with the
password check, and doesn't bypass the password check.
Note A Red Hat training course is available for
RHCSA Rapid Track Course . The sudo command offers a mechanism for providing
trusted users with administrative access to a system without sharing the password of the
root user. When users given access via this mechanism precede an administrative
command with sudo they are prompted to enter their own password. Once
authenticated, and assuming the command is permitted, the administrative command is executed as
if run by the root user. Follow this procedure to create a normal user account and
give it sudo access. You will then be able to use the sudo command
from this user account to execute administrative commands without logging in to the account of
the root user.
Procedure 2.2. Configuring sudo Access
Log in to the system as the root user.
Create a normal user account using the useradd command. Replace
USERNAME with the user name that you wish to create.
# useradd USERNAME
Set a password for the new user using the passwd command.
# passwd USERNAME
Changing password for user USERNAME.
New password:
Retype new password:
passwd: all authentication tokens updated successfully.
Run the visudo to edit the /etc/sudoers file. This file defines
the policies applied by the sudo command.
# visudo
Find the lines in the file that grant sudo access to users in the group
wheel when enabled.
## Allows people in group wheel to run all commands
# %wheel        ALL=(ALL)       ALL
Remove the comment character ( # ) at the start of the second line. This enables the
configuration option.
Save your changes and exit the editor.
Add the user you created to the wheel group using the usermod
command.
# usermod -aG wheel USERNAME
Test that the updated configuration allows the user you created to run commands using
sudo .
Use the su to switch to the new user account that you created.
# su USERNAME -
Use the groups to verify that the user is in the wheel
group.
$ groups
USERNAME wheel
Use the sudo command to run the whoami command. As this is
the first time you have run a command using sudo from this user account the
banner message will be displayed. You will be also be prompted to enter the password for
the user account.
$ sudo whoami
We trust you have received the usual lecture from the local System
Administrator. It usually boils down to these three things:

    #1) Respect the privacy of others.
    #2) Think before you type.
    #3) With great power comes great responsibility.

[sudo] password for USERNAME:
root
The last line of the output is the user name returned by the whoami command. If
sudo is configured correctly this value will be root .
You have successfully configured a user with sudo access. You can now log in
to this user account and use sudo to run commands as if you were logged in to the
account of the root user.
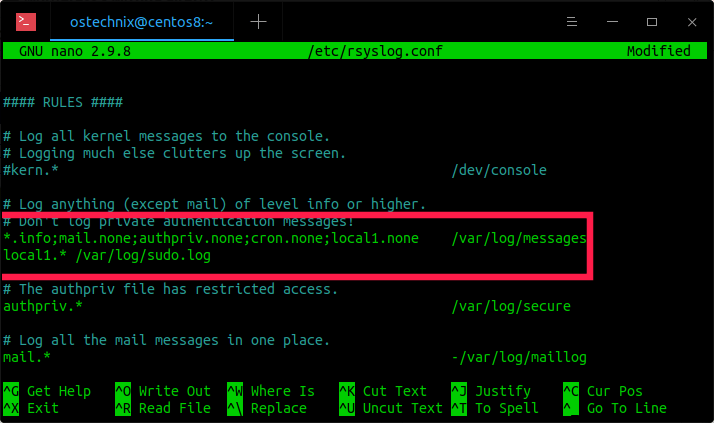
Below are ten /etc/sudoers file configurations to modify the behavior of sudo command using
Defaults entries.
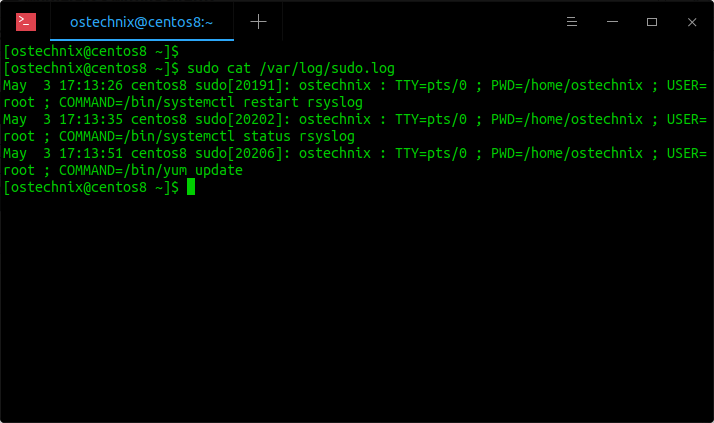
$ sudo cat /etc/sudoers
/etc/sudoers File
#
# This file MUST be edited with the 'visudo' command as root.
#
# Please consider adding local content in /etc/sudoers.d/ instead of
# directly modifying this file.
#
# See the man page for details on how to write a sudoers file.
#
Defaults        env_reset
Defaults        mail_badpass
Defaults        secure_path="/usr/local/sbin:/usr/local/bin:/usr/sbin:/usr/bin:/sbin:/bin"
Defaults        logfile="/var/log/sudo.log"
Defaults        lecture="always"
Defaults        badpass_message="Password is wrong, please try again"
Defaults        passwd_tries=5
Defaults        insults
Defaults        log_input,log_output
Types of Defaults Entries
Defaults                parameter,   parameter_list     #affect all users on any host
Defaults@Host_List      parameter,   parameter_list     #affects all users on a specific host
Defaults:User_List      parameter,   parameter_list     #affects a specific user
Defaults!Cmnd_List      parameter,   parameter_list     #affects  a specific command
Defaults>Runas_List     parameter,   parameter_list     #affects commands being run as a specific user
For the scope of this guide, we will zero down to the first type of Defaults in the forms
below. Parameters may be flags, integer values, strings, or lists.
You should note that flags are implicitly boolean and can be turned off using the
'!' operator, and lists have two additional assignment operators, +=
(add to list) and -= (remove from list).
Defaults     parameter
OR
Defaults     parameter=value
OR
Defaults     parameter -=value
Defaults     parameter +=value
OR
Defaults     !parameter
If a server needs to be administered by a number of people it
is normally not a good idea for them all to use the root account. This is because it becomes
difficult to determine exactly who did what, when and where if everyone logs in with the same
credentials. The sudo utility was designed to overcome this difficulty.
With sudo (which stands for "superuser do"), you can delegate a limited set of
administrative responsibilities to other users, who are strictly limited to the commands you
allow them. sudo creates a thorough audit trail, so everything users do gets logged; if users
somehow manage to do something they shouldn't have, you'll be able to detect it and apply the
needed fixes. You can even configure sudo centrally, so its permissions apply to several
hosts.
The privileged command you want to run must first begin with the word sudo followed by the
command's regular syntax. When running the command with the sudo prefix, you will be prompted
for your regular password before it is executed. You may run other privileged commands using
sudo within a five-minute period without being re-prompted for a password. All commands run as
sudo are logged in the log file /var/log/messages.
The sudo configuration file is /etc/sudoers . We should never edit this file manually.
Instead, use the visudo command: # visudo
This protects from conflicts (when two admins edit this file at the same time) and
guarantees that the right syntax is used (the permission bits are correct). The program uses Vi
text editor.
All Access to Specific Users
You can grant users bob and bunny full access to all privileged commands, with this sudoers
entry.
user1, user2 ALL=(ALL) ALL
This is generally not a good idea because this allows user1 and user2 to use the su command to
grant themselves permanent root privileges thereby bypassing the command logging features of
sudo.
Access To Specific Users To Specific Files
This entry allows user1 and all the members of the group operator to gain access to all the
program files in the /sbin and /usr/sbin directories, plus the privilege of running the command
/usr/apps/check.pl.
This example allows all users in the group operator to execute all the commands in the /sbin
directory without the need for entering a password.
%operator ALL= NOPASSWD: /sbin/
Adding users to the wheel group
The wheel group is a legacy from UNIX. When a server had to be maintained at a higher level
than the day-to-day system administrator, root rights were often required. The 'wheel' group
was used to create a pool of user accounts that were allowed to get that level of access to the
server. If you weren't in the 'wheel' group, you were denied access to root.
Edit the configuration file (/etc/sudoers) with visudo and change these lines:
# Uncomment to allow people in group wheel to run all commands
# %wheel ALL=(ALL) ALL
To this (as recommended):
# Uncomment to allow people in group wheel to run all commands
%wheel ALL=(ALL) ALL
This will allow anyone in the wheel group to execute commands using sudo (rather than having
to add each person one by one).
Now finally use the following command to add any user (e.g- user1) to Wheel group
If sudo vi /etc/hosts is successful, it means that the system administrator has
allowed the user to run vi /etc/hosts as root. That's the whole point of sudo:
it lets the system administrator authorize certain users to run certain commands with extra
privileges.
Giving a user the permission to run vi gives them the permission to run any
vi command, including :sh to run a shell and :w to overwrite any
file on the system. A rule allowing only to run vi /etc/hosts does not make any
sense since it allows the user to run arbitrary commands.
There is no "hacking" involved. The breach of security comes from a misconfiguration, not
from a hole in the security model. Sudo does not particularly try to prevent against
misconfiguration. Its documentation is well-known to be difficult to understand; if in doubt,
ask around and don't try to do things that are too complicated.
It is in general a hard problem to give a user a specific privilege without giving them
more than intended. A bulldozer approach like giving them the right to run an interactive
program such as vi is bound to fail. A general piece of advice is to give the minimum
privileges necessary to accomplish the task. If you want to allow a user to modify one file,
don't give them the permission to run an editor. Instead, either:
Give them the permission to write to the file. This is the simplest method with the
least risk of doing something you didn't intend.
setfacl u:bob:rw /etc/hosts
Give them permission to edit the file via sudo. To do that, don't give them the
permission to run an editor. As explained in the sudo documentation, give them the
permission to run sudoedit , which invokes an editor as the original
user and then uses the extra privileges only to modify the file.
bob ALL = sudoedit /etc/hosts
The sudo method is more complicated to set up, and is less transparent for the user
because they have to invoke sudoedit instead of just opening the file in
their editor, but has the advantage that all accesses are logged.
Note that allowing a user to edit /etc/hosts may have an impact on your
security infrastructure: if there's any place where you rely on a host name corresponding to
a specific machine, then that user will be able to point it to a different machine. Consider
that
it is probably unnecessary anyway .
The log_input and log_output parameters enable sudo to run a command in pseudo-tty and log
all user input and all output sent to the screen receptively.
The default I/O log directory is /var/log/sudo-io , and if there is a session sequence
number, it is stored in this directory. You can specify a custom directory through the
iolog_dir parameter.
Defaults log_input, log_output
There are some escape sequences are supported such as %{seq} which expands to a
monotonically increasing base-36 sequence number, such as 000001, where every two digits are
used to form a new directory, e.g. 00/00/01 as in the example below:
To lecture sudo users about password usage on the system, use the lecture parameter as
below.
It has 3 possible values:
always – always lecture a user.
once – only lecture a user the first time they execute sudo command (this is used
when no value is specified)
never – never lecture the user.
Defaults lecture="always"
Additionally, you can set a custom lecture file with the lecture_file parameter, type the
appropriate message in the file:
Defaults lecture_file="/path/to/file"
Show Custom Message When You Enter Wrong sudo Password
When a user enters a wrong password, a certain message is displayed on the command line.
The default message is " sorry, try again ", you can modify the message using the
badpass_message parameter as follows:
Defaults badpass_message="Password is wrong, please try again"
Increase sudo Password Tries Limit
The parameter passwd_tries is used to specify the number of times a user can try to enter
a password.
The default value is 3:
Defaults passwd_tries=5
Increase Sudo Password Attempts
To set a password timeout (default is 5 minutes) using passwd_timeout parameter, add the
line below:
Defaults passwd_timeout=2
9. Let Sudo Insult You When You Enter Wrong Password
In case a user types a wrong password, sudo will display insults on the terminal with the
insults parameter. This will automatically turn off the badpass_message parameter.
In the sudoers configuration files, there are two types of options: strings and flags. While
strings can contain any value, flags can be turned either ON or OFF. The most important syntax
constructs for sudoers configuration files are:
# Everything on a line after a # gets ignored
Defaults !insults # Disable the insults flag
Defaults env_keep += "DISPLAY HOME" # Add DISPLAY and HOME to env_keep
tux ALL = NOPASSWD: /usr/bin/frobnicate, PASSWD: /usr/bin/journalctl
There are two exceptions: #include and #includedir are normal commands. Followed by
digits, it specifies a UID.
This flag controls whether the invoking user is required to enter the password of the
target user (ON) (for example root ) or the invoking user (OFF).
Defaults targetpw # Turn targetpw flag ON
rootpw
If set, sudo will prompt for the root password instead of the target user's or the
invoker's. The default is OFF.
Defaults !rootpw # Turn rootpw flag OFF
env_reset
If set, sudo constructs a minimal environment with only TERM , PATH , HOME , MAIL ,
SHELL , LOGNAME , USER , USERNAME , and SUDO_* set. Additionally, variables listed in
env_keep get imported from the calling environment. The default is ON.
Defaults env_reset # Turn env_reset flag ON
env_keep
List of environment variables to keep when the env_reset flag is ON.
# Set env_keep to contain EDITOR and PROMPT
Defaults env_keep = "EDITOR PROMPT"
Defaults env_keep += "JRE_HOME" # Add JRE_HOME
Defaults env_keep -= "JRE_HOME" # Remove JRE_HOME
env_delete
List of environment variables to remove when the env_reset flag is OFF.
# Set env_delete to contain EDITOR and PROMPT
Defaults env_delete = "EDITOR PROMPT"
Defaults env_delete += "JRE_HOME" # Add JRE_HOME
Defaults env_delete -= "JRE_HOME" # Remove JRE_HOME
The Defaults token can also be used to create aliases for a collection of users, hosts, and
commands. Furthermore, it is possible to apply an option only to a specific set of users.
For detailed information about the /etc/sudoers configuration file, consult man 5 sudoers .
2.2.3 Rules in sudoers
Rules in the sudoers configuration can be very complex, so this section will only cover the
basics. Each rule follows the basic scheme ( [] marks optional parts):
#Who      Where         As whom      Tag                What
User_List Host_List = [(User_List)] [NOPASSWD:|PASSWD:] Cmnd_List
Syntax for sudoers Rules
User_List
One or more (separated by , ) identifiers: Either a user name, a group in the format
%GROUPNAME or a user ID in the format #UID . Negation can be performed with a ! prefix.
Host_List
One or more (separated by , ) identifiers: Either a (fully qualified) host name or an IP
address. Negation can be performed with a ! prefix. ALL is the usual choice for Host_List
.
NOPASSWD:|PASSWD:
The user will not be prompted for a password when running commands matching CMDSPEC
after NOPASSWD: .
PASSWD is the default, it only needs to be specified when both are on the same line:
tux ALL = PASSWD: /usr/bin/foo, NOPASSWD: /usr/bin/bar
Cmnd_List
One or more (separated by , ) specifiers: A path to an executable, followed by allowed
arguments or nothing.
/usr/bin/foo     # Anything allowed
/usr/bin/foo bar # Only "/usr/bin/foo bar" allowed
/usr/bin/foo ""  # No arguments allowed
ALL can be used as User_List , Host_List , and Cmnd_List .
A rule that allows tux to run all commands as root without entering a password:
tux ALL = NOPASSWD: ALL
A rule that allows tux to run systemctl restart apache2 :
tux ALL = /usr/bin/systemctl restart apache2
A rule that allows tux to run wall as admin with no arguments:
tux ALL = (admin) /usr/bin/wall ""
WARNING: Dangerous constructs
Constructs of the kind
ALL ALL = ALL
must not be used without Defaults targetpw , otherwise anyone can run commands as root .
The owner and group for the sudoers file must both be 0. The file permissions
must be set to 0440. These permissions are set by default, but if you accidentally change them,
they should be changed back immediately or sudo will fail.
Tips and tricksDisable per-terminal sudo Warning: This will let any process
use your sudo session.
If you are annoyed by sudo's defaults that require you to enter your password every time you
open a new terminal, disable tty_tickets :
Defaults !tty_tickets
Environment variables
If you have a lot of environment variables, or you export your proxy settings via
export http_proxy="..." , when using sudo these variables do not get passed to the
root account unless you run sudo with the -E option.
$ sudo -E pacman -Syu
The recommended way of preserving environment variables is to append them to
env_keep :
If you use a lot of aliases, you might have noticed that they do not carry over to the root
account when using sudo. However, there is an easy way to make them work. Simply add the
following to your ~/.bashrc or /etc/bash.bashrc :
alias sudo='sudo '
Root password
Users can configure sudo to ask for the root password instead of the user password by adding
targetpw (target user, defaults to root) or rootpw to the Defaults
line in /etc/sudoers :
Defaults targetpw
To prevent exposing your root password to users, you can restrict this to a specific
group:
Defaults:%wheel targetpw
%wheel ALL=(ALL) ALL
Disable root login
Users may wish to disable the root login. Without root, attackers must first guess a user
name configured as a sudoer as well as the user password. See for example Ssh#Deny .
Warning:
Be careful, you may lock yourself out by disabling root login. Sudo is not automatically
installed and its default configuration allows neither passwordless root access nor root
access with your own password. Ensure a user is properly configured as a sudoer before
disabling the root account!
If you have changed your sudoers -file to use rootpw as default, then do not disable root
login with any of the following commands!
Alternatively, edit /etc/shadow and replace the root's encrypted password with
"!":
root:!:12345::::::
To enable root login again:
$ sudo passwd root
Tip: To get to an interactive root prompt, even after disabling the root account, use
sudo -i . kdesu
kdesu may be used under KDE to launch GUI applications with root privileges. It is possible
that by default kdesu will try to use su even if the root account is disabled. Fortunately one
can tell kdesu to use sudo instead of su. Create/edit the file ~/.config/kdesurc
:
Alternatively, install kdesudoAUR , which
has the added advantage of tab-completion for the command following.
Harden with Sudo
Example
Let us say you create 3 users: admin, devel, and joe. The user "admin" is used for
journalctl, systemctl, mount, kill, and iptables; "devel" is used for installing packages, and
editing config files; and "joe" is the user you log in with. To let "joe" reboot, shutdown, and
use netctl we would do the following:
Edit /etc/pam.d/su and /etc/pam.d/su-1 Require user be in the
wheel group, but do not put anyone in it.
#%PAM-1.0
auth            sufficient      pam_rootok.so
# Uncomment the following line to implicitly trust users in the "wheel" group.
#auth           sufficient      pam_wheel.so trust use_uid
# Uncomment the following line to require a user to be in the "wheel" group.
auth            required        pam_wheel.so use_uid
auth            required        pam_unix.so
account         required        pam_unix.so
session         required        pam_unix.so
Limit SSH login to the 'ssh' group. Only "joe" will be part of this group.
groupadd -r ssh
gpasswd -a joe ssh
echo 'AllowGroups ssh' >> /etc/ssh/sshd_config
Configure sudo using drop-in files in /etc/sudoers.d
sudo parses files contained in the directory /etc/sudoers.d/ . This
means that instead of editing /etc/sudoers , you can change settings in standalone
files and drop them in that directory. This has two advantages:
There is no need to edit a sudoers.pacnew file;
If there is a problem with a new entry, you can remove the offending file instead of
editing /etc/sudoers (but see the warning below).
The format for entries in these drop-in files is the same as for /etc/sudoers
itself. To edit them directly, use visudo -f /etc/sudoers.d/ somefile . See
the "Including other files from within sudoers" section of sudoers(5) for details.
The files in /etc/sudoers.d/ directory are parsed in lexicographical order,
file names containing . or ~ are skipped. To avoid sorting problems,
the file names should begin with two digits, e.g. 01_foo .
Note: The order of
entries in the drop-in files is important: make sure that the statements do not override
themselves. Warning: The files in /etc/sudoers.d/ are just as fragile as
/etc/sudoers itself: any improperly formatted file will prevent sudo
from working. Hence, for the same reason it is strongly advised to use visudoEditing files
sudo -e or sudoedit lets you edit a file as another user while
still running the text editor as your user.
This is especially useful for editing files as root without elevating the privilege of your
text editor, for more details read sudo(8) .
Note that you can set the editor to any program, so for example one can use meld to manage pacnew
files:
$ SUDO_EDITOR=meld sudo -e /etc/file{,.pacnew}
TroubleshootingSSH TTY Problems
Notes: please use the
second argument of the template to provide more detailed indications. (Discuss in Talk:Sudo# )
SSH does not allocate a tty by default when running a remote command. Without a tty, sudo
cannot disable echo when prompting for a password. You can use ssh's -t option to
force it to allocate a tty.
The Defaults option requiretty only allows the user to run sudo if
they have a tty.
# Disable "ssh hostname sudo <cmd>", because it will show the password in clear text. You have to run "ssh -t hostname sudo <cmd>".
#
#Defaults    requiretty
Permissive umask
Notes: please use the
second argument of the template to provide more detailed indications. (Discuss in Talk:Sudo# )
Sudo will union the user's umask value with its own umask (which defaults
to 0022). This prevents sudo from creating files with more open permissions than the user's
umask allows. While this is a sane default if no custom umask is in use, this can lead to
situations where a utility run by sudo may create files with different permissions than if run
by root directly. If errors arise from this, sudo provides a means to fix the umask, even if
the desired umask is more permissive than the umask that the user has specified. Adding this
(using visudo ) will override sudo's default behavior:
Defaults umask = 0022
Defaults umask_override
This sets sudo's umask to root's default umask (0022) and overrides the default behavior,
always using the indicated umask regardless of what umask the user as set.
Defaults
skeleton
Notes: please use the
second argument of the template to provide more detailed indications. (Discuss in Talk:Sudo# )
The authors site has a list of all the
options that can be used with the Defaults command in the
/etc/sudoers file.
See [1] for
a list of options (parsed from the version 1.8.7 source code) in a format optimized for
sudoers .
It is also possible to have a user run an application as a different, non-root user. This
can be very interesting if you run applications as a different user (for instance apache for
the web server) and want to allow certain users to perform administrative steps as that user
(like killing zombie processes).
Inside /etc/sudoers you list the user(s) in between ( and ) before
the command listing:
CODE Non-root execution syntax
users hosts = (run-as) commands
For instance, to allow larry to run the kill tool as the apache or gorg user:
CODE
Non-root execution example
Cmnd_Alias KILL = /bin/kill, /usr/bin/pkill

larry   ALL = (apache, gorg) KILL
With this set, the user can run sudo -u to select the user he wants to run the application
as:
user $sudo -u apache pkill apache
You can set an alias for the user to run an application as using the
Runas_Alias directive. Its use is identical to the other _Alias
directives we have seen before.
Passwords and default settings
By default, sudo asks the user to identify himself using his own password. Once a password
is entered, sudo remembers it for 5 minutes, allowing the user to focus on his tasks and not
repeatedly re-entering his password.
Of course, this behavior can be changed: you can set the Defaults: directive in
/etc/sudoers to change the default behavior for a user.
For instance, to change the default 5 minutes to 0 (never remember):
CODE Changing the
timeout value
Defaults:larry timestamp_timeout=0
A setting of -1 would remember the password indefinitely (until the system
reboots).
A different setting would be to require the password of the user that the command should be
run as and not the users' personal password. This is accomplished using runaspw .
In the following example we also set the number of retries (how many times the user can
re-enter a password before sudo fails) to 2 instead of the default 3:
CODE
Requiring the root password instead of the user's password
Defaults:john runaspw, passwd_tries=2
Another interesting feature is to keep the DISPLAY variable set so that you can
execute graphical tools:
CODE Keeping the DISPLAY variable alive
Defaults:john env_keep=DISPLAY
You can change dozens of default settings using the Defaults: directive. Fire
up the sudoers manual page and search for Defaults .
If you however want to allow a user to run a certain set of commands without providing any
password whatsoever, you need to start the commands with NOPASSWD: , like
so:
CODE Allowing emerge to be ran as root without asking for a password
larry localhost = NOPASSWD: /usr/bin/emerge
Bash completion
Users that want bash completion with sudo need to run this once.
user $sudo echo "complete -cf sudo" >> $HOME/.bashrc
There are times when prefacing every command with "sudo" gets in the way of getting your
work done. With a default /etc/sudoers configuration and membership in the sudo (or admin)
group, you can assume root control using the command sudo su - . Extra care should always be
taken when using the root account in this way.
$ sudo -i -u root
[sudo] password for jdoe:
root@stinkbug:~#
By default, if a user has entered their password to authenticate their self to sudo , it is
remembered for 5 minutes. If the user wants to prolong this period, he can run sudo -v to reset
the time stamp so that it will take another 5 minutes before sudo asks for the password
again.
user $sudo -v
The inverse is to kill the time stamp using sudo -k .
Finally, this line in /usr/local/etc/sudoers allows any member of the webteam
group to manage webservice :
%webteam ALL=(ALL) /usr/sbin/service webservice *
Unlike su
(1) , Sudo only requires the end user password. This adds an advantage where users will not
need shared passwords, a finding in most security audits and just bad all the way around.
Users permitted to run applications with Sudo only enter their own passwords. This is more
secure and gives better control than su
(1) , where the root password is entered and the user acquires all
root permissions.
Tip:
Most organizations are moving or have moved toward a two factor authentication model. In
these cases, the user may not have a password to enter. Sudo provides for these cases with the
NOPASSWD variable. Adding it to the configuration above will allow all members of
the webteam group to manage the service without the password
requirement:
An advantage to implementing Sudo is the ability to enable session logging. Using the built
in log mechanisms and the included sudoreplay command, all commands initiated through Sudo are
logged for later verification. To enable this feature, add a default log directory entry, this
example uses a user variable. Several other log filename conventions exist, consult the manual
page for sudoreplay for additional information.
Defaults iolog_dir=/var/log/sudo-io/%{user}
Tip:
This directory will be created automatically after the logging is configured. It is best to
let the system create directory with default permissions just to be safe. In addition, this
entry will also log administrators who use the sudoreplay command. To change this behavior,
read and uncomment the logging options inside sudoers .
Once this directive has been added to the sudoers file, any user configuration
can be updated with the request to log access. In the example shown, the updated
webteam entry would have the following additional changes:
From this point on, all webteam members altering the status of the
webservice application will be logged. The list of previous and current
sessions can be displayed with:
# sudoreplay -l
In the output, to replay a specific session, search for the TSID= entry, and
pass that to sudoreplay with no other options to replay the session at normal speed. For
example:
# sudoreplay user1/00/00/02
Warning:
While sessions are logged, any administrator is able to remove sessions and leave only a
question of why they had done so. It is worthwhile to add a daily check through an intrusion
detection system ( IDS ) or similar software so that other administrators
are alerted to manual alterations.
The sudoreplay is extremely extendable. Consult the documentation for more
information.
scomadm ALL=(root) NOPASSWD: /bin/sh -c if test -f
/opt/microsoft/omsagent/bin/service_control; then cat
/etc/opt/microsoft/omsagent/scom/certs/scom-cert.pem; else cat
/etc/opt/microsoft/scx/ssl/scx.pem; fi
scomadm ALL=(root) NOPASSWD: /bin/sh -c if test -f
/opt/microsoft/omsagent/bin/service_control; then mv /tmp/scx-scomadm/scom-cert.pem
/etc/opt/microsoft/omsagent/scom/certs/scom-cert.pem; fi
scomadm ALL=(root) NOPASSWD: /bin/sh -c if test -r /etc/opt/microsoft/scx/ssl/scx.pem;
then cat /etc/opt/microsoft/scx/ssl/scx.pem; else cat
/etc/opt/microsoft/scx/ssl/scx-seclevel1.pem; fi
##SCOM Workspace
scomadm ALL=(root) NOPASSWD: /bin/sh -c if test -f
/opt/microsoft/omsagent/bin/service_control; then cp /tmp/scx-scomadm/omsadmin.conf
/etc/opt/microsoft/omsagent/scom/conf/omsadmin.conf;
/opt/microsoft/omsagent/bin/service_control restart scom; fi
scomadm ALL=(root) NOPASSWD: /bin/sh -c if test -f /opt/microsoft/omsagent/bin/omsadmin.sh
&& test ! -f /etc/opt/microsoft/omsagent/scom/certs/scom-cert.pem; then
/opt/microsoft/omsagent/bin/omsadmin.sh -w scom; fi
##Install or upgrade
#Linux
scomadm ALL=(root) NOPASSWD: /bin/sh -c sh
/tmp/scx-scomadm/omsagent-1.[0-9].[0-9]-[0-9][0-9].universal[[\:alpha\:]].[[\:digit\:]].x[6-8][4-6].sh
--install --enable-opsmgr; if test -f /opt/microsoft/omsagent/bin/omsadmin.sh && test
! -f /etc/opt/microsoft/omsagent/scom/certs/scom-cert.pem; then
/opt/microsoft/omsagent/bin/omsadmin.sh -w scom; fi; EC=$?; cd /tmp; rm -rf /tmp/scx-scomadm;
exit $EC
scomadm ALL=(root) NOPASSWD: /bin/sh -c sh
/tmp/scx-scomadm/omsagent-1.[0-9].[0-9]-[0-9][0-9].universal[[\:alpha\:]].[[\:digit\:]].x[6-8][4-6].sh
--upgrade --enable-opsmgr; if test -f /opt/microsoft/omsagent/bin/omsadmin.sh && test
! -f /etc/opt/microsoft/omsagent/scom/certs/scom-cert.pem; then
/opt/microsoft/omsagent/bin/omsadmin.sh -w scom; fi; EC=$?; cd /tmp; rm -rf /tmp/scx-scomadm;
exit $EC
#RHEL
scomadm ALL=(root) NOPASSWD: /bin/sh -c sh
/tmp/scx-scomadm/omsagent-1.[0-9].[0-9]-[0-9][0-9].rhel.[[\:digit\:]].x[6-8][4-6].sh
--install --enable-opsmgr; if test -f /opt/microsoft/omsagent/bin/omsadmin.sh && test
! -f /etc/opt/microsoft/omsagent/scom/certs/scom-cert.pem; then
/opt/microsoft/omsagent/bin/omsadmin.sh -w scom; fi; EC=$?; cd /tmp; rm -rf /tmp/scx-scomadm;
exit $EC
scomadm ALL=(root) NOPASSWD: /bin/sh -c sh
/tmp/scx-scomadm/omsagent-1.[0-9].[0-9]-[0-9][0-9].rhel.[[\:digit\:]].x[6-8][4-6].sh
--upgrade --enable-opsmgr; if test -f /opt/microsoft/omsagent/bin/omsadmin.sh && test
! -f /etc/opt/microsoft/omsagent/scom/certs/scom-cert.pem; then
/opt/microsoft/omsagent/bin/omsadmin.sh -w scom; fi; EC=$?; cd /tmp; rm -rf /tmp/scx-scomadm;
exit $EC
#SUSE
scomadm ALL=(root) NOPASSWD: /bin/sh -c sh
/tmp/scx-scomadm/omsagent-1.[0-9].[0-9]-[0-9][0-9].sles.1[[\:digit\:]].x[6-8][4-6].sh
--install --enable-opsmgr; if test -f /opt/microsoft/omsagent/bin/omsadmin.sh && test
! -f /etc/opt/microsoft/omsagent/scom/certs/scom-cert.pem; then
/opt/microsoft/omsagent/bin/omsadmin.sh -w scom; fi; EC=$?; cd /tmp; rm -rf /tmp/scx-scomadm;
exit $EC
scomadm ALL=(root) NOPASSWD: /bin/sh -c sh
/tmp/scx-scomadm/omsagent-1.[0-9].[0-9]-[0-9][0-9].sles.1[[\:digit\:]].x[6-8][4-6].sh
--upgrade --enable-opsmgr; if test -f /opt/microsoft/omsagent/bin/omsadmin.sh && test
! -f /etc/opt/microsoft/omsagent/scom/certs/scom-cert.pem; then
/opt/microsoft/omsagent/bin/omsadmin.sh -w scom; fi; EC=$?; cd /tmp; rm -rf /tmp/scx-scomadm;
exit $EC
## RHEL PPC
scomadm ALL=(root) NOPASSWD: /bin/sh -c sh
/tmp/scx-scomadm/scx-1.[0-9].[0-9]-[0-9][0-9][0-9].rhel.[[\:digit\:]].ppc.sh --install
--enable-opsmgr; if test -f /opt/microsoft/omsagent/bin/omsadmin.sh && test ! -f
/etc/opt/microsoft/omsagent/scom/certs/scom-cert.pem; then
/opt/microsoft/omsagent/bin/omsadmin.sh -w scom; fi; EC=$?; cd /tmp; rm -rf /tmp/scx-scomadm;
exit $EC
scomadm ALL=(root) NOPASSWD: /bin/sh -c sh
/tmp/scx-scomadm/scx-1.[0-9].[0-9]-[0-9][0-9][0-9].rhel.[[\:digit\:]].ppc.sh --upgrade
--enable-opsmgr; if test -f /opt/microsoft/omsagent/bin/omsadmin.sh && test ! -f
/etc/opt/microsoft/omsagent/scom/certs/scom-cert.pem; then
/opt/microsoft/omsagent/bin/omsadmin.sh -w scom; fi; EC=$?; cd /tmp; rm -rf /tmp/scx-scomadm;
exit $EC
##Uninstall
scomadm ALL=(root) NOPASSWD: /bin/sh -c if test -f
/opt/microsoft/omsagent/bin/omsadmin.sh; then if test
"$(/opt/microsoft/omsagent/bin/omsadmin.sh -l | grep scom | wc -l)" \= "1" && test
"$(/opt/microsoft/omsagent/bin/omsadmin.sh -l | wc -l)" \= "1" || test
"$(/opt/microsoft/omsagent/bin/omsadmin.sh -l)" \= "No Workspace"; then
/opt/microsoft/omsagent/bin/uninstall; else /opt/microsoft/omsagent/bin/omsadmin.sh -x scom;
fi; else /opt/microsoft/scx/bin/uninstall; fi
Here's the same configuration as a comma-separated list of multiple commands. This let's us
get more specific on which service commands we can use with php5-fpm
:
Open the /etc/sudoers file with a text editor. The sudo installation includes the
visudo editor, which checks the syntax of the file before closing.
Add the following commands to the file. Important: Enter each command on a single line:
# Preserve GPFS environment variables:
Defaults env_keep += "MMMODE environmentType GPFS_rshPath GPFS_rcpPath mmScriptTrace GPFSCMDPORTRANGE GPFS_CIM_MSG_FORMAT"

# Allow members of the gpfs group to run all commands but only selected commands without a password:
%gpfs ALL=(ALL) PASSWD: ALL, NOPASSWD: /usr/lpp/mmfs/bin/mmremote, /usr/bin/scp, /bin/echo, /usr/lpp/mmfs/bin/mmsdrrestore

# Disable requiretty for group gpfs:
Defaults:%gpfs !requiretty
There's more that sudo does to protect tyou from malicious mischief. The :man sudo" pages
cover that completely. Let's continue with our examples; it's time to limit "jim" to specific
commands. There are two ways to do that. We can specifically list commands, or we can say that
jim can only run commands in a certain directory. A combination of those methods is useful:
jim ALL= /bin/kill,/sbin/linuxconf, /usr/sbin/jim/
The careful reader will note that there was a bit of a change here. The line used to read
"jim ALL=(ALL) ALL", but now there's only one "ALL" left. Reading the man page can easily leave
you quite confused as to what those three "ALL"'s meant. In the example above, ALL refers to
machines- the assumption is that this is a network wide sudoers file. In the case of this
machine (lnxserve) we could do this:
jim lnxserve= /bin/kill, /usr/sbin/jim/
So what was the "(ALL)" for? Well, here's a clue:
jim lnxserve=(paul,linda) /bin/kill, /usr/sbin/jim/
That says that jim can (using "sudo -u ") run commands as paul or linda.
This is perfect for giving jim the power to kill paul or linda's processes without giving
him anything else. There is one thing we need to add though: if we just left it like this, jim
is forced to use "sudo -u paul" or "sudo -u linda" every time. We can add a default
"runas_default":
sudo commands use a basic syntax. By default, the /etc/sudoers file will have one
stanza:
root ALL=(ALL) ALL
This tells sudo to give root sudo access to everything on every host. The syntax is
simple:
user host = (user) command
The first column defines the user the command applies to. The host section
defines the host this stanza applies to. The (user) section defines the user to run
the command as, while the command section defines the command itself.
You can also define aliases for Hosts, Users, and Commands by using the keywords
Host_Alias , User_Alias , and Cmnd_Alias respectively.
Let's take a look at a few examples of the different aliases you can use.
... ... ...
Next, lets define some User aliases:
User_Alias WEBADMIN = ankit, sam
User_Alias MAILADMIN = ankit, navan
User_Alias BINADMIN = ankit, jon
Here we've also defined three User aliases. The first user alias has the name WEBADMIN for
web administrators. Here we've define Ankit and Sam. The second alias is MAILADMIN, for mail
administrators, and here we have Ankit and Navan. Finally, we define an alias of BINADMIN for
the regular sysadmins, again Ankit, but with Jon as well.
So far we've defined some hosts and some users. Now we get to define what commands they may
be able to run, also using some aliases:
Cmnd_Alias SU = /bin/su
Cmnd_Alias BIN = /bin/rpm, /bin/rm, /sbin/linuxconf
Here we have a few aliases. The first we call SU, and enables the user to run the /bin/su
command. The second we call BIN, which enables the user to run the commands: /bin/rpm , /bin/rm
, and /sbin/linuxconf . The next is the SWATCH alias which allows the user to run
/usr/bin/swatch and /bin/touch . Then we define the HTTPD alias which allows the user to
execute /etc/rc.d/init.d/httpd and /etc/rc.d/init.d/mysql , for web maintenance. Finally, we
define SMTP, which allows the user to manipulate the running of the qmail SMTP server...
You want one user to run commands as another, without sharing passwords.
Solution
Suppose you want user smith to be able to run a given command as user jones.
               /etc/sudoers:
smith  ALL = (jones) /usr/local/bin/mycommand
User smith runs:
smith$ sudo -u jones /usr/local/bin/mycommand
smith$ sudo -u jones mycommand                     If /usr/local/bin is in $PATH
User smith will be prompted for his own password, not jones's. The ALL keyword,
which matches anything, in this case specifies that the line is valid on any host.
Discussion
sudo exists for this very reason!
To authorize root privileges for smith, replace "jones" with "root" in the above
example.
This section presents some simple examples of how to do many commonly required tasks using the sudo utility.
Granting All Access to Specific Users
You can grant users bob and bunny full access to all privileged commands, with this sudoers entry.
bob, bunny ALL=(ALL) ALL
This is generally not a good idea because this allows bob and bunny to use the su command to grant themselves permanent root privileges
thereby bypassing the command logging features of sudo. The example on using aliases in the sudoers file shows how to eliminate this
prob
Granting Access To Specific Users To Specific Files
This entry allows user peter and all the members of the group operator to gain access to all the program files in the /sbin and
/usr/sbin directories, plus the privilege of running the command /usr/local/apps/check.pl. Notice how the trailing slash (/) is required
to specify a directory location:
Notice also that the lack of any username entries within parentheses () after the = sign prevents the users from running the commands
automatically masquerading as another user. This is explained further in the next example.
Granting Access to Specific Files as Another User
The sudo -u entry allows allows you to execute a command as if you were another user, but first you have to be granted this privilege
in the sudoers file.
This feature can be convenient for programmers who sometimes need to kill processes related to projects they are working on. For
example, programmer peter is on the team developing a financial package that runs a program called monthend as user accounts. From
time to time the application fails, requiring "peter" to stop it with the /bin/kill, /usr/bin/kill or /usr/bin/pkill commands but
only as user "accounts". The sudoers entry would look like this:
peter ALL=(accounts) /bin/kill, /usr/bin/kill, /usr/bin/pkill
User peter is allowed to stop the monthend process with this command:
This example allows all users in the group operator to execute all the commands in the /sbin directory without the need for entering
a password. This has the added advantage of being more convenient to the user:
%operator ALL= NOPASSWD: /sbin/
Using Aliases in the sudoers File
Sometimes you'll need to assign random groupings of users from various departments very similar sets of privileges. The sudoers
file allows users to be grouped according to function with the group and then being assigned a nickname or alias which is used throughout
the rest of the file. Groupings of commands can also be assigned aliases too.
In the next example, users peter, bob and bunny and all the users in the operator group are made part of the user alias ADMINS.
All the command shell programs are then assigned to the command alias SHELLS. Users ADMINS are then denied the option of running
any SHELLS commands and su:
This attempts to ensure that users don't permanently su to become root, or enter command shells that bypass sudo's command logging.
It doesn't prevent them from copying the files to other locations to be run. The advantage of this is that it helps to create an
audit trail, but the restrictions can be enforced only as part of the company's overall security policy.
Other Examples
You can view a comprehensive list of /etc/sudoers file options by issuing the command man sudoers.
Using syslog To Track All sudo Commands
All sudo commands are logged in the log file /var/log/messages which can be very helpful in determining how user error may have
contributed to a problem. All the sudo log entries have the word sudo in them, so you can easily get a thread of commands used by
using the grep command to selectively filter the output accordingly.
Here is sample output from a user bob failing to enter their correct sudo password when issuing a command, immediately followed
by the successful execution of the command /bin/more sudoers.
A solution to this question will solve the other question as well, you might want to delete
the other question in this situation. – Pavel Šimerda
Jan 2 '15 at 8:29
To invoke a login shell using sudo just use -i . When command is
not specified you'll get a login shell prompt, otherwise you'll get the output of your
command.
Example (login shell):
sudo -i
Example (with a specified user):
sudo -i -u user
Example (with a command):
sudo -i -u user whoami
Example (print user's $HOME ):
sudo -i -u user echo \$HOME
Note: The backslash character ensures that the dollar sign reaches the target user's shell
and is not interpreted in the calling user's shell.
I have just checked the last example with strace which tells you exactly what's
happening. The output bellow shows that the shell is being called with --login
and with the specified command, just as in your explicit call to bash, but in addition
sudo can do its own work like setting the $HOME .
I noticed that you are using -S and I don't think it is generally a good
technique. If you want to run commands as a different user without performing authentication
from the keyboard, you might want to use SSH instead. It works for localhost as
well as for other hosts and provides public key authentication that works without any
interactive input.
ssh user@localhost echo \$HOME
Note: You don't need any special options with SSH as the SSH server always creates a login
shell to be accessed by the SSH client.
sudo -i -u user echo \$HOME doesn't work for me. Output: $HOME .
strace gives the same output as yours. What's the issue? – John_West
Nov 23 '15 at 11:12
You're giving Bash too much credit. All "login shell" means to Bash is what files are sourced
at startup and shutdown. The $HOME variable doesn't figure into it.
In fact, Bash doesn't do anything to set $HOME at all. $HOME is
set by whatever invokes the shell (login, ssh, etc.), and the shell inherits it. Whatever
started your shell as admin set $HOME and then exec-ed bash ,
sudo by design doesn't alter the environment unless asked or configured to do
so, so bash as otheruser inherited it from your shell.
If you want sudo to handle more of the environment in the way you're
expecting, look at the -i switch for sudo. Try:
That sudo syntax threw an error on my machine. ( su uses the
-c option, but I don't think sudo does.) I had better luck with:
HomeDir=$( sudo -u "$1" -H -s echo "\$HOME" ) – palswim
Oct 13 '16 at 20:21
"... (which means "substitute user" or "switch user") ..."
"... (hmm... what's the mnemonic? Super-User-DO?) ..."
"... The official meaning of "su" is "substitute user" ..."
"... Interestingly, Ubuntu's manpage does not mention "substitute" at all. The manpage at gnu.org ( gnu.org/software/coreutils/manual/html_node/su-invocation.html ) does indeed say "su: Run a command with substitute user and group ID". ..."
"... sudo -s runs a [specified] shell with root privileges. sudo -i also acquires the root user's environment. ..."
"... To see the difference between su and sudo -s , do cd ~ and then pwd after each of them. In the first case, you'll be in root's home directory, because you're root. In the second case, you'll be in your own home directory, because you're yourself with root privileges. There's more discussion of this exact question here . ..."
"... I noticed sudo -s doesnt seem to process /etc/profile ..."
The main difference between these commands is in the way they restrict access to their
functions.
su(which means "substitute user" or "switch user") - does exactly
that, it starts another shell instance with privileges of the target user. To ensure you have
the rights to do that, it asks you for the password of the target user . So, to become root,
you need to know root password. If there are several users on your machine who need to run
commands as root, they all need to know root password - note that it'll be the same password.
If you need to revoke admin permissions from one of the users, you need to change root
password and tell it only to those people who need to keep access - messy.
sudo(hmm... what's the mnemonic? Super-User-DO?) is completely
different. It uses a config file (/etc/sudoers) which lists which users have rights to
specific actions (run commands as root, etc.) When invoked, it asks for the password of the
user who started it - to ensure the person at the terminal is really the same "joe" who's
listed in /etc/sudoers . To revoke admin privileges from a person, you just need
to edit the config file (or remove the user from a group which is listed in that config).
This results in much cleaner management of privileges.
As a result of this, in many Debian-based systems root user has no password
set - i.e. it's not possible to login as root directly.
Also, /etc/sudoers allows to specify some additional options - i.e. user X is
only able to run program Y etc.
The often-used sudo su combination works as follows: first sudo
asks you for your password, and, if you're allowed to do so, invokes the next
command ( su ) as a super-user. Because su is invoked by
root , it require you to enter your password instead of root.
So,
sudo su allows you to open a shell as another user (including root), if you're
allowed super-user access by the /etc/sudoers file.
I've never seen su as "switch user", but always as superuser; the default
behavior without another's user name (though it makes sense). From wikipedia : "The su command, also referred to as super user[1] as early as 1974,
has also been called "substitute user", "spoof user" or "set user" because it allows changing the account associated with the
current terminal (window)."
@dr jimbob: you're right, but I'm finding that "switch user" is kinda describes better what
it does - though historically it stands for "super user". I'm also delighted to find that the
wikipedia article is very similar to my answer - I never saw the article before :)
sudo lets you run commands in your own user account with root privileges.
su lets you switch user so that you're actually logged in as root.
sudo -s runs a [specified] shell with root privileges. sudo -i also acquires
the root user's environment.
To see the difference between su and sudo -s , do cd
~ and then pwd after each of them. In the first case, you'll be in root's
home directory, because you're root. In the second case, you'll be in your own home
directory, because you're yourself with root privileges. There's more discussion of this exact question here .
"you're yourself with root privileges" is not what's actually happening :) Actually, it's not
possible to be "yourself with root privileges" - either you're root or you're yourself. Try
typing whoami in both cases. The fact that cd ~ results are different is
a result of sudo -s not setting $HOME environment variable. – Sergey
Oct 22 '11 at 7:28
@Sergey, whoami it says are 'root' because you are running the 'whoami' cmd as though you
sudoed it, so temporarily (for the duration of that command) you appear to be the root user,
but you might still not have full root access according to the sudoers file. –
Octopus
Feb 6 '15 at 22:15
@Octopus: what I was trying to say is that in Unix, a process can only have one UID, and that
UID determines the permissions of the process. You can't be "yourself with root privileges",
a program either runs with your UID or with root's UID (0). – Sergey
Feb 6 '15 at 22:24
Regarding "you might still not have full root access according to the sudoers file": the
sudoers file controls who can run which command as another user, but that happens before the command is executed.
However, once you were allowed to start a process as, say, root -- the running process has root's UID and has a full access to the system, there's
no way for sudo to restrict that.
Again, you're always either yourself or root, there's no
"half-n-half". So, if sudoers file allows you to run shell as root -- permissions
in that shell would be indistinguishable from a "normal" root shell. – Sergey
Feb 6 '15 at 22:32
This answer is a dupe of my answer on a
dupe of this question , put here on the canonical answer so that people can find it!
The major difference between sudo -i and sudo -s is:
sudo -i gives you the root environment, i.e. your ~/.bashrc
is ignored.
sudo -s gives you the user's environment, so your ~/.bashrc
is respected.
Here is an example, you can see that I have an application lsl in my
~/.bin/ directory which is accessible via sudo -s but not
accessible with sudo -i . Note also that the Bash prompt changes as will with
sudo -i but not with sudo -s :
dotancohen@melancholy:~$ ls .bin
lsl

dotancohen@melancholy:~$ which lsl
/home/dotancohen/.bin/lsl

dotancohen@melancholy:~$ sudo -i

root@melancholy:~# which lsl

root@melancholy:~# exit
logout

dotancohen@melancholy:~$ sudo -s
Sourced .bashrc

dotancohen@melancholy:~$ which lsl
/home/dotancohen/.bin/lsl

dotancohen@melancholy:~$ exit
exit
Though sudo -s is convenient for giving you the environment that you are
familiar with, I recommend the use of sudo -i for two reasons:
The visual reminder that you are in a 'root' session.
The root environment is far less likely to be poisoned with malware, such as a rogue
line in .bashrc .
sudo asks for your own password (and also checks if you're allowed to run
commands as root, which is configured through /etc/sudoers -- by default all
user accounts that belong to the "admin" group are allowed to use sudo).
sudo -s launches a shell as root, but doesn't change your working directory.
sudo -i simulates a login into the root account: your working directory will be
/root , and root's .profile etc. will be sourced as if on
login.
to make the answer more complete: sudo -s is almost equal to su
($HOME is different) and sudo -i is equal to su - –
In Ubuntu or a related system, I don't find much use for su in the traditional,
super-user sense. sudo handles that case much better. However, su
is great for becoming another user in one-off situations where configuring sudoers would be
silly.
For example, if I'm repairing my system from a live CD/USB, I'll often mount my hard drive
and other necessary stuff and chroot into the system. In such a case, my first
command is generally:
su - myuser # Note the '-'. It means to act as if that user had just logged in.
That way, I'm operating not as root, but as my normal user, and I then use
sudo as appropriate.
"... To invoke a login shell using sudo just use -i . When command is not specified you'll get a login shell prompt, otherwise you'll get the output of your command. ..."
To invoke a login shell using sudo just use -i . When command is not specified you'll get a login
shell prompt, otherwise you'll get the output of your command.
By default, sudo asks the user to identify himself using his own password. Once a password
is entered, sudo remembers it for 5 minutes, allowing the user to focus on his tasks and not
repeatedly re-entering his password.
Of course, this behavior can be changed: you can set the Defaults: directive in
/etc/sudoers to change the default behavior for a user.
For instance, to change the default 5 minutes to 0 (never remember):
CODE Changing the
timeout value
Defaults:larry timestamp_timeout=0
A setting of -1 would remember the password indefinitely (until the system
reboots).
A different setting would be to require the password of the user that the command should be
run as and not the users' personal password. This is accomplished using runaspw .
In the following example we also set the number of retries (how many times the user can
re-enter a password before sudo fails) to 2 instead of the default 3:
This is nothing to do with another physical user. Both ID's are mine. I know the password as
I created the account. I just don't want to have to type the password every time. –
zio
Feb 17 '13 at 13:24
It needs a bit of configuration though, but once done you would only do this:
sudo -u user2 -s
And you would be logged in as user2 without entering a password.
Configuration
To configure sudo, you must edit its configuration file via: visudo . Note:
this command will open the configuration using the vi text editor, if you are
unconfortable with that, you need to set another editor (using export
EDITOR=<command> ) before executing the following line. Another command line
editor sometimes regarded as easier is nano , so you would do export
EDITOR=/usr/bin/nano . You usually need super user privilege for visudo
:
sudo
      visudo
This file is structured in different section, the aliases, then defaults and finally at
the end you have the rules. This is where you need to add the new line. So you navigate at
the end of the file and add this:
user1 ALL=(user2) NOPASSWD: /bin/bash
You can replace also /bin/bash by ALL and then you could launch
any command as user2 without a password: sudo -u user2 <command>
.
Update
I have just seen your comment regarding Skype. You could consider adding Skype directly to
the sudo's configuration file. I assume you have Skype installed in your
Applications folder:
One thing to note from a security-perspective is that specifying a specific command implies
that it should be a read-only command for user1; Otherwise, they can overwrite the command
with something else and run that as user2. And if you don't care about that, then you might
as well specify that user1 can run any command as user2 and therefore have a simpler
sudo config. – Stan Kurdziel
Oct 26 '15 at 16:56
@StanKurdziel good point! Although it is something to be aware of, it's really seldom to have
system executables writable by users unless you're root but in this case you don't need sudo
;-) But you're right to add this comment because it's so seldom that I've probably overlooked
it more than one time. – Huygens
Oct 26 '15 at 19:24
To get it nearer to the behaviour su - user2 instead of su user2 ,
the commands should probably all involve sudo -u user2 -i , in order to simulate
an initial login as user2 – Gert van den Berg
Aug 10 '16 at 14:24
You'd still have the issues where Skype gets confused since two instances are running on
one user account and files read/written by that program might conflict. It also might work
well enough for your needs and you'd not need an iPod touch to run your second Skype
instance.
This is a good secure solution for the general case of password-free login to any account on
any host, but I'd say it's probably overkill when both accounts are on the same host and
belong to the same user. – calum_b
Feb 18 '13 at 9:54
@scottishwildcat It's far more secure than the alternative of scripting the password and
feeding it in clear text or using a variable and storing the password in the keychain and
using a tool like expect to script the interaction. I just use sudo su -
blah and type my password. I think the other answer covers sudo well enough to keep
this as a comment. – bmike ♦
Feb 18 '13 at 14:02
We appear to be in total agreement - thanks for the addition - feel free to edit it into the
answer if you can improve on it. – bmike ♦
Feb 18 '13 at 18:46
The accepted solution ( sudo -u user2 <...> ) does have the advantage that
it can't be used remotely, which might help for security - there is no private key for user1
that can be stolen. – Gert van den Berg
Aug 10 '16 at 14:20
If you want to use sudo su - user without a password, you should (if you have
the privileges) do the following on you sudoers file:
<youuser> ALL = NOPASSWD: /bin/su - <otheruser>
where:
<yourusername> is you username :D (saumun89, i.e.)
<otheruser> is the user you want to change to
Then put into the script:
sudo /bin/su - <otheruser>
Doing just this, won't get subsequent commands get run by <otheruser> ,
it will spawn a new shell. If you want to run another command from within the script as this
other user, you should use something like:
sudo -u <otheruser> <command>
And in sudoers file:
<yourusername> ALL = (<otheruser>) NOPASSWD: <command>
Obviously, a more generic line like:
<yourusername> ALL = (ALL) NOPASSWD: ALL
Will get things done, but would grant the permission to do anything as anyone.
when the sudo su - user command gets executed,it asks for a password. i want a solution in
which script automaticaaly reads password from somewhere. i dont have permission to do what u
told earlier. – sam
Feb 9 '11 at 11:43
echo "your_password" | sudo -S [rest of your parameters for sudo]
(Of course without [ and ])
Please note that you should protect your script from read access from unauthorized users.
If you want to read password from separate file, you can use
sudo -S [rest of your parameters for sudo] < /etc/sudo_password_file
(Or whatever is the name of password file, containing password and single line break.)
From sudo man page:
   -S          The -S (stdin) option causes sudo to read the password from
               the standard input instead of the terminal device.  The
               password must be followed by a newline character.
The easiest way is to make it so that user doesn't have to type a password at all.
You can do that by running visudo , then changing the line that looks
like:
someuser ALL=(ALL) ALL
to
someuser ALL=(ALL) NOPASSWD: ALL
However if it's just for one script, it would be more secure to restrict passwordless
access to only that script, and remove the (ALL) , so they can only run it as
root, not any user , e.g.
i do not have permission to edit sudoers file.. any other so that it should read password
from somewhere so that automation of this can be done. – sam
Feb 9 '11 at 11:34
you are out of luck ... you could do this with, lets say expect but that would
let the password for your user hardcoded somewhere, where people could see it (granted that
you setup permissions the right way, it could still be read by root). – Torian
Feb 9 '11 at 11:40
when the sudo su - user command gets executed,it asks for a password. i want a solution in
which script automaticaaly reads password from somewhere. i dont have permission to edit
sudoers file.i have the permission to store password in a file.the script should read
password from that file – sam
The sudoers policy plugin determines a user's sudo privileges.
For the targetpw:
sudo will prompt for the password of the user specified by the -u option (defaults to
root) instead of the password of the invoking user when running a command or editing a
file.
sudo(8) allows you to execute commands as someone else
So, basically it says that any user can run any command on any host as any user and yes,
the user just has to authenticate, but with the password of the other user, in order to run
anything.
The first ALL is the users allowed
The second one is the hosts
The third one is the user as you are running the command
The last one is the commands allowed
is "ALL ALL=!SUDOSUDO" as the last line is like when having DROP iptables POLICY and still
using a -j DROP rule as last rule in ex.: INPUT chain? :D or does it has real effects?
– gasko peter
Dec 6 '12 at 14:30
"... The special command '"sudoedit"' allows users to run sudo with the -e flag or as the command sudoedit . If you include command line arguments in a command in an alias these must exactly match what the user enters on the command line. If you include any of the following they will need to be escaped with a backslash (\): ",", "\", ":", "=". ..."
There are four kinds of aliases: User_Alias, Runas_Alias, Host_Alias and Cmnd_Alias. Each
alias definition is of the form:
Alias_Type NAME = item1, item2, ...
Where Alias_Type is one of User_Alias, Runas_Alias, Host_Alias or Cmnd_Alias. A name is a
string of uppercase letters, numbers and underscores starting with an uppercase letter. You can
put several aliases of the same type on one line by separating them with colons (:) as so:
Alias_Type NAME1 = item1, item2 : NAME2 = item3
You can include other aliases in an alias specification provided they would normally fit
there. For example you can use a user alias wherever you would normally expect to see a list of
users (for example in a user or runas alias).
There are also built in aliases called ALL which match everything where they are used. If
you used ALL in place of a user list it matches all users for example. If you try and set an
alias of ALL it will be overridden by this built in alias so don't even try.
User
Aliases
User aliases are used to specify groups of users. You can specify usernames, system groups
(prefixed by a %) and netgroups (prefixed by a +) as follows:
 # Everybody in the system group "admin" is covered by the alias ADMINS
 User_Alias ADMINS = %admin
 # The users "tom", "dick", and "harry" are covered by the USERS alias
 User_Alias USERS = tom, dick, harry
 # The users "tom" and "mary" are in the WEBMASTERS alias
 User_Alias WEBMASTERS = tom, mary
 # You can also use ! to exclude users from an alias
 # This matches anybody in the USERS alias who isn't in WEBMASTERS or ADMINS aliases
 User_Alias LIMITED_USERS = USERS, !WEBMASTERS, !ADMINS
Runas Aliases
Runas Aliases are almost the same as user aliases but you are allowed to specify users by
uid's. This is helpful as usernames and groups are matched as strings so two users with the
same uid but different usernames will not be matched by entering a single username but can be
matched with a uid. For example:
 # UID 0 is normally used for root
 # Note the hash (#) on the following line indicates a uid, not a comment.
 Runas_Alias ROOT = #0
 # This is for all the admin users similar to the User_Alias of ADMINS set earlier
 # with the addition of "root"
 Runas_Alias ADMINS = %admin, root
Host Aliases
A host alias is a list of hostname, ip addresses, networks and netgroups (prefixed with a
+). If you do not specify a netmask with a network the netmask of the hosts ethernet
interface(s) will be used when matching.
 # This is all the servers
 Host_Alias SERVERS = 192.168.0.1, 192.168.0.2, server1
 # This is the whole network
 Host_Alias NETWORK = 192.168.0.0/255.255.255.0
 # And this is every machine in the network that is not a server
 Host_Alias WORKSTATIONS = NETWORK, !SERVER
 # This could have been done in one step with
 # Host_Alias WORKSTATIONS = 192.168.0.0/255.255.255.0, !SERVERS
 # but I think this method is clearer.
Command Aliases
Command aliases are lists of commands and directories. You can use this to specify a group
of commands. If you specify a directory it will include any file within that directory but not
in any subdirectories.
The special command '"sudoedit"' allows users to run sudo with the -e flag or as
the command sudoedit . If you include command line arguments in a command in an alias
these must exactly match what the user enters on the command line. If you include any of the
following they will need to be escaped with a backslash (\): ",", "\", ":", "=".
User Specifications are where the sudoers file sets who can run what as who. It is the key
part of the file and all the aliases have just been set up for this very point. If this was a
film this part is where all the key threads of the story come together in the glorious
unveiling before the final climatic ending. Basically it is important and without this you
ain't going anywhere.
The user list is a list of users or a user alias that has already been set, the host list is
a list of hosts or a host alias, the operator list is a list of users they must be running as
or a runas alias and the command list is a list of commands or a cmnd alias.
The tag list has not been covered yet and allows you set special things for each command.
You can use PASSWD and NOPASSWD to specify whether the user has to enter a password or not and
you can also use NOEXEC to prevent any programs launching shells themselves (as once a program
is running with sudo it has full root privileges so could launch a root shell to circumvent any
restrictions in the sudoers file.
For example (using the aliases and users from earlier)
 # This lets the webmasters run all the web commands on the machine
 # "webserver" provided they give a password
 WEBMASTERS webserver= WEB_CMDS
 # This lets the admins run all the admin commands on the servers
 ADMINS SERVERS= ADMIN_CMDS
 # This lets all the USERS run admin commands on the workstations provided
 # they give the root password or and admin password (using "sudo -u <username>")
 USERS WORKSTATIONS=(ADMINS) ADMIN_CMDS
 # This lets "harry" shutdown his own machine without a password
 harry harrys-machine= NOPASSWD: SHUTDOWN_CMDS
 # And this lets everybody print without requiring a password
 ALL ALL=(ALL) NOPASSWD: PRINTING_CMDS
The Default Ubuntu Sudoers File
The sudoers file that ships with Ubuntu 8.04 by default is included here so if you break
everything you can restore it if needed and also to highlight some key things.
# /etc/sudoers
#
# This file MUST be edited with the 'visudo' command as root.
#
# See the man page for details on how to write a sudoers file.
#

Defaults    env_reset

# Uncomment to allow members of group sudo to not need a password
# %sudo ALL=NOPASSWD: ALL

# Host alias specification

# User alias specification

# Cmnd alias specification

# User privilege specification
root    ALL=(ALL) ALL

# Members of the admin group may gain root privileges
%admin ALL=(ALL) ALL
This is pretty much empty and only has three rules in it. The first ( Defaults
env_reset ) resets the terminal environment after switching to root. So, ie: all user set
variables are removed. The second ( root ALL=(ALL) ALL ) just lets root do everything
on any machine as any user. And the third ( %admin ALL=(ALL) ALL ) lets anybody in the
admin group run anything as any user. Note that they will still require a password (thus giving
you the normal behaviour you are so used to).
If you want to add your own specifications and you are a member of the admin group then you
will need to add them after this line. Otherwise all your changes will be overridden by this
line saying you (as part of the admin group) can do anything on any machine as any user
provided you give a password.
Common Tasks
This section includes some common tasks and how to accomplish them using the sudoers
file.
Shutting Down From The Console Without A Password
Often people want to be able to shut their computers down without requiring a password to do
so. This is particularly useful in media PCs where you want to be able to use the shutdown
command in the media centre to shutdown the whole computer.
To do this you need to add some cmnd aliases as follows:
You also need to add a user specification (at the end of the file after the " %admin ALL
= (ALL) ALL " line so it takes effect - see above for details):
<your username> ALL=(ALL) NOPASSWD: SHUTDOWN_CMDS
Obviously you need to replace "<your username>" with the username of the user who
needs to be able to shutdown the pc without a password. You can use a user alias here as
normal.
Multiple tags on a line
There are times where you need to have both NOPASSWD and NOEXEC or other tags on the same
configuration line. The man page for sudoers is less than clear, so here is an example of how
this is done:
myuser ALL = (root) NOPASSWD:NOEXEC: /usr/bin/vim
This example lets the user "myuser" run as root the "vim" binary without a password, and
without letting vim shell out (the :shell command).
Enabling Visual Feedback when Typing
Passwords
As of Ubuntu 10.04 (Lucid), you can enable visual feedback when you are typing a password at
a sudo prompt.
Simply edit /etc/sudoers and change the Defaults line to read:
Defaults env_reset,pwfeedback
Troubleshooting
If your changes don't seem to have had any effect, check that they are not trying to use
aliases that are not defined yet and that no other user specifications later in the file are
overriding what you are trying to accomplish.
"... A command may also be the full path to a directory (including a trailing /). This permits execution of all the files in that directory, but not in any subdirectories. ..."
"... The keyword sudoedit is also recognised as a command name, and arguments can be specified as with other commands. Use this instead of allowing a particular editor to be run with sudo, because it runs the editor as the user and only installs the editor's output file into place as root (or other target user). ..."
The /etc/sudoers file contains "user specifications" that define the commands that users may
execute. When sudo is invoked, these specifications are checked in order, and the last match is
used. A user specification looks like this at its most basic:
User Host = (Runas) Command
Read this as "User may run Command as the Runas user on Host".
Any or all of the above may be the special keyword ALL, which always matches.
User and Runas may be usernames, group names prefixed with %, numeric UIDs prefixed with #,
or numeric GIDs prefixed with %#. Host may be a hostname, IP address, or a whole network (e.g.,
192.0.2.0/24), but not 127.0.0.1.
Runas
This optional clause controls the target user (and group) sudo will run the Command as, or
in other words, which combinations of the -u and -g arguments it will accept.
If the clause is omitted, the user will be permitted to run commands only as root. If you
specify a username, e.g., (postgres), sudo will accept "-u postgres" and run commands as that
user. In both cases, sudo will not accept -g.
If you also specify a target group, e.g., (postgres:postgres), sudo will accept any
combination of the listed users and groups (see the section on aliases below). If you specify
only a target group, e.g., (:postgres), sudo will accept and act on "-g postgres" but run
commands only as the invoking user.
This is why you sometimes see (ALL:ALL) in the 90% of examples.
Commands
In the simplest case, a command is the full path to an executable, which permits it to be
executed with any arguments. You may specify a list of arguments after the path to permit the
command only with those exact arguments, or write "" to permit execution only without any
arguments.
A command may also be the full path to a directory (including a trailing /). This permits
execution of all the files in that directory, but not in any subdirectories.
The keyword sudoedit is also recognised as a command name, and arguments can be specified as
with other commands. Use this instead of allowing a particular editor to be run with sudo,
because it runs the editor as the user and only installs the editor's output file into place as
root (or other target user).
As shown above, comma-separated lists of commands and aliases may be specified. Commands may
also use shell wildcards either in the path or in the argument list (but see the warning below
about the latter).
Sudo is very flexible, and it's tempting to set up very fine-grained access, but it can be
difficult to understand the consequences of a complex setup, and you can end up with unexpected
problems . Try to keep things simple.
Options
Before the command, you can specify zero or more options to control how it will be executed.
The most important options are NOPASSWD (to not require a password) and SETENV (to allow the
user to set environment variables for the command).
ams ALL=(ALL) NOPASSWD: SETENV: /bin/ls
Other available options include NOEXEC, LOG_INPUT and LOG_OUTPUT, and SELinux role and type
specifications. These are all documented in the manpage.
Digests
The path to a binary (i.e., not a directory or alias) may also be prefixed with a
digest:
The specified binary will then be executed only if it matches the digest. SHA-2 digests of
224, 256, 384, and 512-bits are accepted in hex or Base64 format. The values can be generated
using, e.g., sha512sum or openssl.
Aliases
In addition to the things listed above, a User, Host, Runas, or Command may be an alias,
which is a named list of comma-separated values of the corresponding type. An alias may be used
wherever a User, Host, Runas, or Command may occur. They are always named in uppercase, and can
be defined as shown in these examples:
An alias definition can also include another alias of the same type (e.g., LEGACYUSERS
above). You cannot include options like NOPASSWD: in command aliases.
Any term in a list may be prefixed with ! to negate it. This can be used to include a group
but exclude a certain user, or to exclude certain addresses in a network, and so on. Negation
can also be used in command lists, but note the manpage's warning that trying to "subtract"
commands from ALL using ! is generally not effective .
Use aliases whenever you need rules involving multiple users, hosts, or
commands.
Default options
Sudo has a number of options whose values may be set in the configuration file, overriding
the defaults either unconditionally, or only for a given user, host, or command. The defaults
are sensible, so you do not need to care about options unless you're doing something
special.
Option values are specified in one or more "Defaults" lines. The example below switches on
env_reset, turns off insults (read !insults as "not insults"), sets password_tries to 4, and so
on. All the values are set unconditionally, i.e. they apply to every user specification.
Defaults env_reset, !insults, password_tries=4, \
    lecture=always
Defaults passprompt="Password for %p:"
Options may also be set only for specific hosts, users, or commands, as shown below.
Defaults@host sets options for a host, Defaults:user for a (requesting) user, Defaults!command
for a command, and Defaults>user for a target user. You can also use aliases in these
definitions.
Unconditional defaults are parsed first, followed by host and user defaults, then runas
defaults, then command defaults.
The many available options are explained well in the
manpage.
Complications
In addition to the alias mechanism, a User, Host, Runas, or Command may each be a
comma-separated list of things of the corresponding type. Also, a user specification may
contain multiple host and command sets for a single User. Please be sparing in your use of this
syntax, in case you ever have to make sense of it again.
Users and hosts can also be a +netgroup or other more esoteric things, depending on plugins.
Host names may also use shell wildcards (see the fqdn option).
If Runas is omitted but the () are not, sudo will reject -u and -g and run commands only as
the invoking user.
You can use wildcards in command paths and in arguments, but their meaning is different. In
a path, a * will not match a /, so /usr/bin/* will match /usr/bin/who but not
/usr/bin/X11/xterm. In arguments, a * does match /; also, arguments are matched as a
single string (not a list of separate words), so * can match across words. The manpage includes
the following problematic example, which permits additional arguments to be passed to /bin/cat
without restriction:
%operator ALL = /bin/cat /var/log/messages*
Warning : Sudo will not work if /etc/sudoers contains syntax errors, so you should
only ever edit it using visudo, which performs basic sanity checks, and installs the new file
only if it parses correctly.
Another warning: if you take the EBNF in the manpage seriously enough, you will discover
that the implementation doesn't follow it. You can avoid this sad fate by linking to this
article instead of trying to write your own. Happy sudoing!
This is an example of the contents of the sudoers file is located in the
/etc directory of the UNIX target computer. This example contains sample
configurations required to use the sudo functionality as mentioned in the section Using sudo
functionality for querying Oracle UNIX targets .
Over time, your sudoers file will grow with more and more entries, which is to be expected. This could be because more application
environments are being placed on the server, or because of splitting the delegation of currents tasks down further to segregate responsibility.
With many entries, typos can occur, which is common. Making the sudoers file more manageable by the root user makes good administrative
sense. Let's look at two ways this can be achieved, or at least a good standard to build on. If you have many static entries (meaning
the same command is run on every machine where sudo is), put these into a separate sudoers file, which can be achieved using the
include directive.
Having many entries for individual users can also be time consuming when adding or amending entries. With many user entries, it
is good practice to put these into groups. Using groups, you can literally group users together, and the groups are valid AIX groups.
Now look at these two methods more closely.
Include file
Within large-enterprise environments, keeping the sudoers file maintained is an important and regularly required task. A solution
to make this chore easier is to reorganize the sudoers file. One way to do this is to extract entries that are static or reusable,
where the same commands are run on every box. Like audit/security or storix backups or general performance reports, with sudo you
can now use the include directive. The main sudoers file can then contain the local entries, and the include file would barely need
editing as those entries are static. When visudo is invoked, it will scan sudoers when it sees the include entry. It will scan that
file, then come back to the main sudoers and carry on scanning. In reality, it works like this. When you exit out of visudo from
the main sudoers file, it will take you to the include file for editing. Once you quit the include, you are back to the AIX prompt.
You can have more than one include file, but I cannot think of a reason why you would want more than one.
Let's call our secondary sudoers file sudo_static.<hostname>. In the examples in this demonstration the hostname I am using is
rs6000. In the main sudoers file, make the entry as follows:
1
#include /etc/sudo_static.rs6000
Next, add some entries to the /etc/sudo_static.rs6000 file. You do not have to put in all the sudoers directives or stanzas. If
this file contains entries where they are not required, don't include them. For example, my include file contains only the following
text, and nothing more.
You can use the %h, instead of typing the actual hostname:
I personally do not use this method because I have experienced returning extra characters on the hostname. This issue is fixed
in sudo 1.7.2 p1.
When you run visudo, and you save and quit the file, visudo will inform you to click Enter to edit the include sudoers file. Once
you have edited the file, sudo will pick up on syntax errors if any, as with the main file. Alternatively, to edit the include file
directly, use:
1
visudo -f /etc/sudo_static.rs6000
Using groups
Users belonging to a valid AIX group can be included in sudoers, making the sudoers file more manageable with fewer entries per
user. When reorganizing the sudoers entries to include groups, you may have to create a new groups under AIX to include users that
are only allowed to use sudo for certain commands. To use groups, simply prefix the entries with a '%'. Assume you have groups called
devops and devuat , and with those groups you have the following users:
1 2 3 4 5 6 7 8
# lsgroup -f -a users devopsdevops:users=joex,delta,charlie,tstgn# lsgroup
-f -a users devuatdevuat:users=zebra,spsys,charlie
For the group devops to be allowed to run the /usr/local/bin/data_ext.sh command as dbdftst.
For the group devuat to be allowed to run the commands :/usr/local/bin/data_mvup.sh, /usr/local/bin/data_rep.sh as dbukuat.
Notice in the previous entries, the group devops users will not be prompted for their password when executing /usr/local/bin/data_ext.sh;
however, the group devuat users will be prompted for their password. User "charlie" is a member of both groups ( devops
and devuat ), so he can execute all the above commands.
Timeout with sudo
Sudo has a feature that uses time tickets to determine how long since the last sudo command was run. During this time period,
the user can re-run the command without being prompted for the password (that's the user's own password). Once this time allotment
has ended, the user is prompted for the password again to re-run the command. If the user gives the correct password, the command
is executed, the ticket is then re-set, and the time clock starts all over again. The ticket feature will not work if you have NOPASSWD
in the user's entry in sudoers. The default timeout is five minutes. If you wish to change the default value, simply put an entry
in sudoers. For example, to set the timeout value for user "bravo" on any commands he runs to 20 minutes, you could use:
1
Defaults:bravo timestamp_timeout=20
To destroy the ticket, as the user, use:
1
$ sudo -k
When the ticket is destroyed, the user will be prompted for his password again, when running a sudo command.
Please do not set the timeout value for all users, as this will cause problems, especially when running jobs in batch and the
batch takes longer to run than normal. To disable this feature, use the value -1 in the timestamp_timeout variable. The
time tickets are directory entries with the name of the user located in /var/run/sudo.
Those variables
As discussed earlier, sudo will strip out potentially dangerous system variables. To check out what variables are kept and which
ones are stripped, use sudo -V . The output will give you a listing of preserved and stripped variables. Stripping out the LIBPATH
is clearly an inconvenience. There are a couple of ways around this--either write a wrapper script or specify the environments on
the command line. Looking at the wrapper script solution first, suppose you have an application that stops or starts a DB2® instance.
You could create a bare-bones script that would keep the variables intact. In
Listing 1. rc.db2 , notice that you
source the instance profile, which in turn exports various LIBPATH and DB2 environment variables, keeping the environment variable
intact, by using:
1
. /home/$inst/sqllib/db2profile
For completeness, the entries in sudoers to execute this is and not strip out any system environment variables are:
If you do not put the !env_reset entry in, you will get the following error from sudo when you try to run the command:
1
sudo: sorry, you are not allowed to set the following environment variables: LIBPATH
If you find that sudo is also stripping out other environment variables, you can specify the variable name in sudoers so that
sudo keeps those variables intact (with the Defaults env_keep += directive). For instance, suppose sudo was stripping out the application
variables DSTAGE_SUP and DSTAGE_META from one of my suodo-ised scripts. To preserve these variables, I could put the following entries
in sudoers:
Now when the sudo script is executed, the above environment variables are preserved.
Securing the sudo path
A default PATH within sudoers can be imposed using the secure_path directive. This directive specifies where to look for binaries
and commands when a user executes a sudo command. This option clearly tries to lock down specific areas where a user runs a sudo
command, which is good practice. Use the following directive in sudoers, specifying the secure PATH with its search directories:
Restrictions can be put in place to restrict certain commands to users. Assume you have a group called dataex , whose
members are "alpha," "bravo," and "charlie." Now, that group has been allowed to run the sudo command /usr/local/bin/mis_ext * ,
where the asterisk represents the many parameters passed to the script. However, user "charlie" is not allowed to execute that script
if the parameter is import . This type of condition can be met by using the logical NOT '!' operator. Here is how that is achieved
in sudoers:
Note that the logical NOT operator entries go after the non-restrictive entry. Many conditional NOT entries can be applied on
the same line; just make sure that they are comma separated, like so:
When in visudo, do not think just saving the sudo entry and staying in visudo will make the changes effective; it won't. You must
exit visudo for the changes to take effect. Rolling out sudo commands
Rolling out sudo commands to remote hosts in an enterprise environment is best done using a ssh script as root, and the keys should
have been exchanged between the hosts, for password-less logins. Let's look at one example of how to do this. With geographically
remote machines, if you get a hardware issue of some sort (disk or memory), the IBM® engineer will be on-site to replace the failing
hardware. There will be occasions when they require the root password to carry out their task. One procedure you might want to put
in place is for the engineer to gain access to root they must use sudo. Informing the engineer prior to the visit of the password
would be advantageous. Listing 2 demonstrates
one way you could roll out this configuration. Looking more closely at
Listing 2 , use a for loop containing
a list of hosts you are pushing out to. (Generally, though, you would have these hosts in a text file and read them in using a while
loop.) Using the 'here' document method, make a backup copy of sudoers, and an entry is then appended to sudoers, like so:
Next, the user "ibmeng" is created, and the password is set for the user using chpasswd . In this demonstration, it is ibmpw
. A message is then appended to their profile, informing the user how to sudo to root. So when the engineer logs in, he is presented
with the message:
1
IBM Engineer, to access root account type: sudo -u root su -
Of course the account for ibmeng would be locked after the visit.
Sudo allows you to control who can run what commands as whom. But you must be able to understand the features of sudoers fully
to gain maximum understanding of its implications and responsibility.
Download IBM product evaluation versions and
get your hands on application development tools and middleware products from DB2®, Lotus®, Rational®, Tivoli®, and WebSphere®.
In order to use a netgroup in the sudoers file, you just need to explicitly define it as a netgroup
by using the " + " sign (instead of a " % " sign that would be used for a system group).
You will need to include this netgroup inside a User_Alias (you may want to create a new User_Alias
for this purpose)
Please check the " 3.1.2 User_Alias " section for more infos, and feel free to ask for more detailed explanation.
I've setup the .ssh/authorized_keys and am able to login with the new "user"
using the pub/private key ... I have also added "user" to the sudoers list ...
the problem I have now is when I try to execute a sudo command, something simple
like:
$ sudo cd /root
it will prompt me for my password, which I enter, but it doesn't work (I
am using the private key password I set)
Also, ive disabled the users password using
$ passwd -l user
What am I missing?
Somewhere my initial remarks are being misunderstood ...
I am trying to harden my system ... the ultimate goal is to use pub/private
keys to do logins versus simple password authentication. I've figured out how
to set all that up via the authorized_keys file.
Additionally I will ultimately prevent server logins through the root account.
But before I do that I need sudo to work for a second user (the user which I
will be login into the system with all the time).
For this second user I want to prevent regular password logins and force
only pub/private key logins, if I don't lock the user via" passwd -l user ...
then if i dont use a key, i can still get into the server with a regular password.
But more importantly I need to get sudo to work with a pub/private
key setup with a user whos had his/her password disabled.
Edit: Ok I think I've got it (the solution):
1) I've adjusted /etc/ssh/sshd_config and set PasswordAuthentication
no This will prevent ssh password logins (be sure to have a working public/private
key setup prior to doing this
2) I've adjusted the sudoers list visudo and added
root ALL=(ALL) ALL
dimas ALL=(ALL) NOPASSWD: ALL
3) root is the only user account that will have a password, I am testing
with two user accounts "dimas" and "sherry" which do not have a password set
(passwords are blank, passwd -d user)
The above essentially prevents everyone from logging into the system with
passwords (a public/private key must be setup).
Additionally users in the sudoers list have admin abilities. They can also
su to different accounts. So basically "dimas" can sudo su
sherry, however "dimas can NOT do su sherry. Similarly any
user NOT in the sudoers list can NOT do su user or sudo su
user.
NOTE The above works but is considered poor security. Any
script that is able to access code as the "dimas" or "sherry" users will be
able to execute sudo to gain root access. A bug in ssh that allows remote users
to log in despite the settings, a remote code execution in something like firefox,
or any other flaw that allows unwanted code to run as the user will now be able
to run as root. Sudo should always require a password or you may as well log
in as root instead of some other user.
ssh and sudo have nothing to do with each other.
Setting up an ssh authentication method isn't going to do anything
for sudo. sudo isn't going to understand an
ssh password.
passwd -l is intended to lock a user's account, so that he can
no longer authenticate by password. That's pretty much the opposite of what
you want, which is letting the user authenticate without a password.
(PS, there's no reason to be running a cd command with
sudo. cd does not propagate to parent processes, so as soon
as the sudo exits, you're back where you started.)
Edit: You keep saying that you want to lock the account
password and want sudo to understand public/private keys. Sorry, sudo isn't
going to use ssh keys. It isn't ssh. If you don't want users to be able to log
in with their passwords, I think the answer is to
disable ssh password authentication, not to lock the account. Then you can
retain a password for the users, which they can use to sudo after they log in
via ssh authorized_keys.
@farinspace Yes, I understand the question better and have substantially expanded
my remarks. passwd -l removes the password in the sense that the
account is LOCKED--that is, no password will work. You want to turn off password
authentication in sudo. –
how is this logic: turning off the password in the sudoers file would still
be secure, as the system is hardened via the pub/private key logins ... and
again only admin would be able to add users to sudoers list –
when using a private key is it typical to set a password for it, or is it
secure enough to simply not have it set and bypass any password entry on server
login –
With virtualization environments, a simple infrastructure contains easily
15/20 hosts. Administrators often have to perform operations across several
hosts. One of the consequences : a (good) administrator has to input his passwords
to "unlock" sudo several dozen times per day.
There are many bad solutions. Good ones are not so numerous. We're testing
one of them for 2 weeks : libpam-ssh-agent or
pam ssh agent auth (its
original name).
The principle is simple : you're already using a password-less authentication
for ssh. libpam-ssh-agent provides a solution to use this mechanism in every
pam configuration. It looks like a real good solution for sudo authentication.
Configure libpam-ssh-agent
A small example with your laptop and one of your servers : your ssh dsa/rsa
private/public
key pair is on your laptop, it has a strong passphrase (or …
create a new one !). A
ssh-agent allows you to
enter this passphrase less frequently.
In this configuration, each user can authorize its own keys. If you don't
trust them enough, use a file managed by you (like /etc/security/authorized_keys).
Allow the ssh authentication socket to be accessible in the a sudo environment
by adding this line in the server /etc/sudoers :
$ ssh-keygen -t dsa
Generating public/private dsa key pair.
Enter passphrase (empty for no passphrase):
Enter same passphrase again:
Your identification has been saved in ~/.ssh/id_dsa.
Your public key has been saved in ~/.ssh/id_dsa.pub.
The key fingerprint is:
5e:9f:8c:b4:84:57:5b:23:67:18:37:57:6e:d8:27:2d alban@hyppo
The key's randomart image is:
+--[ DSA 1024]----+
| . o +|
| + B |
| + E *|
| . . * =.|
| S = . |
| . = = . |
| . o + |
| |
| |
+-----------------+
If needed, you can use the previous key by using the -i ssh
options :
In order to use sudo you first need to configure the sudoers
file. The sudoers file is located at /etc/sudoers. And you should
not edit it directly, you need to use the visudo command.
Once you enter visudo command, you will see something like this:
# /etc/sudoers
#
# This file MUST be edited with the 'visudo' command as root.
#
# See the man page for details on how to write a sudoers file.
#
Defaults env_reset
# Host alias specification
# User alias specification
# Cmnd alias specification
# User privilege specification
root ALL=(ALL) ALL
Almost all lines are commented out, the one that matters in this sudoers
file example is:
root ALL=(ALL) ALL
This line means: The root user can execute from ALL terminals, acting
as ALL (any) users, and run ALL (any) command.
The first part is the user, the second is the terminal from where the user
can use sudo command, the third part is which users he may act
as, and the last one, is which commands he may run when using sudo.
sudoers examples
operator ALL= /sbin/poweroff
The above command, makes the user operator can from any terminal, run the
command power off.
You can also create aliases for: users -> User_Alias, run commands as other
users -> Runas_Alias, host -> Host_Alias and command -> Cmnd_Alias
As you can see the alias OPERATORS includes the users joe, mike and jude,
the alias OP includes the users root and operator, alias OFNET includes the
network 10.1.2.0 (all the C class), and the command alias PRINTING includes
the commands lpc and lprm.
So, a typical sudoers file may look like this:
User_Alias OPERATORS = joe, mike, jude
Runas_Alias OP = root, operator
Host_Alias OFNET = 10.1.2.0/255.255.255.0
Cmnd_Alias PRINTING = /usr/sbin/lpc, /usr/bin/lprm
OPERATORS ALL=ALL
#The users in the OPERATORS group can run any command from
any terminal.
linus ALL=(OP) ALL
# The user linus can run any command from any terminal as any
user in the OP group (root or operator).
user2 OFNET=(ALL) ALL
# user user2 may run any command from any machine in the
OFNET network, as any user.
user3 ALL= PRINTING
# user user3 may run lpc and lprm from any machine.
go2linux ALL=(ALL) ALL
# user go2linux may run any command from any machine acting
as any user. (like Ubuntu)
If you want not to be asked for a password use this form:
As of May 24, 2012 the current stable release of sudo is
1.8.5p1.
May 17, 2012
A vulnerability has been reported in Sudo, which can be exploited by malicious
users to bypass certain security restrictions.
The vulnerability is caused due to an error within the network matching mechanism
when processing hosts based on the IPv4 netmask. This can be exploited to execute
commands from otherwise restricted hosts.
Successful exploitation requires that the user exists in the sudoers file
and is granted access to commands on hosts on one or more IPv4 networks.
The vulnerability is reported in versions 1.6.9p3 through 1.8.4p4.
Solution:
Update to version 1.8.4p5 or 1.7.9p1.
Provided and/or discovered by: Jan Lieskovsky (Red Hat).
Please just a quick one. Does any one know how I can restrict users from
being able to switch to root in sudoers file?? Presently the users are defined
in the sudoers file and could switch to another user without password but
I do not want them to be able to switch to root.
Note: If you are the author of this question and wish to assign points
to any of the answers, please login first.For more information on assigning
points ,click here
Patrick Wallek
:Use a command alias like this:
Cmnd_Alias SU=!/usr/bin/su -, !/usr/bin/su *root*
Add this to each user and they should not be able to su to root.
ozas ( Question Author )
I have tried that before it did not work. See below my sudoers file, maybe
I need to change anything.
This is the sudoers file:
# User_Alias
User_Alias WAS = g343ahe,m017ahe,y073ahe
User_Alias SUPPORT = d060ahe,h070ahe,s029ahe
#User privilege specification
root ALL=(ALL) ALL SUPPORT ALL=(ALL) ALL
SUPPORT ALL=(ALL) NOPASSWD: ALL WAS
ALL=(ALL) NOPASSWD: ALL WAS ALL=/usr/bin/su - wasdevadmin,/bin/su - wasdevadmin
What I want is that the users in WAS should not be able to switch to root,
but they should be able to switch to user "wasdevadmin". Only users in SUPPORT
should be able to switch to root.
Jeff Traigle:
> WAS ALL=(ALL) NOPASSWD: ALL
> WAS ALL=/usr/bin/su - wasdevadmin,/bin/su
- wasdevadmin
The first line is saying to allow the WAS users to run any command on
any host as any user. The second line is redundantly saying to allow WAS
users to run the su commands specified on all hosts as root. You don't have
anything restricting them from running su to root as a previous post stated
to do.
Patrick Wallek:
What about the following:
WAS ALL=!/usr/bin/su -, !/usr/bin/su *root*, /usr/bin/su - wasdevadmin,/bin/su
- wasdevadmin
You also have 2 lines for WAS. I don't remember which will take priority,
but the 2 may be conflicting.
What happens if you comment out the first WAS line?
ofure:
Thanks for your prompt reply. This has partly resolved the issue. At least
users in WAS cannot su to root again but now the WAS cannot switch to wasdevadmin
user.
I want a situation where they can switch to wasdevadmin without been
prompted for a password.
Matti Kurkela:
> I want a situation where they [= the users in sudo group WAS] can switch
to wasdevadmin without been prompted for a password.
You need this line in your sudoers file:
WAS ALL=(wasdevadmin) NOPASSWD: ALL
Then tell your users to use the sudo command like this:
sudo -H -u wasdevadmin -i (to run a shell as wasdevadmin; equivalent
to "sudo su - wasdevadmin")
...or like this:
sudo -H -u wasdevadmin <command> (to run <command> as wasdevadmin and
then continue the session as themselves)
MK
ofure:
Below is how my sudoers file now look:
User_Alias WAS = g343ahe,m017ahe,y073ahe,y072ahe,h234ahe,r019ahe
User_Alias SUPPORT = d060ahe,h070ahe,s029ahe #User privilege specification
root ALL=(ALL) ALL SUPPORT ALL=(ALL) ALL SUPPORT ALL=(ALL) NOPASSWD: ALL
WAS ALL=!/usr/bin/su -, !/usr/bin/su *root*, /usr/bin/su - wasdevadmin,/bin/su
- wasdevadmin WAS ALL=(wasdevadmin) NOPASSWD: ALL
But the users in WAS still cannot switch to wasdevadmin account. I want
the users in WAS to be able to do this without prompting for password. Thanks.
Regards.
INH :
Remove the user name you dont wantthem to do sudo to root in sudoers
file
if you have to grant specfic access you can grant in sudoers file for
required users. by defining user alias, command alias and host alias for
those users
ofure:
;The challenge I have now is that I want the users in WAS to be able to
switch to the account wasdevadmin without prompting for password. I have
tried this below but did not work.
WAS ALL=(wasdevadmin) NOPASSWD: ALL
Regards,
Matti Kurkela Jan 24, 2011 15:49:55 GMT Unassigned
> WAS ALL=(wasdevadmin) NOPASSWD: ALL
When you use this sudoers line, your user *must* use "sudo -u wasdevadmin
-i" or similar sudo command to become wasdevadmin. The "-H" option is optional,
but probably in line with the user's expectations.
With this sudoers line, a command like "sudo su wasdevadmin" or "sudo
su - wasdevadmin" will *not* work. This is because these commands first
use sudo to become root, then use su to become the target user. Sudo can
do it in one step - but it requires that the user uses the correct syntax.
MK
ofure:
Hi All,
When I type this: sudo -u wasdevadmin -i it works without prompting me
for password but it is a long command. I want to be able to type su - wasdevadmin
and for it to call up sudo -u wasdevadmin -i
Presently, I have this configuration:
#cd /bin # ls -l su* root root 45 Feb 16 17:17 su root root 28336 Oct
30 2008 su.original
# cat su sudo su.original $@
So presently when I type su -, it call up sudo su.original, which works
fine for my switching to root access. How can I also have: "sudo -u wasdevadmin
-i" equal to "su - wasdevadmin"
Thanks.
ofure:
I have resolved this by creating an alias for wasdevadmin.
To view what commands a user can run and what other constraints are assigned
under sudo, as the user, run:
sudo -l
Using groups
Users belonging to a valid AIX group can be included in sudoers, making the
sudoers file more manageable with fewer entries per user. When reorganizing
the sudoers entries to include groups, you may have to create a new groups under
AIX to include users that are only allowed to use sudo for certain commands.
To use groups, simply prefix the entries with a '%'. Assume you have groups
called devops and devuat, and with those groups you have the following
users:
# lsgroup -f -a users devops
devops:
users=joex,delta,charlie,tstgn
# lsgroup
         -f -a users devuat
devuat:
users=zebra,spsys,charlie
For the group devops to be allowed to run the /usr/local/bin/data_ext.sh
command as dbdftst.
For the group devuat to be allowed to run the commands :/usr/local/bin/data_mvup.sh,
/usr/local/bin/data_rep.sh as dbukuat.
Notice in the previous entries, the group devops users will not be
prompted for their password when executing /usr/local/bin/data_ext.sh;
however, the group devuat users will be prompted for their password.
User "charlie" is a member of both groups (devops and devuat),
so he can execute all the above commands.
It's better to have sudo file standard and periodically overwritable from baseline
as unauthorized (and undetected) modifications of the sudoer file is a security
risk. Enrollment of users should be done via adding them to a privileged group such
as wheel.
It's often too late when we realize that our sudoers file was not configured
to be limited to only a select list of users, or was not logging (e.g., if we
have inherited 200 machines installed with stock sudo -- see my August 2009
Linux Gazette "Layer
8 Linux Security" column on maintaining sudo via Puppet). So, perhaps it
went unnoticed that a past disgruntled developer was accessing the system from
his desktop via RDP to SSH and accessing root regularly via 'sudo su'.
In startup ISPs and Web development shops in the mid-1990s, a "Nazi" Linux
security administrator would often tire of being on-call 24x7 in an uncontrollable
server farm, and come down with the avant-garde edict of "no shared root access",
whereupon all developers just took escalated access via escaping system calls
from emacs or vi, or via buffer overflows, and happily changed the access passwords
for users: games, haldaemon, adm, lp, or sync. Similar shops and Linux un-professionals
still exist, unfortunately.
Since any access to root via sudo can result in changes (and potential errors),
a good keylogger makes a lot of sense as an easily setup secondary tracking
mechanism.
PCI compliance and SOX both require controls in place for the root or administrative
user. However, when mixed with corporate profit, these controls are loosely
interpreted to the point of complete insecurity. If we cannot track change,
we control nothing. Implementing a keylogger will take no more than fifteen
to thirty minutes (and can easily be automated through Puppet), so if you suspect
your systems of being accessed and the logs being wiped, or if you don't have
the time to fully evaluate all binary checksums for rootkits, keyloggers can
be a good immediate additional security tool.
By default, 'rootsh' logs to /var/log/rootsh/ (which can be changed during
setup). Of course, 'rootsh' logs can be edited, like any logs, unless you use
'syslog-ng', or stunnel loghost or cron-based e-mail log burst, so hide them
well. You will generally find that no one even notices that 'rootsh' is logging,
and happily carry on as normal.
If you use sudo to run commands as root, you've probably run into "permission
denied" problems when only part of a pipeline or part of a command is running
with root permissions.
This fails with "permission denied" because the file is writable only by
root:
Why? The /bin/echo program is running as root, because of sudo, but the shell
that's redirecting echo's output to the root-only file is still running as you.
Your current shell does the redirection before sudo starts.
The solution is to run the whole pipeline under sudo. There are a couple
ways to do it, but I prefer:
echo "echo 12000 > /proc/sys/vm/dirty_writeback_centisecs" | sudo sh
That way, I can type everything before the pipe character, and see what I'm
about to run as root, then press the up arrow and add the | sudo sh
to do it for real. This is not a big deal for short, obvious pipelines, but
when you're building up a more complicated command as root, it's safer to look
at it first before you run it.
Recipe 5.11. Permitting Read-Only Access to a Shared File via sudo
Author's note: Sharing a file with multiple users is easy with Linux groups.
But what if you want to restrict some people to have read-only access to a file,
while giving others read/write access? This recipe, from Chapter 5, "Authorization
Controls," explains how sudo can come to the rescue.
Problem
Two or more users want to share a file, some read/write and the others read-only.
Solution
Create two Linux groups, one for read/write and one for read-only users:
Permit the readers group to read the file via sudo:
/etc/sudoers:
%readers  ALL = (w1) /bin/cat /path/to/shared_file
Discussion
This situation could arise in a university setting, for example, if a file
must be writable by a group of teaching assistants but read-only to a group
of students.
If there were only two users -- one reader and one writer -- you could dispense
with groups and simply let the reader access the file via sudo.
If smith is the reader and jones the writer, and we give smith the following
capability:
/etc/sudoers:
smith  ALL = (jones) NOPASSWD: /bin/cat /home/jones/private.stuff
then jones can protect her file:
jones$ chmod 600 $HOME/private.stuff
and smith can view it:
smith$ sudo -u jones cat /home/jones/private.stuff
Check back here next week for recipes from Linux Security Cookbook
on how to use PAM to restrict authentication on Linux systems, and how to use
SMTP to securely accept connections from arbitrary clients.
The most difficult part of sudo is the /etc/sudoers syntax. The basic syntax
is like so:
user host = commands
This syntax tells sudo that the user, identified by user and logged on through
the system host can execute any of the commands listed in commands as the root
user. A more real-life example might make this more clear: allow the user swift
to execute emerge if he is logged on from the system (not through SSH):
swift localhost = /usr/bin/emerge
A big warning is in place though: do
not allow a user to run an application that can allow people to elevate privileges.
For instance, allowing users to execute emerge as root can indeed grant them
full root access to the system because emerge can be manipulated to change the
live file system to the user's advantage. If you do not trust your sudo users,
don't grant them any rights.
The user name can also be substituted with a group name - in this case you
should start the group name with a % sign. For instance, to allow any one in
the wheel group to execute emerge:
%wheel localhost = /usr/bin/emerge
You can extend the line to allow for several commands (instead of making
a single entry for each command). For instance, to allow the same user to not
only run emerge but also ebuild and emerge-webrsync as root:
swift localhost = /usr/bin/emerge, /usr/bin/ebuild, /usr/sbin/emerge-webrsync
You can also specify a precise command and not only the tool itself. This
is useful to restrict the use of a certain tool to a specified set of command
options. The sudo tool allows shell-style wildcards (AKA meta or glob characters)
to be used in pathnames as well as command line arguments in the sudoers file.
Note that these are not regular expressions.
Let us put this to the test:
$ sudo emerge -uDN world

We trust you have received the usual lecture from the local System
Administrator. It usually boils down to these three things:

    #1) Respect the privacy of others.
    #2) Think before you type.
    #3) With great power comes great responsibility.

Password: (Enter the user password, not root!)
The password that sudo requires is the user's own password. This is to make
sure that no terminal that you accidentally left open to others is abused for
malicious purposes.
You should know that sudo does not alter the ${PATH} variable: any command
you place after sudo is treated from your environment. If you want the user
to run a tool in for instance /sbin he should provide the full path to sudo,
like so:
In larger environments having to enter all users over and over again (or
hosts, or commands) can be a daunting task. To ease the administration of /etc/sudoers
you can define aliases. The format to declare aliases is quite simple:
One alias that always works, for any position, is the ALL alias (to make
a good distinction between aliases and non-aliases it is recommended to use
capital letters for aliases). As you might undoubtedly have guessed, the ALL
alias is an alias to all possible settings.
A sample use of the ALL alias to allow any user to execute the shutdown command
if he is logged on locally is:
ALL localhost = /sbin/shutdown
Another example is to allow the user swift to execute the emerge command
as root, regardless of where he is logged in from:
swift ALL = /usr/bin/emerge
More interesting is to define a set of users who can run software administrative
applications (such as emerge and ebuild) on the system and a group of administrators
who can change the password of any user, except root!
It is also possible to have a user run an application as a different, non-root
user. This can be very interesting if you run applications as a different user
(for instance apache for the web server) and want to allow certain users to
perform administrative steps as that user (like killing zombie processes).
Inside /etc/sudoers you list the user(s) in between ( and ) before the command
listing:
users hosts = (run-as) commands
For instance, to allow swift to run the kill tool as the apache or gorg user:
Cmnd_Alias KILL = /bin/kill, /usr/bin/pkill

swift   ALL = (apache, gorg) KILL
With this set, the user can run sudo -u to select the user he wants to run
the application as:
$ sudo -u apache pkill apache
You can set an alias for the user to run an application as using the Runas_Alias
directive. Its use is identical to the other _Alias directives we have seen
before.
By default, sudo asks the user to identify himself using his own password.
Once a password is entered, sudo remembers it for 5 minutes, allowing the user
to focus on his tasks and not repeatedly re-entering his password.
Of course, this behavior can be changed: you can set the Defaults: directive
in /etc/sudoers to change the default behavior for a user.
For instance, to change the default 5 minutes to 0 (never remember):
Defaults:swift timestamp_timeout=0
A setting of -1 would remember the password indefinitely (until the system
reboots).
A different setting would be to require the password of the user that the
command should be run as and not the users' personal password. This is accomplished
using runaspw. In the following example we also set the number of retries (how
many times the user can re-enter a password before sudo fails) to 2 instead
of the default 3:
Defaults:john runaspw, passwd_tries=2
Another interesting feature is to keep the DISPLAY variable set so that you
can execute graphical tools:
Defaults:john env_keep=DISPLAY
You can change dozens of default settings using the Defaults: directive.
Fire up the sudo manual page and search for Defaults.
If you however want to allow a user to run a certain set of commands without
providing any password whatsoever, you need to start the commands with NOPASSWD:,
like so:
To inform yourself what your capabilities are, run sudo -l:
$ sudo -l
User swift may run the following commands on this host:
    (root)   /usr/libexec/xfsm-shutdown-helper
    (root)   /usr/bin/emerge
    (root)   /usr/bin/passwd [a-zA-Z0-9_-]*
    (root)   !/usr/bin/passwd root
    (apache) /usr/bin/pkill
    (apache) /bin/kill
If you have any command in /etc/sudoers that does not require you to enter
a password, it will not require a password to list the entries either. Otherwise
you might be asked for your password if it isn't remembered.
By default, if a user has entered his password to authenticate himself to
sudo, it is remembered for 5 minutes. If the user wants to prolong this period,
he can run sudo -v to reset the time stamp so that it will take another 5 minutes
before sudo asks for the password again.
$ sudo -v
The inverse is to kill the time stamp using sudo -k.
The format of the sudoers file is simple: it starts with four optional sections,
and it ends with the specific rights assignments. It can include empty lines,
or comment lines that start with the # sign. The optional sections
are:
User Alias: Specifies an alias for a single user (not very useful)
or a set of users. A user can appear in several aliases.
"Run as" Alias: Specifies which other user(s) the sudo user will
be able to work as. By default, sudo implies root, but you might want to
run as another user.
Host Alias: Specifies the hosts that the rights apply to. You
won't be using this unless you're doing sysadmin jobs for a group of several
Linux boxes. You would have to rsync the file to the other hosts, or use
something like Network Information Service (NIS) to provide access to the
file.
Command Alias: Specifies a synonym for a specific command. For
instance, it's easier to type APT than a fully qualified absolute
path such as /usr/sbin/apt-get.
You don't need to use aliases, but they do make future editing easier. For
example, if you have to assign donald_duck the same rights that mickey_mouse
has, just add the former to the latter's group, and you won't have to spend
lots of time duplicating lines everywhere. A special alias called ALL exists,
and you can use it anywhere; it can mean ALL users, ALL hosts, and so on.
After these sections, you must have a section for specific rights, which
looks like "who where = (whoelse) what," meaning who (a user, a group,
or a user alias) on the host where can run a command what as a
user whoelse. (If this is too cryptic, look at the following example.)
You can also include several specific options, such as NOPASSWD to allow a user
to sudo without entering his password; check the manual for the other options.
This sample doesn't show every configuration possible (for that, you should
do man sudoers), but here's what a sample file with some of these
options might look like:
#
# Sample /etc/sudoers file, with apologies to the Disney company!
#

# User aliases
# The first line creates an alias for three specific users.
# The second one includes everybody in the "ducks" user group, but excludes "donald"
# The third one creates an alias for just one user; it can be useful in the future!
#
User_Alias	NEPHEWS = huey, dewey, louie
User_Alias	ALL_DUCKS_BUT_DONALD = %ducks, !donald
User_Alias	MICKEY = mickey_mouse

# Command aliases

Cmnd_Alias      HALT_OR_REBOOT = /sbin/halt
Cmnd_Alias      KILL = /usr/bin/killall
Cmnd_Alias      SHUTDOWN = /sbin/shutdown
Cmnd_Alias      SU = /bin/su

# The rights: who gets to run what

# A standard rule: root, and users in group "wheel", have full rights
root            ALL = (ALL) ALL
%wheel          ALL = (ALL) ALL

# Suppose mickey is an sysadmin; let him run anything without a password
MICKEY		ALL = NOPASSWD: ALL

# NEPHEWS can stop the box if they want
NEPHEWS		HALT_OR_REBOOT, SHUTDOWN
You can also add some
extra configuration lines at the end of the configuration file. You can
specify, for example:
Whether emails should be sent for wrong passwords or unallowed attempts
to use sudo
How many login attempts to allow before exiting
Whether the user should get a short lecture about the risks involved
in using sudo
A log file specific to sudo, where all commands will be logged
The syntax of /etc/sudoers.
The basic syntax of /etc/sudoers file looks like this:
user computer = command
In short, it means that the user logged into computer
can run the command with administrative privileges. Here is an
example:
johnny localhost = /usr/bin/du
This means that johnny will be able to use du (disk
usage) command on localhost (the current computer).
Warning: if the computer name has been change, a real name (not localhost) needs
to be entered..
2.b. Granting users of group XXX the right to execute the
command YYY: % XXX localhost = /the/path/to/command/YYY
2.c. Allow to execute many command in one rule: johnny localhost = /usr/bin/du, /usr/bin/nail, /usr/bin/sane
While
proper implementation of groups can help reduce the need for the root password,
at times, users must absolutely run commands as another user (usually root).
As the system administrator, you're stuck between deciding to hand out the root
password or doing everything for your users. sudo provides a third
way, one that can help solve this dilemma. It's a tricky program, however, and
needs some care in implementation. sudo is integrated into OpenBSD,
and is an add-on package for just about every other Unix-like operating system
out there.
sudo is a setuid root wrapper that implements fine-grained access
control for commands that need to be run as root. It takes the command you want
to run and compares it to its internal list of permissions. If sudo's
permissions allow that particular user to run that command, sudo
runs that command for you, with its privileges. As root can run commands as
any user, sudo can execute commands as any arbitrary system user.
With proper setup, the system administrator can allow any user to run any
command as any other user. sudo is a very powerful tool, and can
be configured to allow or deny almost any set of commands. As a result of this
flexibility, the documentation tends to scare off new users. We're going to
do a basic sudo setup that will cover almost all uses, but you
should be aware that many more combinations are possible, and are documented
in sudo(8) and sudoers(5).
Other than the obvious fine-grained access control sudo provides,
there are a few other benefits to using sudo. One of the biggest
advantages is the command logging. Every sudo command is logged,
making it very easy to track who made what changes. And once you have
sudo configured correctly, you can change the root password and not give
it to anyone. Nobody should need the root password if they have the correct
sudo permissions, after all! Reducing the number of people who
have the root password can help improve security. Finally, a single sudo
configuration file can be used on all of these systems, vastly easing administrator
overhead.
The most overwhelmingly common disadvantage to sudo is that
users and junior administrators don't like it. If people have traditionally
had root access on a system, they will perceive that they're losing something
when you implement sudo. They key to overcoming this is to make
sure that people have the ability to do their jobs. If users think that they
need the root password to perform other tasks, then your need to settle just
who is responsible for what. These users may have been taking extra duties upon
themselves, rather than troubling you with jobs that you should do.
A faulty sudo setup can create security holes. A thoughtless
configuration will create holes in the system that a clever user can use to
actually become root. This problem is best dealt with by a combination of careful
configuration and administrative policy.
NOPASSWD option is useful for temporary granting a specific user access to root:
you enroll him to the wheel group and submit at command that deletes him from this
group at the end of the specified period. This way you do not need to communicate
the password to the user at all and thus do not need change it back after the period
for which the user was granted tem root access expire...
You have an entry in your sudoers file that contains something like
this:
admin ALL=(ALL) ALL
then sudo will require you to enter a password when running a command with
sudo. This is the user password (and not the root password), in
this case the password of the user "admin".
targetpw
If for some reason you want to change this behavior, then you can use the
sudo global flag targetpw. This is by default OFF, and if you
set it like show bellow then the password you will be asked while running sudo
will be the password of the target user (in our case the root password).
Defaults targetpw
Personally, I don't see the use of this parameter and never used it myself…
But maybe someone else will find it useful.
NOPASSWD
If you don't want to be prompted for any password while running sudo then
we can use the NOPASSWD parameter on a particular entry:
admin ALL = NOPASSWD: ALL
this parameter is the opposite of the default PASSWD and will no
longer require any password for the user "admin" while running sudo. This
can be of useful while running scripts that will launch sudo (in this case
I would recommend to enable NOPASSWD only for the needed commands), or just
if you don't want to keep typing the password. Obviously with this commodity,
you will reduce the security of sudo: if someone hacks the "admin" account then
this can be easily used to gain root privileges.
authenticate
Another sudo option that can be used to control the prompt for a password
is the global flag: authenticate. This is by default ON and this
means that it will ask the user to authenticate with a password. This can be
overwritten as seen above with the NOPASSWD on a particular entry. If
we want to disable it globally, this can be done with:
Defaults !authenticate
Once set, this will disable authentication for all users that use
the defaults like our "admin" sample from above. It can be overwritten on particular
definition by setting the PASSWD parameter:
admin ALL=(ALL) PASSWD: ALL
Note: this post doesn't recommend you to disable the passwords usage
in sudo (this is not a good idea, by the way), but just to show you what options
are available and how you can use them. Knowing the security implications of
disabling password usage in sudo, use them wisely based on your particular needs.
The operator user may run commands limited to simple maintenance.
Here, those are commands related to backups, killing processes, the printing
system, shutting down the system, and any commands in the directory /usr/oper/bin.
sudo is better to set up pseudo root access in smaller environments.

The size of your environment and your requirements will determine which is the better tool.
Sudo Main Page
Sudo (superuser do) allows a system administrator to give certain users (or groups
of users) the ability to run some (or all) commands as root while logging all commands
and arguments.
The Last but not LeastTechnology is dominated by
two types of people: those who understand what they do not manage and those who manage what they do not understand ~Archibald Putt.
Ph.D
FAIR USE NOTICEThis site contains
copyrighted material the use of which has not always been specifically
authorized by the copyright owner. We are making such material available
to advance understanding of computer science, IT technology, economic, scientific, and social
issues. We believe this constitutes a 'fair use' of any such
copyrighted material as provided by section 107 of the US Copyright Law according to which
such material can be distributed without profit exclusively for research and educational purposes.
This is a Spartan WHYFF (We Help You For Free)
site written by people for whom English is not a native language. Grammar and spelling errors should
be expected. The site contain some broken links as it develops like a living tree...
You can use PayPal to to buy a cup of coffee for authors
of this site
Disclaimer:
The statements, views and opinions presented on this web page are those of the author (or
referenced source) and are
not endorsed by, nor do they necessarily reflect, the opinions of the Softpanorama society.We do not warrant the correctness
of the information provided or its fitness for any purpose. The site uses AdSense so you need to be aware of Google privacy policy. You you do not want to be
tracked by Google please disable Javascript for this site. This site is perfectly usable without
Javascript.