Software and configuration management using RPM
RPM repositories and yum provide ready made and available in default Red Hat (and derivatives)
distribution infrastructure for distribution of custom patches and configuration files. The only
problem is to learn how to use them. here this page might help. Many people are afraid
of even touching this area because it looks like building your own RPMs is very complex. It is not.
It is actually less complex that it sound.
To distribute a set of patches to all your servers you need to create a custom RPM with those
patches.
The simplest way to create your own RPM is to start with somebody else RPM and modify it for your
needs. Source ROMs are better deal.
For testing you can install an rpm to an arbitrary directory (e.g. /my/targetdir) placing the
package files under targetdir and the rpm database in the targetdir/var/rpm directory with something
like:
rpm -ivh --nodeps --relocate /=/my/targetdir --root=/my/targetdir mypackage.rpm
rpm2cpio is the tool you'd need, to extract the content of CPIO part of the archive.
Midnight commander can extract all other files and actually is a preferable tool for working with
RPMs.
Suse has unrpm, which been part of the distribution for a long time See
UnRpm Issue 19
Midnight commander allows you to view the files inside the rpm, viewing not just the directory
structure, but the init script itself
Linux
Certifications - RHCSA / RHCE
Certification | Ansible Automation
Certification | LFCS / LFCE
Certification In the past few years, the Linux community has been blessed with some
remarkable advancements in the area of package management on Linux systems ,
especially when it comes to universal or cross-distribution software packaging and
distribution. One of such advancements is the Snap package format developed by Canonical , the
makers of the popular Ubuntu Linux . What are Snap Packages?
Snaps are cross-distribution, dependency-free, and easy to install applications packaged
with all their dependencies to run on all major Linux distributions. From a single build, a
snap (application) will run on all supported Linux distributions on desktop, in the cloud, and
IoT. Supported distributions include Ubuntu, Debian, Fedora, Arch Linux, Manjaro, and
CentOS/RHEL.
Snaps are secure – they are confined and sandboxed so that they do not compromise the
entire system. They run under different confinement levels (which is the degree of isolation
from the base system and each other). More notably, every snap has an interface carefully
selected by the snap's creator, based on the snap's requirements, to provide access to specific
system resources outside of their confinement such as network access, desktop access, and
more.
Another important concept in the snap ecosystem is Channels . A channel determines which
release of a snap is installed and tracked for updates and it consists of and is subdivided by,
tracks, risk-levels, and branches.
The main components of the snap package management system are:
- snapd – the background service that manages and maintains your snaps on a Linux
system.
- snap – both the application package format and the command-line interface tool used
to install and remove snaps and do many other things in the snap ecosystem.
- snapcraft – the framework and powerful command-line tool for building snaps.
- snap store – a place where developers can share their snaps and Linux users search
and install them.
Besides, snaps also update automatically. You can configure when and how updates occur. By
default, the snapd daemon checks for updates up to four times a day: each update check is
called a refresh . You can also manually initiate a refresh.
How to Install Snapd in
Linux
As described above, the snapd daemon is the background service that manages and maintains
your snap environment on a Linux system, by implementing the confinement policies and
controlling the interfaces that allow snaps to access specific system resources. It also
provides the snap command and serves many other purposes.
To install the snapd package on your system, run the appropriate command for your Linux
distribution.
------------ [On Debian and Ubuntu] ------------
$ sudo apt update
$ sudo apt install snapd

------------ [On Fedora Linux] ------------
# dnf install snapd

------------ [On CentOS and RHEL] ------------
# yum install epel-release
# yum install snapd

------------ [On openSUSE - replace openSUSE_Leap_15.0 with the version] ------------
$ sudo zypper addrepo --refresh https://download.opensuse.org/repositories/system:/snappy/openSUSE_Leap_15.0 snappy
$ sudo zypper --gpg-auto-import-keys refresh
$ sudo zypper dup --from snappy
$ sudo zypper install snapd

------------ [On Manjaro Linux] ------------
# pacman -S snapd

------------ [On Arch Linux] ------------
# git clone https://aur.archlinux.org/snapd.git
# cd snapd
# makepkg -si
After installing snapd on your system, enable the systemd unit that manages the main snap
communication socket, using the systemctl
commands as follows.
On Ubuntu and its derivatives, this should be triggered automatically by the package
installer.
$ sudo systemctl enable --now snapd.socket
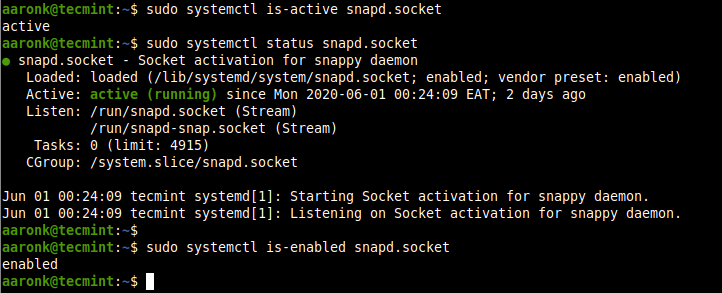
Note that you can't run the snap command if the snapd.socket is not running. Run the
following commands to check if it is active and is enabled to automatically start at system
boot.
$ sudo systemctl is-active snapd.socket
$ sudo systemctl status snapd.socket
$ sudo systemctl is-enabled snapd.socket
 <img aria-describedby="caption-attachment-37630"
src="https://www.tecmint.com/wp-content/uploads/2020/06/check-if-snapd-socket-is-running.png"
alt="Check Snapd Service Status" width="722" height="293" />
<img aria-describedby="caption-attachment-37630"
src="https://www.tecmint.com/wp-content/uploads/2020/06/check-if-snapd-socket-is-running.png"
alt="Check Snapd Service Status" width="722" height="293" />
Check Snapd Service Status
Next, enable classic snap support by creating a symbolic link between /var/lib/snapd/snap
and /snap as follows.
$ sudo ln -s /var/lib/snapd/snap /snap
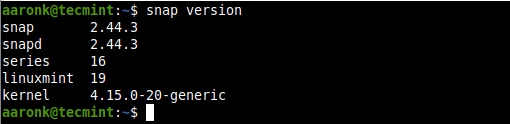
To check the version of snapd and snap command-line tool installed on your system, run the
following command.
$ snap version
 <img aria-describedby="caption-attachment-37631"
src="https://www.tecmint.com/wp-content/uploads/2020/06/check-snapd-and-snap-version.png"
alt="Check Snapd and Snap Version" width="510" height="124" />
<img aria-describedby="caption-attachment-37631"
src="https://www.tecmint.com/wp-content/uploads/2020/06/check-snapd-and-snap-version.png"
alt="Check Snapd and Snap Version" width="510" height="124" />
Check Snapd and Snap Version How to Install Snaps in Linux
The snap command allows you to install, configure, refresh and remove snaps, and interact
with the larger snap ecosystem.
Before installing a snap , you can check if it exists in the snap store. For example, if the
application belongs in the category of " chat servers " or " media players ", you can run these
commands to search for it, which will query the store for available packages in the stable
channel.
$ snap find "chat servers"
$ snap find "media players"
 <img aria-describedby="caption-attachment-37632"
src="https://www.tecmint.com/wp-content/uploads/2020/06/find-snaps.png" alt="Find Applications
in Snap Store" width="899" height="515"
srcset="https://www.tecmint.com/wp-content/uploads/2020/06/find-snaps.png 899w,
https://www.tecmint.com/wp-content/uploads/2020/06/find-snaps-768x440.png 768w"
sizes="(max-width: 899px) 100vw, 899px" />
<img aria-describedby="caption-attachment-37632"
src="https://www.tecmint.com/wp-content/uploads/2020/06/find-snaps.png" alt="Find Applications
in Snap Store" width="899" height="515"
srcset="https://www.tecmint.com/wp-content/uploads/2020/06/find-snaps.png 899w,
https://www.tecmint.com/wp-content/uploads/2020/06/find-snaps-768x440.png 768w"
sizes="(max-width: 899px) 100vw, 899px" />
Find Applications in Snap Store
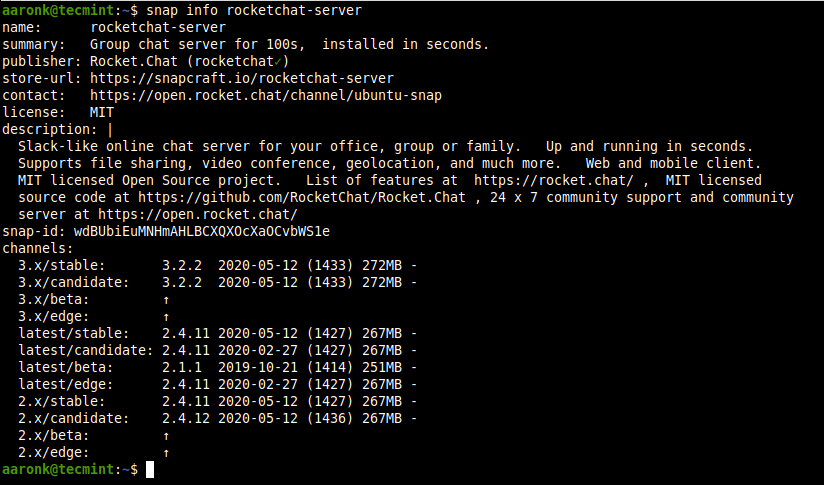
To show detailed information about a snap , for example, rocketchat-server ,
you can specify its name or path. Note that names are looked for both in the snap store and in
the installed snaps.
$ snap info rocketchat-server
 <img aria-describedby="caption-attachment-37633"
src="https://www.tecmint.com/wp-content/uploads/2020/06/get-more-details-about-a-snap.png"
alt="Get Info About Application in Snap" width="824" height="485"
srcset="https://www.tecmint.com/wp-content/uploads/2020/06/get-more-details-about-a-snap.png
824w,
https://www.tecmint.com/wp-content/uploads/2020/06/get-more-details-about-a-snap-768x452.png
768w" sizes="(max-width: 824px) 100vw, 824px" />
<img aria-describedby="caption-attachment-37633"
src="https://www.tecmint.com/wp-content/uploads/2020/06/get-more-details-about-a-snap.png"
alt="Get Info About Application in Snap" width="824" height="485"
srcset="https://www.tecmint.com/wp-content/uploads/2020/06/get-more-details-about-a-snap.png
824w,
https://www.tecmint.com/wp-content/uploads/2020/06/get-more-details-about-a-snap-768x452.png
768w" sizes="(max-width: 824px) 100vw, 824px" />
Get Info About Application in Snap
To install a snap on your system, for example, rocketchat-server , run the following
command. If no options are provided, a snap is installed tracking the " stable " channel, with
strict security confinement.
$ sudo snap install rocketchat-server
 <img aria-describedby="caption-attachment-37634"
src="https://www.tecmint.com/wp-content/uploads/2020/06/rocketchat-server-snap-installed-successfully.png"
alt="Install Application from Snap Store" width="700" height="57" />
<img aria-describedby="caption-attachment-37634"
src="https://www.tecmint.com/wp-content/uploads/2020/06/rocketchat-server-snap-installed-successfully.png"
alt="Install Application from Snap Store" width="700" height="57" />
Install Application from Snap Store
You can opt to install from a different channel: edge , beta , or candidate , for one reason
or the other, using the --edge , --beta , or --candidate
options respectively. Or use the --channel option and specify the channel you wish
to install from.
$ sudo snap install --edge rocketchat-server
$ sudo snap install --beta rocketchat-server
$ sudo snap install --candidate rocketchat-server
Manage Snaps in Linux
In this section, we will learn how to manage snaps in Linux system.
Viewing Installed
Snaps
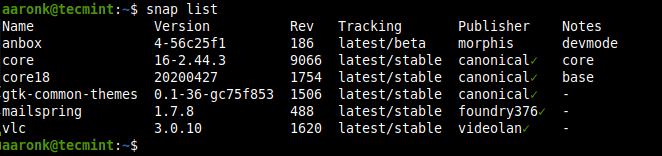
To display a summary of snaps installed on your system, use the following command.
$ snap list
 <img aria-describedby="caption-attachment-37635"
src="https://www.tecmint.com/wp-content/uploads/2020/06/list-installed-snaps.png" alt="List
Installed Snaps" width="662" height="156" />
<img aria-describedby="caption-attachment-37635"
src="https://www.tecmint.com/wp-content/uploads/2020/06/list-installed-snaps.png" alt="List
Installed Snaps" width="662" height="156" />
List Installed Snaps
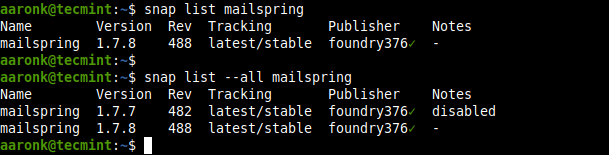
To list the current revision of a snap being used, specify its name. You can also list all
its available revisions by adding the --all option.
$ snap list mailspring
OR
$ snap list --all mailspring
 <img aria-describedby="caption-attachment-37636"
src="https://www.tecmint.com/wp-content/uploads/2020/06/list-all-versions-of-a-snap.png"
alt="List All Installation Versions of Snap" width="609" height="155" />
<img aria-describedby="caption-attachment-37636"
src="https://www.tecmint.com/wp-content/uploads/2020/06/list-all-versions-of-a-snap.png"
alt="List All Installation Versions of Snap" width="609" height="155" />
List All Installation Versions of Snap Updating and Reverting Snaps
You can update a specified snap, or all snaps in the system if none are specified as
follows. The refresh command checks the channel being tracked by the snap and it downloads and
installs a newer version of the snap if it is available.
$ sudo snap refresh mailspring
OR
$ sudo snap refresh             #update all snaps on the local system
 <img aria-describedby="caption-attachment-37637"
src="https://www.tecmint.com/wp-content/uploads/2020/06/refresh-a-snap.png" alt="Refresh a
Snap" width="591" height="57" />
<img aria-describedby="caption-attachment-37637"
src="https://www.tecmint.com/wp-content/uploads/2020/06/refresh-a-snap.png" alt="Refresh a
Snap" width="591" height="57" />
Refresh a Snap
After updating an app to a new version, you can revert to a previously used version using
the revert command. Note that the data associated with the software will also be reverted.
$ sudo snap revert mailspring
 <img aria-describedby="caption-attachment-37638"
src="https://www.tecmint.com/wp-content/uploads/2020/06/revert-a-snap-to-older-version.png"
alt="Revert a Snap to Older Version" width="450" height="56" />
<img aria-describedby="caption-attachment-37638"
src="https://www.tecmint.com/wp-content/uploads/2020/06/revert-a-snap-to-older-version.png"
alt="Revert a Snap to Older Version" width="450" height="56" />
Revert a Snap to Older Version
Now when you check all revisions of mailspring , the latest revision is disabled , a
previously used revision is now active.
$ snap list --all mailspring
 <img aria-describedby="caption-attachment-37639"
src="https://www.tecmint.com/wp-content/uploads/2020/06/snap-reverted-to-older-version.png"
alt="Check Revision of Snap " width="601" height="90" />
<img aria-describedby="caption-attachment-37639"
src="https://www.tecmint.com/wp-content/uploads/2020/06/snap-reverted-to-older-version.png"
alt="Check Revision of Snap " width="601" height="90" />
Check Revision of Snap Disabling/Enabling and Removing Snaps
You can disable a snap if you do not want to use it. When disabled, a snap's binaries and
services will no longer be available, however, all the data will still be there.
$ sudo snap disable mailspring
If you need to use the snap again, you can enable it back.
$ sudo snap enable mailspring
To completely remove a snap from your system, use the remove command. By default, all of a
snap's revisions are removed.
$ sudo snap remove mailspring
To remove a specific revision, use the --revision option as follows.
$ sudo snap remove --revision=482 mailspring
It is key to note that when you remove a snap , its data (such as internal user, system, and
configuration data) is saved by snapd (version 2.39 and higher) as a snapshot, and stored on
the system for 31 days. In case you reinstall the snap within the 31 days, you can restore the
data.
Conclusion
Snaps are becoming more popular within the Linux community as they provide an easy way to
install software on any Linux distribution. In this guide, we have shown how to install and
work with snaps in Linux. We covered how to install snapd , install snaps , view installed
snaps, update and revert snaps, and disable/enable and remove snaps.
You can ask questions or reach us via the feedback form below. In the next part of this
guide, we will cover managing snaps (commands, aliases, services, and snapshots) in
Linux.
by editor ·
Published June 24, 2019 · Updated June 24, 2019
Package managers provide a way of packaging, distributing, installing, and maintaining apps
in an operating system. With modern desktop, server and IoT applications of the Linux operating
system and the hundreds of different distros that exist, it becomes necessary to move away from
platform specific packaging methods to platform agnostic ones. This post explores 3 such tools,
namely AppImage , Snap and Flatpak , that each aim to be the future of software deployment and
management in Linux. At the end we summarize a few key findings.
1. AppImage
AppImage follows a concept called "One app = one file" . This is to be understood as an
AppImage being a regular independent "file" containing one application with everything it needs
to run in the said file. Once made executable, the AppImage can be run like any application in
a computer by simply double-clicking it in the users file system.[1]
It is a format for creating portable software for Linux without requiring the user to
install the said application. The format allows the original developers of the software
(upstream developers) to create a platform and distribution independent (also called a
distribution-agnostic binary) version of their application that will basically run on any
flavor of Linux.
AppImage has been around for a long time. Klik , a predecessor of AppImage was created by
Simon Peter in 2004. The project was shut down in 2011 after not having passed the beta stage.
A project named PortableLinuxApps was created by Simon around the same time and the format was
picked up by a few portals offering software for Linux users. The project was renamed again in
2013 to its current name AppImage and a repository has been maintained in GitHub (project
link ) with all the latest
changes to the same since 2018.[2][3]
Written primarily in C and donning the MIT license since 2013, AppImage is currently
developed by The AppImage project . It is a very convenient way to use applications as
demonstrated by the following features:
- AppImages can run on virtually any Linux system. As mentioned before applications derive
a lot of functionality from the operating system and a few common libraries. This is a common
practice in the software world since if something is already done, there is no point in doing
it again if you can pick and choose which parts from the same to use. The problem is that
many Linux distros might not have all the files a particular application requires to run
since it is left to the developers of that particular distro to include the necessary
packages. Hence developers need to separately include the dependencies of the application for
each Linux distro they are publishing their app for. Using the AppImage format developers can
choose to include all the libraries and files that they cannot possibly hope the target
operating system to have as part of the AppImage file. Hence the same AppImage format file
can work on different operating systems and machines without needing granular control.
- The one app one file philosophy means that user experience is simple and elegant in that
users need only download and execute one file that will serve their needs for using the
application.
- No requirement of root access . System administrators will require people to have root
access to stop them from messing with computers and their default setup. This also means that
people with no root access or super user privileges cannot install the apps they need as they
please. The practice is common in a public setting (such as library or university computers
or on enterprise systems). The AppImage file does not require users to "install" anything and
hence users need only download the said file and make it executable to start using it. This
removes the access dilemmas that system administrators have and makes their job easier
without sacrificing user experience.
- No effect on core operating system . The AppImage-application format allows using
applications with their full functionality without needing to change or even access most
system files. Meaning whatever the applications do, the core operating system setup and files
remain untouched.
- An AppImage can be made by a developer for a particular version of their application. Any
updated version is made as a different AppImage. Hence users if need be can test multiple
versions of the same application by running different instances using different AppImages.
This is an invaluable feature when you need to test your applications from an end-user POV to
notice differences.
- Take your applications where you go. As mentioned previously AppImages are archived files
of all the files that an application requires and can be used without installing or even
bothering about the distribution the system uses. Hence if you have a set of apps that you
use regularly you may even mount a few AppImage files on a thumb drive and take it with you
to use on multiple computers running multiple different distros without worrying whether
they'll work or not.
Furthermore, the AppImageKit allows users from all backgrounds to build their own AppImages
from applications they already have or for applications that are not provided an AppImage by
their upstream developer.
The package manager is platform independent but focuses primarily on software distribution
to end users on their desktops with a dedicated daemon AppImaged for integrating the AppImage
formats into respective desktop environments. AppImage is supported natively now by a variety
of distros such as Ubuntu, Debian, openSUSE, CentOS, Fedora etc. and others may set it up as
per their needs. AppImages can also be run on servers with limited functionality via the CLI
tools included.
To know more about AppImages, go to the official AppImage documentation page.
Suggested read:
2. Snappy
Snappy is a software deployment and package management system like AppImage or any other
package manager for that instance. It is originally designed for the now defunct Ubuntu Touch
Operating system. Snappy lets developers create software packages for use in a variety of Linux
based distributions. The initial intention behind creating Snappy and deploying "snaps" on
Ubuntu based systems is to obtain a unified single format that could be used in everything from
IoT devices to full-fledged computer systems that ran some version of Ubuntu and in a larger
sense Linux itself.[4]
The lead developer behind the project is Canonical , the same company that pilots the Ubuntu
project. Ubuntu had native snap support from version 16.04 LTS with more and more distros
supporting it out of the box or via a simple setup these days. If you use Arch or Debian or
openSUSE you'll find it easy to install support for the package manager using simple commands
in the terminal as explained later in this section. This is also made possible by making the
necessary snap platform files available on the respective repos.[5]
Snappy has the following important components that make up the entire package manager
system.[6]
- Snap – is the file format of the packages themselves. Individual applications that
are deployed using Snappy are called "Snaps". Any application may be packaged using the tools
provided to make a snap that is intended to run on a different system running Linux. Snap,
similar to AppImage is an all-inclusive file and contains all dependencies the application
needs to run without assuming them to part of the target system.
- Snapcraft – is the tool that lets developers make snaps of their applications. It
is basically a command that is part of the snap system as well as a framework that will let
you build your own snaps.
- Snapd – is the background daemon that maintains all the snaps that are installed in
your system. It integrates into the desktop environment and manages all the files and
processes related to working with snaps. The snapd daemon also checks for updates normally 4
times a day unless set otherwise.
- Snap Store – is an online
gallery of sorts that lets developers upload their snaps into the repository. Snap store is
also an application discovery medium for users and will let users see and experience the
application library before downloading and installing them.
The snapd component is written primarily in C and Golang whereas the Snapcraft framework is
built using Python . Although both the modules use the GPLv3 license it is to be noted that
snapd has proprietary code from Canonical for its server-side operations with just the client
side being published under the GPL license. This is a major point of contention with developers
since this involves developers signing a CLA form to participate in snap development.[7]
Going deeper into the finer details of the Snappy package manager the following may be
noted:
- Snaps as noted before are all inclusive and contain all the necessary files
(dependencies) that the application needs to run. Hence, developers need not to make
different snaps for the different distros that they target. Being mindful of the runtimes is
all that's necessary if base runtimes are excluded from the snap.
- Snappy packages are meant to support transactional updates. Such a transactional update
is atomic and fully reversible, meaning you can use the application while its being updated
and that if an update does not behave the way its supposed to, you can reverse the same with
no other effects whatsoever. The concept is also called as delta programming in which only
changes to the application are transmitted as an update instead of the whole package. An
Ubuntu derivative called Ubuntu Core actually promises the snappy update protocol to the OS
itself.[8]
- A key point of difference between snaps and AppImages, is how they handle version
differences. Using AppImages different versions of the application will have different
AppImages allowing you to concurrently use 2 or more different versions of the same
application at the same time. However, using snaps means conforming to the transactional or
delta update system. While this means faster updates, it keeps you from running two instances
of the same application at the same time. If you need to use the old version of an app you'll
need to reverse or uninstall the new version. Snappy does support a feature called
"parallel install" which will let users accomplish similar goals, however, it is still in
an experimental stage and cannot be considered to be a stable implementation. Snappy also
makes use of channels meaning you can use the beta or the nightly build of an app and the
stable version at the same time.[9]
- Extensive support from major Linux distros and major developers including Google,
Mozilla, Microsoft, etc.[4]
- Snapd the desktop integration tool supports taking "snapshots" of the current state of
all the installed snaps in the system. This will let users save the current configuration
state of all the applications that are installed via the Snappy package manager and let users
revert to that state whenever they desire so. The same feature can also be set to
automatically take snapshots at a frequency deemed necessary by the user. Snapshots can be
created using the snap save command in the snapd framework.[10]
- Snaps are designed to be sandboxed during operation. This provides a much-required layer
of security and isolation to users. Users need not worry about snap-based applications
messing with the rest of the software on their computer. Sandboxing is implemented using
three levels of isolation viz, classic , strict and devmode . Each level of isolation allows
the app different levels of access within the file system and computer.[11]
On the flip side of things, snaps are widely criticized for being centered around
Canonical's modus operandi . Most of the commits to the project are by Canonical employees or
contractors and other contributors are required to sign a release form (CLA). The sandboxing
feature, a very important one indeed from a security standpoint, is flawed in that the
sandboxing actually requires certain other core services to run (such as Mir) while
applications running the X11 desktop won't support the said isolation, hence making the said
security feature irrelevant. Questionable press releases and other marketing efforts from
Canonical and the "central" and closed app repository are also widely criticized aspects of
Snappy. Furthermore, the file sizes of the different snaps are also comparatively very large
compared to the app sizes of the packages made using AppImage.[7]
For more details, check Snap official
documentation .
Related read:
3. Flatpak
Like the Snap/Snappy listed above, Flatpak is also a software deployment tool that aims to
ease software distribution and use in Linux. Flatpak was previously known as "xdg-app" and was
based on concept proposed by Lennart Poettering in 2004. The idea was to contain applications
in a secure virtual sandbox allowing for using applications without the need of root privileges
and without compromising on the systems security. Alex started tinkering with Klik (thought to
be a former version of AppImage) and wanted to implement the concept better. Alexander Larsson
who at the time was working with Red Hat wrote an implementation called xdg-app in 2015 that
acted as a pre-cursor to the current Flatpak format.
Flatpak officially came out in 2016 with backing from Red Hat, Endless Computers and
Collabora. Flathub is the official repository of all Flatpak application packages. At its
surface Flatpak like the other is a framework for building and packaging distribution agnostic
applications for Linux. It simply requires the developers to conform to a few desktop
environment guidelines in order for the application to be successfully integrated into the
Flatpak environment.
Targeted primarily at the three popular desktop implementations FreeDesktop , KDE , and
GNOME , the Flatpak framework itself is written in C and works on a LGPL license. The
maintenance repository can be accessed via the GitHub link here .
A few features of Flatpak that make it stand apart are mentioned below. Notice that features
Flatpak shares with AppImage and Snappy are omitted here.
- Deep integration into popular Linux desktop environments such as GNOME & KDE so that
users can simply use Flatpaks using Graphical software management tools instead of resorting
to the terminal. Flatpak can be installed from the default repositories of major desktop
environments now and once the apps themselves are set-up they can be used and provide
features similar to normal desktop applications.[12][13]
- Forward-compatibility – Flatpaks are built from the ground up keeping the operating
systems core kernel and runtimes in mind. Hence, even if you upgrade or update your distro
the Flatpaks you have should still work unless there is a core update. This is especially
crucial for people who prefer staying on rolling betas or development versions of their
distros. For such people, since the kinks of the OS itself isn't ironed out usually, the
Flatpak application will run seamlessly without having to depend on the OS files or libraries
for its operation.[13]
- Sandboxing using Bubblewrap – snaps are also by default sandboxed in that they run
in isolation from the rest of the applications running while you're using your computer.
However, Flatpaks fully seal the application from accessing OS files and user files during
its operation by default. This essentially means that system administrators can be certain
that Flatpaks that are installed in their systems cannot exploit the computer and the files
it contains whereas for end users this will mean that in order to access a few specific
functions or user data root permission is required.[14]
- Flatpak supports decentralized distribution of application natively however the team
behind Flatpak still maintains a central online repository of apps/Flatpaks called Flathub .
Users may in fact configure Flatpak to use multiple remote repositories as they see
necessary. As opposed to snap you can have multiple repositories.[13]
- Modular access through the sandbox. Although this capability comes at a great potential
cost to the integrity of the system, Flatpak framework allows for channels to be created
through the sandbox for exchange of specific information from within the sandbox to the host
system or vice versa. The channel is in this case referred to as a portal. A con to this
feature is discussed later in the section.[14]
One of the most criticized aspects of Flatpak however is it's the sandbox feature itself.
Sandboxing is how package managers such as Snappy and Flatpak implement important security
features. Sandboxing essentially isolates the application from everything else in the system
only allowing for user defined exchange of information from within the sandbox to outside. The
flaw with the concept being that the sandbox cannot be inherently impregnable. Data has to be
eventually transferred between the two domains and simple Linux commands can simply get rid of
the sandbox restriction meaning that malicious applications might potentially jump out of the
said sandbox.[15]
This combined with the worse than expected commitment to rolling out security updates for
Flatpak has resulted in widespread criticism of the team's tall claim of providing a secure
framework. The blog (named flatkill ) linked at the end of this guide in fact mentions a couple
of exploits that were not addressed by the Flatpak team as soon as they should've been.[15]
For more details, I suggest you to read Flatpak official documentation .
Related read:
AppImage vs Snap vs Flatpak
The table attached below summarizes all the above findings into a concise and technical
comparison of the three frameworks.
| Feature |
AppImage |
Snappy |
Flatpak |
Unique feature
|
Not an appstore or repository, its simply put a packaging
format for software distribution. |
Led by Canonical (Same company as Ubuntu), features
central app repository and active contribution from Canonical. |
Features an app store called FlatHub, however, individuals
may still host packages and distribute it. |
| Target system |
Desktops and Servers. |
Desktops, Servers, IoT devices, Embedded devices etc. |
Desktops and limited function on servers. |
| Libraries/Dependencies |
Base system. Runtimes optional, Libraries and other
dependencies packaged. |
Base system or via Plugins or can be packaged. |
GNOME, KDE, Freedesktop bundled or custom bundled. |
| Developers |
Community Driven led by Simon Peter. |
Corporate driven by Canonical Ltd. |
Community driven by flatpak team supported by
enterprise. |
| Written in |
C. |
Golang, C and Python. |
C. |
| Initial release |
2004. |
2014. |
2015. |
| Sandboxing |
Can be implemented. |
3 modes – strict, classic, and devmode with varying
confinement capabilities. Runs in isolation. |
Isolated but Uses system files to run applications by
default. |
| Sandboxing Platform |
Firejail, AppArmor, Bubblewrap. |
AppArmor. |
Bubblewrap. |
| App Installation |
Not necessary. Will act as self mounted disc. |
Installation using snapd. |
Installed using flatpak client tools. |
| App Execution |
Can be run after setting executing bit. |
Using desktop integrated snap tools. Runs isolated with
user defined resources. |
Needs to be executed using flatpak command if CLI is
used. |
| User Privileges |
Can be run w/o root user access. |
Can be run w/o root user access. |
Selectively required. |
| Hosting Applications |
Can be hosted anywhere by anybody. |
Has to be hosted with Canonical servers which are
proprietary. |
Can be hosted anywhere by anybody. |
| Portable Execution from non system
locations |
Yes. |
No. |
Yes, after flatpak client is configured. |
| Central Repository |
AppImageHub. |
Snap Store. |
Flathub. |
| Running multiple versions of the app |
Possible, any number of versions simultaneously. |
One version of the app in one channel. Has to be
separately configured for more. |
Yes. |
| Updating applications |
Using CLI command AppImageUpdate or via an updater tool
built into the AppImage. |
Requires snapd installed. Supports delta updating, will
automatically update. |
Required flatpak installed. Update Using flatpak update
command. |
| Package sizes on disk |
Application remains archived. |
Application remains archived. |
Client side is uncompressed. |
Here is a long tabular comparison of AppImage vs. Snap vs. Flatpak features. Please note
that the comparison is made from an AppImage perspective.
Conclusion
While all three of these platforms have a lot in common with each other and aim to be
platform agnostic in approach, they offer different levels of competencies in a few areas.
While Snaps can run on a variety of devices including embedded ones, AppImages and Flatpaks are
built with the desktop user in mind. AppImages of popular applications on the other had have
superior packaging sizes and portability whereas Flatpak really shines with its forward
compatibility when its used in a set it and forget it system.
If there are any flaws in this guide, please let us know in the comment section below. We
will update the guide accordingly.
References:
Package managers play an important role in Linux software management. Here's how some of the leading players compare.
Join the 85,000 open source advocates who receive our giveaway alerts and article roundups.
https://opensource.com/eloqua-embedded-email-capture-block.html?offer_id=70160000000QzXNAA0
Linux adopted early the practice of maintaining a centralized location where users could find and install software. In this article,
I'll discuss the history of software installation on Linux and how modern operating systems are kept up to date against the never-ending
torrent of CVEs .
How was software on Linux installed before package managers?
Historically, software was provided either via FTP or mailing lists (eventually this distribution would grow to include basic
websites). Only a few small files contained the instructions to create a binary (normally in a tarfile). You would untar the files,
read the readme, and as long as you had GCC or some other form of C compiler, you would then typically run a ./configure
script with some list of attributes, such as pathing to library files, location to create new binaries, etc. In addition, the
configure process would check your system for application dependencies. If any major requirements were missing, the
configure script would exit and you could not proceed with the installation until all the dependencies were met. If the configure
script completed successfully, a Makefile would be created.
Once a Makefile existed, you would then proceed to run the make command (this command is provided by
whichever compiler you were using). The make command has a number of options called make flags , which help optimize
the resulting binaries for your system. In the earlier days of computing, this was very important because hardware struggled to keep
up with modern software demands. Today, compilation options can be much more generic as most hardware is more than adequate for modern
software.
Finally, after the make process had been completed, you would need to run make install (or sudo
make install ) in order to actually install the software. As you can imagine, doing this for every single piece of software
was time-consuming and tedious -- not to mention the fact that updating software was a complicated and potentially very involved
process.
What is a package?
Packages were invented to combat this complexity. Packages collect multiple data files together into a single archive file for
easier portability and storage, or simply compress files to reduce storage space. The binaries included in a package are precompiled
with according to the sane defaults the developer chosen. Packages also contain metadata, such as the software's name, a description
of its purpose, a version number, and a list of dependencies necessary for the software to run properly.
Several flavors of Linux have created their own package formats. Some of the most commonly used package formats include:
- .deb: This package format is used by Debian, Ubuntu, Linux Mint, and several other derivatives. It was the first package type
to be created.
- .rpm: This package format was originally called Red Hat Package Manager. It is used by Red Hat, Fedora, SUSE, and several
other smaller distributions.
- .tar.xz: While it is just a compressed tarball, this is the format that Arch Linux uses.
While packages themselves don't manage dependencies directly, they represented a huge step forward in Linux software management.
What is a software repository?
A few years ago, before the proliferation of smartphones, the idea of a software repository was difficult for many users to grasp
if they were not involved in the Linux ecosystem. To this day, most Windows users still seem to be hardwired to open a web browser
to search for and install new software. However, those with smartphones have gotten used to the idea of a software "store." The way
smartphone users obtain software and the way package managers work are not dissimilar. While there have been several attempts at
making an attractive UI for software repositories, the vast majority of Linux users still use the command line to install packages.
Software repositories are a centralized listing of all of the available software for any repository the system has been configured
to use. Below are some examples of searching a repository for a specifc package (note that these have been truncated for brevity):
Arch Linux with aurman
user@arch ~ $ aurman -Ss kate
extra/kate 18.04.2-2 (kde-applications kdebase)
Advanced Text Editor
aur/kate-root 18.04.0-1 (11, 1.139399)
Advanced Text Editor, patched to be able to run as root
aur/kate-git r15288.15d26a7-1 (1, 1e-06)
An advanced editor component which is used in numerous KDE applications requiring a text editing component
CentOS 7 using YUM
[user@centos ~]$ yum search kate
kate-devel.x86_64 : Development files for kate
kate-libs.x86_64 : Runtime files for kate
kate-part.x86_64 : Kate kpart plugin
Ubuntu using APT
user@ubuntu ~ $ apt search kate
Sorting... Done
Full Text Search... Done
kate/xenial 4:15.12.3-0ubuntu2 amd64
powerful text editor
kate-data/xenial,xenial 4:4.14.3-0ubuntu4 all
shared data files for Kate text editor
kate-dbg/xenial 4:15.12.3-0ubuntu2 amd64
debugging symbols for Kate
kate5-data/xenial,xenial 4:15.12.3-0ubuntu2 all
shared data files for Kate text editor
What are the most prominent package managers?
As suggested in the above output, package managers are used to interact with software repositories. The following is a brief overview
of some of the most prominent package managers.
RPM-based package managers
Updating RPM-based systems, particularly those based on Red Hat technologies, has a very interesting and detailed history. In
fact, the current versions of yum (for enterprise distributions)
and DNF (for community) combine several open source projects to
provide their current functionality.
Initially, Red Hat used a package manager called RPM
(Red Hat Package Manager), which is still in use today. However, its primary use is to install RPMs, which you have locally, not
to search software repositories. The package manager named up2date was created to inform users of updates to packages
and enable them to search remote repositories and easily install dependencies. While it served its purpose, some community members
felt that up2date had some significant shortcomings.
The current incantation of yum came from several different community efforts. Yellowdog Updater (YUP) was developed in 1999-2001
by folks at Terra Soft Solutions as a back-end engine for a graphical installer of
Yellow Dog Linux . Duke University liked the idea of
YUP and decided to improve upon it. They created
Yellowdog Updater, Modified
(yum) which was eventually adapted to help manage the university's Red Hat Linux systems. Yum grew in popularity, and by 2005
it was estimated to be used by more than half of the Linux market. Today, almost every distribution of Linux that uses RPMs uses
yum for package management (with a few notable exceptions).
Working with yum
In order for yum to download and install packages out of an internet repository, files must be located in /etc/yum.repos.d/
and they must have the extension .repo . Here is an example repo file:
[local_base]
name=Base CentOS (local)
baseurl=http://7-repo.apps.home.local/yum-repo/7/
enabled=1
gpgcheck=0
This is for one of my local repositories, which explains why the GPG check is off. If this check was on, each package would need
to be signed with a cryptographic key and a corresponding key would need to be imported into the system receiving the updates. Because
I maintain this repository myself, I trust the packages and do not bother signing them.
Once a repository file is in place, you can start installing packages from the remote repository. The most basic command is
yum update , which will update every package currently installed. This does not require a specific step to refresh
the information about repositories; this is done automatically. A sample of the command is shown below:
[user@centos ~]$ sudo yum update
Loaded plugins: fastestmirror, product-id, search-disabled-repos, subscription-manager
local_base | 3.6 kB 00:00:00
local_epel | 2.9 kB 00:00:00
local_rpm_forge | 1.9 kB 00:00:00
local_updates | 3.4 kB 00:00:00
spideroak-one-stable | 2.9 kB 00:00:00
zfs | 2.9 kB 00:00:00
(1/6): local_base/group_gz | 166 kB 00:00:00
(2/6): local_updates/primary_db | 2.7 MB 00:00:00
(3/6): local_base/primary_db | 5.9 MB 00:00:00
(4/6): spideroak-one-stable/primary_db | 12 kB 00:00:00
(5/6): local_epel/primary_db | 6.3 MB 00:00:00
(6/6): zfs/x86_64/primary_db | 78 kB 00:00:00
local_rpm_forge/primary_db | 125 kB 00:00:00
Determining fastest mirrors
Resolving Dependencies
--> Running transaction check
If you are sure you want yum to execute any command without stopping for input, you can put the -y flag in the command,
such as yum update -y .
Installing a new package is just as easy. First, search for the name of the package with yum search :
[user@centos ~]$ yum search kate
artwiz-aleczapka-kates-fonts.noarch : Kates font in Artwiz family
ghc-highlighting-kate-devel.x86_64 : Haskell highlighting-kate library development files
kate-devel.i686 : Development files for kate
kate-devel.x86_64 : Development files for kate
kate-libs.i686 : Runtime files for kate
kate-libs.x86_64 : Runtime files for kate
kate-part.i686 : Kate kpart plugin
Once you have the name of the package, you can simply install the package with sudo yum install kate-devel -y . If
you installed a package you no longer need, you can remove it with sudo yum remove kate-devel -y . By default, yum will
remove the package plus its dependencies.
There may be times when you do not know the name of the package, but you know the name of the utility. For example, suppose you
are looking for the utility updatedb , which creates/updates the database used by the locate command. Attempting
to install updatedb returns the following results:
[user@centos ~]$ sudo yum install updatedb
Loaded plugins: fastestmirror, langpacks
Loading mirror speeds from cached hostfile
No package updatedb available.
Error: Nothing to do
You can find out what package the utility comes from by running:
[user@centos ~]$ yum whatprovides *updatedb
Loaded plugins: fastestmirror, langpacks
Loading mirror speeds from cached hostfile
bacula-director-5.2.13-23.1.el7.x86_64 : Bacula Director files
Repo : local_base
Matched from:
Filename : /usr/share/doc/bacula-director-5.2.13/updatedb
mlocate-0.26-8.el7.x86_64 : An utility for finding files by name
Repo : local_base
Matched from:
Filename : /usr/bin/updatedb
The reason I have used an asterisk * in front of the command is because yum whatprovides uses the path
to the file in order to make a match. Since I was not sure where the file was located, I used an asterisk to indicate any path.
There are, of course, many more options available to yum. I encourage you to view the man page for yum for additional options.
Dandified Yum (DNF) is a newer iteration on yum. Introduced
in Fedora 18, it has not yet been adopted in the enterprise distributions, and as such is predominantly used in Fedora (and derivatives).
Its usage is almost exactly the same as that of yum, but it was built to address poor performance, undocumented APIs, slow/broken
dependency resolution, and occasional high memory usage. DNF is meant as a drop-in replacement for yum, and therefore I won't repeat
the commands -- wherever you would use yum , simply substitute dnf .
Working with Zypper
Zypper is another package manager meant to help manage RPMs.
This package manager is most commonly associated with SUSE (and
openSUSE ) but has also seen adoption by
MeeGo , Sailfish
OS , and Tizen . It was originally introduced in 2006 and has been iterated
upon ever since. There is not a whole lot to say other than Zypper is used as the back end for the system administration tool
YaST and some users find it to be faster than yum.
Zypper's usage is very similar to that of yum. To search for, update, install or remove a package, simply use the following:
zypper search kate
zypper update
zypper install kate
zypper remove kate
Some major differences come into play in how repositories are added to the system with zypper . Unlike the package
managers discussed above, zypper adds repositories using the package manager itself. The most common way is via a URL,
but zypper also supports importing from repo files.
suse:~ # zypper addrepo http://download.videolan.org/pub/vlc/SuSE/15.0 vlc
Adding repository 'vlc' [done]
Repository 'vlc' successfully added
Enabled : Yes
Autorefresh : No
GPG Check : Yes
URI : http://download.videolan.org/pub/vlc/SuSE/15.0
Priority : 99
You remove repositories in a similar manner:
suse:~ # zypper removerepo vlc
Removing repository 'vlc' ...................................[done]
Repository 'vlc' has been removed.
Use the zypper repos command to see what the status of repositories are on your system:
suse:~ # zypper repos
Repository priorities are without effect. All enabled repositories share the same priority.
# | Alias | Name | Enabled | GPG Check | Refresh
---+---------------------------+-----------------------------------------+---------+-----------+--------
1 | repo-debug | openSUSE-Leap-15.0-Debug | No | ---- | ----
2 | repo-debug-non-oss | openSUSE-Leap-15.0-Debug-Non-Oss | No | ---- | ----
3 | repo-debug-update | openSUSE-Leap-15.0-Update-Debug | No | ---- | ----
4 | repo-debug-update-non-oss | openSUSE-Leap-15.0-Update-Debug-Non-Oss | No | ---- | ----
5 | repo-non-oss | openSUSE-Leap-15.0-Non-Oss | Yes | ( p) Yes | Yes
6 | repo-oss | openSUSE-Leap-15.0-Oss | Yes | ( p) Yes | Yes
zypper even has a similar ability to determine what package name contains files or binaries. Unlike YUM, it uses
a hyphen in the command (although this method of searching is deprecated):
localhost:~ # zypper what-provides kate
Command 'what-provides' is replaced by 'search --provides --match-exact'.
See 'help search' for all available options.
Loading repository data...
Reading installed packages...
S | Name | Summary | Type
---+------+----------------------+------------
i+ | Kate | Advanced Text Editor | application
i | kate | Advanced Text Editor | package
As with YUM and DNF, Zypper has a much richer feature set than covered here. Please consult with the official documentation for
more in-depth information.
Debian-based package managers
One of the oldest Linux distributions currently maintained, Debian's system is very similar to RPM-based systems. They use
.deb packages, which can be managed by a tool called dpkg . dpkg is very similar to rpm in that
it was designed to manage packages that are available locally. It does no dependency resolution (although it does dependency checking),
and has no reliable way to interact with remote repositories. In order to improve the user experience and ease of use, the Debian
project commissioned a project called Deity . This codename was eventually abandoned and changed to
Advanced Package Tool (APT) .
Released as test builds in 1998 (before making an appearance in Debian 2.1 in 1999), many users consider APT one of the defining
features of Debian-based systems. It makes use of repositories in a similar fashion to RPM-based systems, but instead of individual
.repo files that yum uses, apt has historically used /etc/apt/sources.list to
manage repositories. More recently, it also ingests files from /etc/apt/sources.d/ . Following the examples in the RPM-based
package managers, to accomplish the same thing on Debian-based distributions you have a few options. You can edit/create the files
manually in the aforementioned locations from the terminal, or in some cases, you can use a UI front end (such as Software
& Updates provided by Ubuntu et al.). To provide the same treatment to all distributions, I will cover only the command-line
options. To add a repository without directly editing a file, you can do something like this:
user@ubuntu:~$ sudo apt-add-repository "deb http://APT.spideroak.com/ubuntu-spideroak-hardy/ release restricted"
This will create a spideroakone.list file in /etc/apt/sources.list.d . Obviously, these lines change
depending on the repository being added. If you are adding a Personal Package Archive (PPA), you can do this:
user@ubuntu:~$ sudo apt-add-repository ppa:gnome-desktop
NOTE: Debian does not support PPAs natively.
After a repository has been added, Debian-based systems need to be made aware that there is a new location to search for packages.
This is done via the apt-get update command:
user@ubuntu:~$ sudo apt-get update
Get:1 http://security.ubuntu.com/ubuntu xenial-security InRelease [107 kB]
Hit:2 http://APT.spideroak.com/ubuntu-spideroak-hardy release InRelease
Hit:3 http://ca.archive.ubuntu.com/ubuntu xenial InRelease
Get:4 http://ca.archive.ubuntu.com/ubuntu xenial-updates InRelease [109 kB]
Get:5 http://security.ubuntu.com/ubuntu xenial-security/main amd64 Packages [517 kB]
Get:6 http://security.ubuntu.com/ubuntu xenial-security/main i386 Packages [455 kB]
Get:7 http://security.ubuntu.com/ubuntu xenial-security/main Translation-en [221 kB]
...
Fetched 6,399 kB in 3s (2,017 kB/s)
Reading package lists... Done
Now that the new repository is added and updated, you can search for a package using the apt-cache command:
user@ubuntu:~$ apt-cache search kate
aterm-ml - Afterstep XVT - a VT102 emulator for the X window system
frescobaldi - Qt4 LilyPond sheet music editor
gitit - Wiki engine backed by a git or darcs filestore
jedit - Plugin-based editor for programmers
kate - powerful text editor
kate-data - shared data files for Kate text editor
kate-dbg - debugging symbols for Kate
katepart - embeddable text editor component
To install kate , simply run the corresponding install command:
user@ubuntu:~$ sudo apt-get install kate
To remove a package, use apt-get remove :
user@ubuntu:~$ sudo apt-get remove kate
When it comes to package discovery, APT does not provide any functionality that is similar to yum whatprovides .
There are a few ways to get this information if you are trying to find where a specific file on disk has come from.
Using dpkg
user@ubuntu:~$ dpkg -S /bin/ls
coreutils: /bin/ls
Using apt-file
user@ubuntu:~$ sudo apt-get install apt-file -y
user@ubuntu:~$ sudo apt-file update
user@ubuntu:~$ apt-file search kate
The problem with apt-file search is that it, unlike yum whatprovides , it is overly verbose unless you
know the exact path, and it automatically adds a wildcard search so that you end up with results for anything with the word kate
in it:
kate: /usr/bin/kate
kate: /usr/lib/x86_64-linux-gnu/qt5/plugins/ktexteditor/katebacktracebrowserplugin.so
kate: /usr/lib/x86_64-linux-gnu/qt5/plugins/ktexteditor/katebuildplugin.so
kate: /usr/lib/x86_64-linux-gnu/qt5/plugins/ktexteditor/katecloseexceptplugin.so
kate: /usr/lib/x86_64-linux-gnu/qt5/plugins/ktexteditor/katectagsplugin.so
Most of these examples have used apt-get . Note that most of the current tutorials for Ubuntu specifically have taken
to simply using apt . The single apt command was designed to implement only the most commonly used commands
in the APT arsenal. Since functionality is split between apt-get , apt-cache , and other commands,
apt looks to unify these into a single command. It also adds some niceties such as colorization, progress bars, and
other odds and ends. Most of the commands noted above can be replaced with apt , but not all Debian-based distributions
currently receiving security patches support using apt by default, so you may need to install additional packages.
Arch-based package managers
Arch Linux uses a package manager called
pacman . Unlike .deb or .rpm
files, pacman uses a more traditional tarball with the LZMA2 compression ( .tar.xz ). This enables Arch Linux
packages to be much smaller than other forms of compressed archives (such as gzip ). Initially released in 2002, pacman has
been steadily iterated and improved. One of the major benefits of pacman is that it supports the
Arch Build System , a system for building packages
from source. The build system ingests a file called a PKGBUILD, which contains metadata (such as version numbers, revisions, dependencies,
etc.) as well as a shell script with the required flags for compiling a package conforming to the Arch Linux requirements. The resulting
binaries are then packaged into the aforementioned .tar.xz file for consumption by pacman.
This system led to the creation of the Arch User Repository (AUR) which
is a community-driven repository containing PKGBUILD files and supporting patches or scripts. This allows for a virtually endless
amount of software to be available in Arch. The obvious advantage of this system is that if a user (or maintainer) wishes to make
software available to the public, they do not have to go through official channels to get it accepted in the main repositories. The
downside is that it relies on community curation similar to Docker Hub , Canonical's
Snap packages, or other similar mechanisms. There are numerous AUR-specific package managers that can be used to download, compile,
and install from the PKGBUILD files in the AUR (we will look at this later).
Working with pacman and official repositories
Arch's main package manager, pacman, uses flags instead of command words like yum and apt . For example,
to search for a package, you would use pacman -Ss . As with most commands on Linux, you can find both a manpage
and inline help. Most of the commands for pacman use the sync (-S) flag. For example:
user@arch ~ $ pacman -Ss kate
extra/kate 18.04.2-2 (kde-applications kdebase)
Advanced Text Editor
extra/libkate 0.4.1-6 [installed]
A karaoke and text codec for embedding in ogg
extra/libtiger 0.3.4-5 [installed]
A rendering library for Kate streams using Pango and Cairo
extra/ttf-cheapskate 2.0-12
TTFonts collection from dustimo.com
community/haskell-cheapskate 0.1.1-100
Experimental markdown processor.
Arch also uses repositories similar to other package managers. In the output above, search results are prefixed with the repository
they are found in ( extra/ and community/ in this case). Similar to both Red Hat and Debian-based systems,
Arch relies on the user to add the repository information into a specific file. The location for these repositories is /etc/pacman.conf
. The example below is fairly close to a stock system. I have enabled the [multilib] repository for Steam support:
[options]
Architecture = auto
Color
CheckSpace
SigLevel = Required DatabaseOptional
LocalFileSigLevel = Optional
[core]
Include = /etc/pacman.d/mirrorlist
[extra]
Include = /etc/pacman.d/mirrorlist
[community]
Include = /etc/pacman.d/mirrorlist
[multilib]
Include = /etc/pacman.d/mirrorlist
It is possible to specify a specific URL in pacman.conf . This functionality can be used to make sure all packages
come from a specific point in time. If, for example, a package has a bug that affects you severely and it has several dependencies,
you can roll back to a specific point in time by adding a specific URL into your pacman.conf and then running the commands
to downgrade the system:
[core]
Server=https://archive.archlinux.org/repos/2017/12/22/$repo/os/$arch
Like Debian-based systems, Arch does not update its local repository information until you tell it to do so. You can refresh the
package database by issuing the following command:
user@arch ~ $ sudo pacman -Sy
:: Synchronizing package databases...
core 130.2 KiB 851K/s 00:00 [##########################################################] 100%
extra 1645.3 KiB 2.69M/s 00:01 [##########################################################] 100%
community 4.5 MiB 2.27M/s 00:02 [##########################################################] 100%
multilib is up to date
As you can see in the above output, pacman thinks that the multilib package database is up to date. You can force
a refresh if you think this is incorrect by running pacman -Syy . If you want to update your entire system (excluding
packages installed from the AUR), you can run pacman -Syu :
user@arch ~ $ sudo pacman -Syu
:: Synchronizing package databases...
core is up to date
extra is up to date
community is up to date
multilib is up to date
:: Starting full system upgrade...
resolving dependencies...
looking for conflicting packages...
Packages (45) ceph-13.2.0-2 ceph-libs-13.2.0-2 debootstrap-1.0.105-1 guile-2.2.4-1 harfbuzz-1.8.2-1 harfbuzz-icu-1.8.2-1 haskell-aeson-1.3.1.1-20
haskell-attoparsec-0.13.2.2-24 haskell-tagged-0.8.6-1 imagemagick-7.0.8.4-1 lib32-harfbuzz-1.8.2-1 lib32-libgusb-0.3.0-1 lib32-systemd-239.0-1
libgit2-1:0.27.2-1 libinput-1.11.2-1 libmagick-7.0.8.4-1 libmagick6-6.9.10.4-1 libopenshot-0.2.0-1 libopenshot-audio-0.1.6-1 libosinfo-1.2.0-1
libxfce4util-4.13.2-1 minetest-0.4.17.1-1 minetest-common-0.4.17.1-1 mlt-6.10.0-1 mlt-python-bindings-6.10.0-1 ndctl-61.1-1 netctl-1.17-1
nodejs-10.6.0-1
Total Download Size: 2.66 MiB
Total Installed Size: 879.15 MiB
Net Upgrade Size: -365.27 MiB
:: Proceed with installation? [Y/n]
In the scenario mentioned earlier regarding downgrading a system, you can force a downgrade by issuing pacman -Syyuu
. It is important to note that this should not be undertaken lightly. This should not cause a problem in most cases; however, there
is a chance that downgrading of a package or several packages will cause a cascading failure and leave your system in an inconsistent
state. USE WITH CAUTION!
To install a package, simply use pacman -S kate :
user@arch ~ $ sudo pacman -S kate
resolving dependencies...
looking for conflicting packages...
Packages (7) editorconfig-core-c-0.12.2-1 kactivities-5.47.0-1 kparts-5.47.0-1 ktexteditor-5.47.0-2 syntax-highlighting-5.47.0-1
threadweaver-5.47.0-1
kate-18.04.2-2
Total Download Size: 10.94 MiB
Total Installed Size: 38.91 MiB
:: Proceed with installation? [Y/n]
To remove a package, you can run pacman -R kate . This removes only the package and not its dependencies:
user@arch ~ $ sudo pacman -S kate
checking dependencies...
Packages (1) kate-18.04.2-2
Total Removed Size: 20.30 MiB
:: Do you want to remove these packages? [Y/n]
If you want to remove the dependencies that are not required by other packages, you can run pacman -Rs:
user@arch ~ $ sudo pacman -Rs kate
checking dependencies...
Packages (7) editorconfig-core-c-0.12.2-1 kactivities-5.47.0-1 kparts-5.47.0-1 ktexteditor-5.47.0-2 syntax-highlighting-5.47.0-1
threadweaver-5.47.0-1
kate-18.04.2-2
Total Removed Size: 38.91 MiB
:: Do you want to remove these packages? [Y/n]
Pacman, in my opinion, offers the most succinct way of searching for the name of a package for a given utility. As shown above,
yum and apt both rely on pathing in order to find useful results. Pacman makes some intelligent guesses
as to which package you are most likely looking for:
user@arch ~ $ sudo pacman -Fs updatedb
core/mlocate 0.26.git.20170220-1
usr/bin/updatedb
user@arch ~ $ sudo pacman -Fs kate
extra/kate 18.04.2-2
usr/bin/kate
Working with the AUR
There are several popular AUR package manager helpers. Of these, yaourt and pacaur are fairly prolific.
However, both projects are listed as discontinued or problematic on the
Arch Wiki . For that reason,
I will discuss aurman . It works almost exactly like pacman, except it searches the AUR and includes some
helpful, albeit potentially dangerous, options. Installing a package from the AUR will initiate use of the package maintainer's build
scripts. You will be prompted several times for permission to continue (I have truncated the output for brevity):
aurman -S telegram-desktop-bin
~~ initializing aurman...
~~ the following packages are neither in known repos nor in the aur
...
~~ calculating solutions...
:: The following 1 package(s) are getting updated:
aur/telegram-desktop-bin 1.3.0-1 -> 1.3.9-1
?? Do you want to continue? Y/n: Y
~~ looking for new pkgbuilds and fetching them...
Cloning into 'telegram-desktop-bin'...
remote: Counting objects: 301, done.
remote: Compressing objects: 100% (152/152), done.
remote: Total 301 (delta 161), reused 286 (delta 147)
Receiving objects: 100% (301/301), 76.17 KiB | 639.00 KiB/s, done.
Resolving deltas: 100% (161/161), done.
?? Do you want to see the changes of telegram-desktop-bin? N/y: N
[sudo] password for user:
...
==> Leaving fakeroot environment.
==> Finished making: telegram-desktop-bin 1.3.9-1 (Thu 05 Jul 2018 11:22:02 AM EDT)
==> Cleaning up...
loading packages...
resolving dependencies...
looking for conflicting packages...
Packages (1) telegram-desktop-bin-1.3.9-1
Total Installed Size: 88.81 MiB
Net Upgrade Size: 5.33 MiB
:: Proceed with installation? [Y/n]
Sometimes you will be prompted for more input, depending on the complexity of the package you are installing. To avoid this tedium,
aurman allows you to pass both the --noconfirm and --noedit options. This is equivalent to
saying "accept all of the defaults, and trust that the package maintainers scripts will not be malicious." USE THIS OPTION WITH
EXTREME CAUTION! While these options are unlikely to break your system on their own, you should never blindly accept someone
else's scripts.
Conclusion
This article, of course, only scratches the surface of what package managers can do. There are also many other package managers
available that I could not cover in this space. Some distributions, such as Ubuntu or Elementary OS, have gone to great lengths to
provide a graphical approach to package management.
If you are interested in some of the more advanced functions of package managers, please post your questions or comments below
and I would be glad to write a follow-up article.
Appendix # search for packages
yum search <package>
dnf search <package>
zypper search <package>
apt-cache search <package>
apt search <package>
pacman -Ss <package>
# install packages
yum install <package>
dnf install <package>
zypper install <package>
apt-get install <package>
apt install <package>
pacman -Ss <package>
# update package database, not required by yum, dnf and zypper
apt-get update
apt update
pacman -Sy
# update all system packages
yum update
dnf update
zypper update
apt-get upgrade
apt upgrade
pacman -Su
# remove an installed package
yum remove <package>
dnf remove <package>
apt-get remove <package>
apt remove <package>
pacman -R <package>
pacman -Rs <package>
# search for the package name containing specific file or folder
yum whatprovides *<binary>
dnf whatprovides *<binary>
zypper what-provides <binary>
zypper search --provides <binary>
apt-file search <binary>
pacman -Sf <binary>
Topics Linux About the author
 Steve Ovens - Steve is a dedicated IT professional and Linux advocate. Prior to joining Red Hat, he spent several years in financial,
automotive, and movie industries. Steve currently works for Red Hat as an OpenShift consultant and has certifications ranging from
the RHCA (in DevOps), to Ansible, to Containerized Applications and more. He spends a lot of time discussing technology and writing
tutorials on various technical subjects with friends, family, and anyone who is interested in listening.
More about me
Steve Ovens - Steve is a dedicated IT professional and Linux advocate. Prior to joining Red Hat, he spent several years in financial,
automotive, and movie industries. Steve currently works for Red Hat as an OpenShift consultant and has certifications ranging from
the RHCA (in DevOps), to Ansible, to Containerized Applications and more. He spends a lot of time discussing technology and writing
tutorials on various technical subjects with friends, family, and anyone who is interested in listening.
More about me
If you're maintaining multiple Red Hat Enterprise Linux systems (or equivalent offsets like CentOS
or Scientific Linux) your administration work with the particular hosts will gain in a routine. Because
even the best administrator might forget something it would be advantageously to have a central software
and configuration management solution. Chef and Puppet are two very mighty and popular management
tools for this application. Depending on your system landscape and needs these tools might also be
oversized though – Red Hat Package Manager (RPM) can emerge as a functional alternative in this case.
It is often forgotten that RPM can be used for sharing own software and configurations as well.
If you're not managing huge system landscapes with uncontrolled growth of software and want to have
a easy-to-use solution, you might want to have a look at RPM.
I'm myself using RPM to maintain my whole Red Hat Enterprise Linux system landscape – this article
will show you how easy RPM can be used to simplify system management.

Platform
The core of this scenario is a web-service which can be implemented on a dedicated host or on
a pre-existing server (e.g. web server) as well. This web-service offers RPM packages for downloading
and doesn't even need to be a RHEL or CentOS system because the server only serves the RPM files
(and ideally doesn't create them).
RPM packages are created and replicated to the web server using SSH and Rsync on dedicated RHEL
or CentOS systems depending on the distribution releases you want to maintain (e.g. RHEL 5 and 6).
A YUM repository is created of the RPM packages collection preliminary using createrepo. The YUM
repository can be used by additional servers and other clients and consists of multiple sub-directories
that are named after the supported processor architectures. After the repository had been configured
on the client it can be used for downloading and installing additional software packages. If you
only have to maintain RPM packages for one distribution release you can scale down your test environment.
In this case a YUM repository for the Red Hat Enterprise Linux releases 5 and 6 is created.
Web server file structure
The YUM repository directory (myrepo in this case) consists of multiple sub-directories containing
the software packages per supported distribution release and processor architecture. The names of
these folders are very important – the name has to be the same like the value of the appropriate
YUM variable $releasever (discussed later!).
A table of popular RPM-based Linux distributions:
| $releasever |
Explanation |
| 5Server |
RHEL 5 |
| 6Server |
RHEL 6 |
| 5Workstation |
RHED 5 |
| 6Workstation |
RHED 6 |
| 5 / 5.1 / 5.2 / … |
CentOS / Scientific Linux 5 |
| 6 / 6.1 / 5.2 / … |
CentOS / Scientific Linux 6 |
| 17 / 18 / … |
Fedora 17 / 18 / … |
Example: If you want to serve software packages for the Red Hat Enterprise Linux releases 5 and
6 you'll have to create two sub-directories: 5Server and 6Server.
This implies the following directory structure:
myrepo/
       /5Server
            .../repodata
            .../noarch
                      ...
            .../i686
                    ...
            .../x86_64
                      ...
       /6Server
               (see above)
               ...
The appropriate main directories are created on the web server – the sub-directories and further
contents are copied to the machine using SSH / Rsync later:
# mkdir -p /var/www/html/myrepo/{5,6}Server
Preparation
Before RPM packages can be created and served to other hosts using a YUM repository several development
tools need to be installed:
# yum install rpm-build createrepo rpmdevtools
I suggest to create the RPM packages on dedicated hosts or virtual machines and copy the packages
to the web server using SSH and Rsync afterwards. The web server should never be used as development
environment additionally, due to security reasons. Especially if you want to serve packages for multiple
distribution releases (RHEL5, RHEL6) you will definitely need appropriate test environments.
The web server host needs to be prepared for serving the data (if not done yet) – e.g. for a EL
system:
# yum install httpd
# chkconfig httpd on
# system-config-firewall-tui
# service httpd start
Due to security reasons, a dedicated service user for creating the packages is created on the
development machines. RPM packages should never be created under the user context of root! Afterwards
the needed directory structures are created using rpmdev-setuptree (this command doesn't exist under
EL5):
# useradd su-rpmdev
# passwd su-rpmdev
# su - su-rpmdev
$ rpmdev-setuptree
$ ln -s /usr/src/redhat ~su-rpmdev/rpmbuild    #symb. link under EL5
If you're using EL5 you'll find the needed structures below /usr/src/redhat – the directory permissions
need to be set for the created user su-rpmdev. In the new created folder rpmbuild (respectively below
/usr/src/redhat) consists of the following sub-directories:
- BUILD – folder in which source code archives are extracted and compiled.
- RPMS – created RPM packages are stored here in appropriate sub-directories per supported processor
architecture (x86_64, i686, noarch,…).
- SOURCES – contains source code archives that are needed for creating RPM binary packages;
e.g. software source codes or archives containing configuration files (see example below).
- SPECS – contains structure files (.spec files) that define the content and structure of RPM
packages; this file is needed to create the RPM file.
- SRPMS – source code RPM packages; are created on demand. Enables clients to also download
source codes and compile packages manually using yumdownloader.
SOURCES and SPECS are the most important directories – most of the time the RPM farmer is moving
around there.

Example 1: configuration files
The most administrators will customize the standard configuration of a Enterprise Linux systems
to fit their needs. Some popular examples of customizable configuration files are:
- NTP
- sudo
- environment profiles (below /etc/profile.d)
- WINS and DNS configuration
As a matter of principle, creating RPM packages is a complex topic which is only raised roughly
in this article. If you want to go deeper with this topic you might want to have a look at the Fedora
wiki and documentation – there are plenty useful information:
In thie case a NTP configuration shall be packaged in a RPM file and rolled out on all hosts in
the company. First of all, a specfile is created for the future RPM package:
$ cd ~su-rpmdev/rpmbuild/SPECS
$ rpmdev-newspec mycompany-ntp
Skeleton specfile (minimal) has been created to "mycompany-ntp.spec".
All rpmdev tools doesn't exist under EL5 so that you'll have to create the specfile on your own!
If you're on EL6, the previous command created a skeleton of a RPM specfile – this file is edited
using an editor now:
$ vim mycompany-ntp.spec
Name:           mycompany-ntp
Version:
Release:        1%{?dist}
Summary:

Group:
License:
URL:
Source0:

BuildRequires:
Requires:

%description

%prep
%setup -q

%build
%configure
make %{?_smp_mflags}

%install
rm -rf $RPM_BUILD_ROOT
make install DESTDIR=$RPM_BUILD_ROOT

%clean
rm -rf $RPM_BUILD_ROOT

%files
%defattr(-,root,root,-)
%doc

%changelog
Beside meta information about the application, additional scripts for compiling and creating the
package are included. The particular meta variables are largely self-explanatory – some explanations:
- Name – name of the software package (mycompany-ntp-1.0-1)
- Version – version of the software package (my-company-ntp-1.0-1)
- Release – release of the software package (my-company-ntp-1.0-1)
- Summary – short package description
- Group – software group the package belongs to. A full listing of possible groups can be found
below: /usr/share/doc/rpm-*/GROUPS
- License – assigned license (GPL, AGPL, MIT,…)
- URL – URL of the project website
- Source0 – relative path starting in SOURCES to the source code
- BuildRequires – dependencies that are needed to compile the source code (e.g. header files
or library source codes)
- Requires – dependencies that are needed to run the application (in this case: the NTP daemon)
- Conflicts – defines third-party software packages and version that are incompatible with the
customized software packages (missing in template – but very important)
- %description – long description of the software package
- %changelog – changelog, applied changes, authors, and so on…
Some of the additional script or macro segments:
- %prep – preparation before compiling the source code; e.g. applying patches
- %build – compiling the source code
- %install – creating the RPM package; copying of created binary files and directory structures
to the RPM package
To be honest – it's not hard to lose track in the beginning. I suggest to have a look at finished
RPM specfiles – often you'll learn some "tricks" by having a look at other's work.
There are two ways to have a look at finished RPM specfiles. Some additional repositories are
serving their specfiles over SVN or GIT. As an example, Repoforge has a public GIT mirror for this:
[click me!]
Another possibility is to include the optional source code channels of additional repositories
– like EPEL – and download the source code packages:
# vi /etc/yum.repos.d/epel.repo
...
[epel-source]
...
enabled=1

ESC ZZ
# yum install yum-utils
# yumdownloader --source nrpe
The RPM packages can be adapted using cpio – another more comfortable way is to use Midnight Commander
to examine the package. The RPM package includes a CPIO archive named CONTENTS.cpio – the specfile
is stored there:

To build a preferably "clean" package it is important to create a source code archive – even if
you only want to share configuration files. It is also possible to create those files directly in
the install macro of the specfile – but especially if you want to share multiple or long configuration
files you'll lose track . In this case an archive containing the NTP configuration is created:
$ mkdir ~/rpmbuild/SOURCES/mycompany-ntp-1.0
$ cd ~/rpmbuild/SOURCES/mycompany-ntp-1.0
$ vi ntp.conf
driftfile /var/lib/ntp/drift
server localserver.loc

ESC ZZ
$ cd ..
$ tar cf mycompany-ntp-1.0.tar.gz mycompany-ntp-1.0/*
Afterwards the RPM specfile is modified – my version looks like this:
$ cd ../SPECS
$ cat mycompany-ntp.spec
Name:           mycompany-ntp
Version:        1.0
Release:        1%{?dist}
Summary:        MyCompany customized NTP configuration

Group:          System Environment/Daemons
License:        GPL
Source0:        %name-%version.tar.gz

Requires:       ntp

%description
This package includes MyCompany customized NTP configuration files.
Feel free to delete this package if received outside the MyCompany network.

%prep
%setup -q

%build

%install
rm -rf $RPM_BUILD_ROOT
install -m 0755 -d %{buildroot}%{_sysconfdir}/mycompany
install -m 0644 ntp.conf %{buildroot}%{_sysconfdir}/mycompany/ntp.conf

%clean
rm -rf $RPM_BUILD_ROOT

%files
%config(noreplace) %{_sysconfdir}/mycompany/ntp.conf
I'm sure you notices that the modified NTP configuration file isn't stored at its accurate place
(/etc/ntp.conf) – it is rather saved in an alternative directory (/etc/mycompany/ntp.conf). The reason
for this is that the former configuration file (which is provided by the ntp package) can be replaced
because of the noreplace flag:
#code quote of the ntp RPM specfile
%files
%config(noreplace) %{_sysconfdir}/ntp.conf
This package stores its configuration file in an alternative directory which can't be overwritten
by other RPM packages.
You'll have to help yourself by using a "trigger trick" that saves the former configuration and
creates a symbolic link to the new configuration after the installation. After the uninstallation
of the package this step is rolled back. For implement this you'll have to add the following macros
to your RPM specfile:
%triggerin -- mycompany-ntp
if [ ! -h /etc/ntp.conf -o ! "`readlink /etc/ntp.conf`" = "/etc/mycompany/ntp.conf" ] ; then
        if [ -e /etc/ntp.conf ] ; then
                mv -f /etc/ntp.conf /etc/ntp.conf.orig
        fi
        ln -s /etc/mycompany/ntp.conf /etc/ntp.conf
fi

%triggerun -- mycompany-ntp
if [ $1 -eq 0 -a $2 -gt 0 -a -e /etc/ntp.conf.orig ] ; then
        mv -f /etc/ntp.conf.orig /etc/ntp.conf
fi

%triggerpostun -- mycompany-ntp
if [ $2 -eq 0 ]; then
        rm -f /etc/ntp.conf.rpmsave /etc/ntp.conf.orig
fi
if [ -e /etc/ntp.conf.rpmnew ] ; then
        mv /etc/ntp.conf.rpnnew /etc/ntp.conf.orig
fi

%postun
if [ -e /etc/ntp.conf.orig -a -h /etc/ntp.conf -a ! -e "`readlink /etc/ntp.conf`" ] ; then
        mv -f /etc/ntp.conf.orig /etc/ntp.conf
fi
Simplified summarization of the triggers functions:
- Installation: if the former configuration file exists ".orig" is appended to the file
name and a symbolic link to the new configuration file is created
- Deinstallation of the customized NTP configuration: if the former configuration file still
exists the file name is reset
- After uninstalling the customized NTP configuration: remaining additional or newly added NTP
configuration files are deleted
- After uninstalling: resetting the file name of the former NTP configuration file
I abdicated the URL and BuildRequires tags in my specfile because there are no websites or special
compiling dependencies for a customized NTP configuration.
Example 2: Meta packages
There are plenty of applications and configuration that are part of a senseful customized system
installation – to name some practical examples: sudo configuration, GNU Screen (of course!), and
customized application profiles.
To avoid doing the application installation manually everytime, meta packages can be built to
simplify the process. These packages don't have their own files – they only have dependencies to
other packages.
Because of this, RPM meta packages aren't assigned to special processor architectures (x86_64,
i686, s390,…) – an additional specification "BuildArch noarch" is added in the specfile.
Another practical example: a meta package for installing NTP including the customized configuration
and telnet for checking the daemon's function:
$ cd SOURCES
$ mkdir mycompany-ntp-full-1.0
$ tar cvfz mycompany-ntp-full-1.0.tar.gz mycompany-ntp-full-1.0
$ cd ../SPECS
$ cat mycompany-ntp-full.spec
Name:           mycompany-ntp-full
Version:        1.0
Release:        1%{?dist}
Summary:        MyCompany customized NTP configuration and netstat utility

Group:          System Environment/Daemons
License:        GPL
Source0:        %name-%version.tar.gz

BuildArch:      noarch
Requires:       ntp mycompany-ntp net-tools

%description
This package includes MyCompany customized NTP configuration files.
Feel free to delete this package if received outside the MyCompany network.

%prep
%setup -q

%build

%install

%clean
rm -rf $RPM_BUILD_ROOT

%files
Using rpm you can list the package's dependencies:
$ rpmbuild -bb mycompany-ntp-full.spec
$ rpm --query -Rp ../RPMS/noarch/mycompany-ntp-full-1.0-1.el6.noarch.rpm
ntp
mycompany-ntp
net-tools
rpmlib(PayloadFilesHavePrefix) <= 4.0-1
rpmlib(CompressedFileNames) <= 3.0.4-1
Package dependencies can very depending on the distribution release. In this example between RHEL5
and 6 – the packages providing the telnet command are different here:
rhel5 # rpm -qf $(which telnet)
krb5-workstation-1.6.1-70.el5_9.2
rhel6 # rpm-qf $(which telnet)
net-tools-1.60-110.el6_2.x86_64
You might want to consider this in the specfile:
Requires:       ntp mycompany-ntp
%{?el5:Requires: krb5-workstation}
%{?el6:Requires: net-tools}
The first dependeny line is significant for all releases, the following lines are considered under
RHEL5 or RHEL6.
You can also define particular versions in combination with the Requires and Conflicts tags –
for example, if you want to reference a myapp package which is at least version 1.1. One of the following
lines can be used:
Requires:        myapp >= 1.1
Conflicts:       myapp < 1.1
If you want to reference a special version of a package there are also two possibilities – choose
one:
Requires:        myapp = 1.1
Conflicts:       myapp < 1.1 myapp > 1.1
It's a kind of philosophical question which of the two possibilites is used – like the question
if the glass is half-full or half-empty. Either a package is excluded or referenced explicitely.
Further information regarding RPM dependencies can be found on the official RPM website: [click
me!]
Let's go back to the former motivation of this meta package: as an alternative you can also define
package groups in your own YUM repository. If you have already worked with the YUM commands grouplist,
groupinstall and groupremove, you might know this logical grouping of software packages. You can
find an interesting article about this in the YUM wiki: [click me!]
Package and repository creation
Okay – we have a RPM specfile now, what's next? RPM packages are creating using the rpmbuild utility.
This tool has a plenty of swithces and arguments – as an example you can also create source code
packages or packages for additional processor architectures.
Important parameters:
| Parameter |
Explanation |
| -ba |
Creates a binary and source code package |
| -bb |
Creates a binary package |
| -bp |
Extracting and patching (if necessary) of the source code |
| -bs |
Creates a source code package |
| –target=noarch |
Creates a platform independent package |
| –target=i686 |
…a 32-bit package |
| –target=x86_64 |
…a 64-bit package |
Some examples:
# Creates a binary and source code package of myapp
$ rpmbuild -ba myapp.spec
# Creates a 32-bit binary package of myapp
$ rpmbuild -bb --target=i686 myapp.spec
Afterwards you'll find a RPM package below RPMS depending on your processor architecture (noarch,
i686 or x86_64). If you're a proud owner of a IBM System Z machine you might want to have a look
below s390 or s390z.
$ ls RPMS/*/*.rpm
RPMS/i386/mycompany-ntp-1.0-1.el6.i386.rpm
This RPM package could now be installed using YUM:
# yum localinstall --nogpgcheck mycompany-ntp-1.0-1.el6.i386.rpm
Synchronization and automation
After creating the RPM packages on the particular test machines (e.g. RHEL6 and RHEL5) the packages
need to be copied to the web server. I suggest using SSH and Rsync for a synchronization between
the test machines, the main test machine and the web server.
If you don't want to do this manually every time you can automate this using a small script:
1.Synchronization between the EL5 machine and the main test machine:
$ ln -s /usr/src/redhat /home/su-rpmdev/rpmbuild
$ vi /home/su-rpmdev/export_repo.sh
#!/bin/sh
rsync -avz --delete /home/su-rpmdev/rpmbuild/RPMS/ /opt/myrepo
createrepo --database /opt/myrepo/
rsync -avz --delete -e ssh /opt/myrepo/ su-rpmdev@MAIN:/opt/myrepo/5Server

ESC ZZ
$ chmod +x /home/su-rpmdev/export_repo.sh
$ ./home/su-rpmdev/export_repo.sh
The first rsync command copied all RPM packages of all processor architectures below /opt/myrepo
– if a RPM package is deleted in the source, it is also deleted below /opt/myrepo. createrepo created
a SQLite database for the YUM repository (myrepo) below /opt/myrepo. The second rsync command copies
the local YUM repository to the main test machine (MAIN).
2.Synchronization between the main test machine (EL6) and the web server:
$ vi /home/su-rpmdev/export_repo.sh
#!/bin/sh
rsync -avz --delete /home/su-rpmdev/rpmbuild/RPMS/ /opt/myrepo/6Server
createrepo --database /opt/myrepo/6Server
rsync -avz --delete -e ssh /opt/myrepo/ su-rpmdev@WEB:/var/www/html/myrepo

ESC ZZ
$ chmod +x /home/su-rpmdev/export_repo.sh
$ ./home/su-rpmdev/export_repo.sh
The first rsync command copies all (EL6) RPM packages below /opt/myrepo/6Server. After that createrepo
creates a SQLite-Datenbank for the EL6 repository. The second rsync command copies the whole repository
(including the other EL5 repository) to the web server (WEB).
Usage and test
To use the new YUM repository on other hosts, an appropriate YUM configuration needs to be created.
In this file the repository URL and other parameters like package signing are defined. The syntax
looks a bit like good-old Windows .ini files:
# vi /etc/yum.repos.d/myrepo.repo
[myrepo]
name=mycompany packages for EL
baseurl=http://server01/$releasever
enabled=1
gppgcheck=0

ESC ZZ
You might see the variable $releasever – it was mentioned in the table above. This variable is
replaced by another value depending on your distribution release – in this case by 5Server or 6Server.
These directories had been filled with the appropriate RPM packages from the test machines.
After that, all available packages of the repository can be listed:
# yum --disablerepo='*' --enablerepo='myrepo' makecache
# yum --disablerepo='*' --enablerepo='myrepo' list available
...
mycompany-ntp                      1.0-1                      myrepo
If you have multiple repository web servers (e.g. because of big setups for processing the amount
of requests or compensate failures) you can assign a mirror list:
# vi /etc/yum.repos.d/myrepo.repo
[myrepo]
...
#baseurl=...
mirrorlist=myrepo.mirror

ESC ZZ
# vi /etc/yum.repos.d/myrepo.mirror
http://server01/$releasever
http://server02/$releasever
http://server03/$releasever
For every download YUM uses one of these servers – beginning with the first one. If this server
fails or doesn't have the file YUM will select the next server.
By the way – these configuration files could be shared using a RPM package, too. If this is done,
you only need to install a RPM package to access the YUM repository zugreifen. This is how access
to Fedora's Extra Packages For Enterprise Linux (EPEL) is provided: [click me!]
This package could look like this:
# vi SPECS/myrepo-release.spec
Name:           myrepo-release
Version:        1.0
Release:        1%{?dist}
Summary:        mycompany Packages for Enterprise Linux repository configuration

Group:          System Environment/Base
BuildArch:      noarch
License:        GPL
URL:            http://www.mycompany.com
Source0:        myrepo-release-%{version}.tar.gz
BuildRoot:      %{_tmppath}/%{name}-%{version}-%{release}-root-%(%{__id_u} -n)

%description
This package contains the mycompany customized Packages for Enterprise Linux repository.

%prep
%setup -q

%build

%install
install -m 0755 -d %{buildroot}%{_sysconfdir}/yum.repos.d/
install -m 0755 myrepo.repo %{buildroot}%{_sysconfdir}/yum.repos.d/myrepo.repo
install -m 0755 myrepo.mirror %{buildroot}%{_sysconfdir}/yum.repos.d/myrepo.mirror

%clean
rm -rf $RPM_BUILD_ROOT

%files
%config(noreplace) %{_sysconfdir}/yum.repos.d/myrepo.repo
%config(noreplace) %{_sysconfdir}/yum.repos.d/myrepo.mirror

%changelog
* Sat Jun 29 2013 FirstName LastName  - 1.0-1
- initial release

ESC ZZ
# tar tvfz SOURCES/myrepo-release-1.0.tar.gz
-rw-r--r-- su-rpmdev/su-rpmdev 94 2013-06-28 18:12 myrepo-release-1.0/myrepo.mirror
-rw-r--r-- su-rpmdev/su-rpmdev 189 2013-06-28 18:09 myrepo-release-1.0/myrepo.repo

# tar xvfz SOURCES/myrepo-release-1.0.tar.gz -C SOURCES/
# cat SOURCES/myrepo-release-1.0/myrepo.mirror
http://server01/$releasever
http://server02/$releasever
http://server03/$releasever
# cat SOURCES/myrepo-release-1.0/myrepo.repo
[myrepo]
name=mycompany packages for EL
#baseurl=http://server01/$releasever
mirrorlist=/etc/yum.repos.d/myrepo.mirror
enabled=1
gppgcheck=0
After the RPM specfile had been created the package can be created and distributed easily. Finally,
you only have to install the RPM package to use the YUM repository:
# rpmbuild -bb SPECS/myrepo-release.spec
# scp RPMS/noarch/myrepo-release-1.0-1.rpm root@host:/root
root@host # yum localinstall --nogpgcheck myrepo-release*.rpm
root@host # yum repolist
repoid            reponame
...
myrepo            mycompany packages for EL
Et voilà!

Perspective / Additional ideas
Of course there is a lot that can be optimized. To name some of these things:
- SSH public-key authentification – while synchronizing the RPM packages between the test machines
and the web server the password of the service user has to be entered twice. This can be avoided
by implementing SSH public-key authentification.
- Theme for viewing the repository in web browsers – when the repository is accessed using a
normal web browser the directory contents are displayed. Depending on your web server this might
look ugly – a header including your company's logo and usage information could be used in addition.
- Version control using SVN / GIT – especially if you're working in a team on your repository
it might be very handy to use a version control system like SVN or GIT.
Integration in Red Hat Network Satellite, Spacewalk or SuSE Manager – if you're maintaining a
big amount of hosts you (hopefully) have the management suite of your preferred distributor. You
can include your repository to simply share your packages.
- Package signing – To avoid manipulated packages, packages can be signed using a key which
has to be copied to every client. Using this mechanism, clients can verify that the downloaded
packages are authentic.
To manage a plenty of systems you don't need a "egg-laying, milk-bearing woolly sow" – RPM is
a mighty tool which can also be used for software and configuration management. If you're engaged
with Red Hat Enterprise Linux, you will often into a situation where you have to automate something
quickly. And that's where RPM can also help you to reach your goal quickly.
This work is licensed under a
Creative Commons Attribution-NonCommercial-NoDerivs
3.0 Unported License
Softpanorama Recommended
- Maximum RPM: the book I read
to learn how to write RPM .spec files and build RPMs.
- The RPM home page.
-
General Use
Packager Documentation
RPM API
RPM Language Bindings
Miscellaneous Developer Docs:
Books
The following books have been published regarding RPM:
- Maximum RPM A book written by Ed Bailey. It is available
in hardback (442 pages), and has recently been re-printed by Sams in
soft-cover (450 pages - ISBN: 0672311054). The hardcover edition includes a
quick reference card. An on-line version of the original book is also
available, and a more up to date, work in progress version can be found
here.
- Red Hat RPM Guide A more recent book by Eric
Foster-Johnson, this has recently been released under the Open Publication
License and a draft close to the published version is available on-line as
Fedora RPM Guide. This book covers everything from basic usage to advanced
tricks, package creation and API programming. Participation in updating the
Guide can be done via the
Fedora Documentation Project. Discussions about moving this content and
work upstream to rpm.org can occur on
fedora-docs-list.
Other Resources
- http://fedoraproject.org/wiki/How_to_create_an_RPM_package
-
http://docs.fedoraproject.org/en-US/Fedora_Draft_Documentation/0.1/html/RPM_Guide/ch-creating-rpms.html
- Dan Poirier,
Packaging Software with RPM, Part 1.
- Dan Poirier,
Packaging Software with RPM, Part 2.
- Dan Poirier,
Packaging Software with RPM, Part 3.
- Donnie Barnes,
RPM HOWTO: RPM at Idle.
- Edward Bailey,
Maximum RPM.
- Matthias Saou,
freshrpms.net:
The fight, rpm package building introduction.
- Matthias Saou,
freshrpms.net: Example
spec files.
- Matthias Saou,
freshrpms.net: Using apt
with rpm and Red Hat Linux.
Society
Groupthink :
Two Party System
as Polyarchy :
Corruption of Regulators :
Bureaucracies :
Understanding Micromanagers
and Control Freaks : Toxic Managers :
Harvard Mafia :
Diplomatic Communication
: Surviving a Bad Performance
Review : Insufficient Retirement Funds as
Immanent Problem of Neoliberal Regime : PseudoScience :
Who Rules America :
Neoliberalism
: The Iron
Law of Oligarchy :
Libertarian Philosophy
Quotes
War and Peace
: Skeptical
Finance : John
Kenneth Galbraith :Talleyrand :
Oscar Wilde :
Otto Von Bismarck :
Keynes :
George Carlin :
Skeptics :
Propaganda : SE
quotes : Language Design and Programming Quotes :
Random IT-related quotes :
Somerset Maugham :
Marcus Aurelius :
Kurt Vonnegut :
Eric Hoffer :
Winston Churchill :
Napoleon Bonaparte :
Ambrose Bierce :
Bernard Shaw :
Mark Twain Quotes
Bulletin:
Vol 25, No.12 (December, 2013) Rational Fools vs. Efficient Crooks The efficient
markets hypothesis :
Political Skeptic Bulletin, 2013 :
Unemployment Bulletin, 2010 :
Vol 23, No.10
(October, 2011) An observation about corporate security departments :
Slightly Skeptical Euromaydan Chronicles, June 2014 :
Greenspan legacy bulletin, 2008 :
Vol 25, No.10 (October, 2013) Cryptolocker Trojan
(Win32/Crilock.A) :
Vol 25, No.08 (August, 2013) Cloud providers
as intelligence collection hubs :
Financial Humor Bulletin, 2010 :
Inequality Bulletin, 2009 :
Financial Humor Bulletin, 2008 :
Copyleft Problems
Bulletin, 2004 :
Financial Humor Bulletin, 2011 :
Energy Bulletin, 2010 :
Malware Protection Bulletin, 2010 : Vol 26,
No.1 (January, 2013) Object-Oriented Cult :
Political Skeptic Bulletin, 2011 :
Vol 23, No.11 (November, 2011) Softpanorama classification
of sysadmin horror stories : Vol 25, No.05
(May, 2013) Corporate bullshit as a communication method :
Vol 25, No.06 (June, 2013) A Note on the Relationship of Brooks Law and Conway Law
History:
Fifty glorious years (1950-2000):
the triumph of the US computer engineering :
Donald Knuth : TAoCP
and its Influence of Computer Science : Richard Stallman
: Linus Torvalds :
Larry Wall :
John K. Ousterhout :
CTSS : Multix OS Unix
History : Unix shell history :
VI editor :
History of pipes concept :
Solaris : MS DOS
: Programming Languages History :
PL/1 : Simula 67 :
C :
History of GCC development :
Scripting Languages :
Perl history :
OS History : Mail :
DNS : SSH
: CPU Instruction Sets :
SPARC systems 1987-2006 :
Norton Commander :
Norton Utilities :
Norton Ghost :
Frontpage history :
Malware Defense History :
GNU Screen :
OSS early history
Classic books:
The Peter
Principle : Parkinson
Law : 1984 :
The Mythical Man-Month :
How to Solve It by George Polya :
The Art of Computer Programming :
The Elements of Programming Style :
The Unix Hater’s Handbook :
The Jargon file :
The True Believer :
Programming Pearls :
The Good Soldier Svejk :
The Power Elite
Most popular humor pages:
Manifest of the Softpanorama IT Slacker Society :
Ten Commandments
of the IT Slackers Society : Computer Humor Collection
: BSD Logo Story :
The Cuckoo's Egg :
IT Slang : C++ Humor
: ARE YOU A BBS ADDICT? :
The Perl Purity Test :
Object oriented programmers of all nations
: Financial Humor :
Financial Humor Bulletin,
2008 : Financial
Humor Bulletin, 2010 : The Most Comprehensive Collection of Editor-related
Humor : Programming Language Humor :
Goldman Sachs related humor :
Greenspan humor : C Humor :
Scripting Humor :
Real Programmers Humor :
Web Humor : GPL-related Humor
: OFM Humor :
Politically Incorrect Humor :
IDS Humor :
"Linux Sucks" Humor : Russian
Musical Humor : Best Russian Programmer
Humor : Microsoft plans to buy Catholic Church
: Richard Stallman Related Humor :
Admin Humor : Perl-related
Humor : Linus Torvalds Related
humor : PseudoScience Related Humor :
Networking Humor :
Shell Humor :
Financial Humor Bulletin,
2011 : Financial
Humor Bulletin, 2012 :
Financial Humor Bulletin,
2013 : Java Humor : Software
Engineering Humor : Sun Solaris Related Humor :
Education Humor : IBM
Humor : Assembler-related Humor :
VIM Humor : Computer
Viruses Humor : Bright tomorrow is rescheduled
to a day after tomorrow : Classic Computer
Humor
The Last but not Least Technology is dominated by
two types of people: those who understand what they do not manage and those who manage what they do not understand ~Archibald Putt.
Ph.D
Copyright © 1996-2021 by Softpanorama Society. www.softpanorama.org
was initially created as a service to the (now defunct) UN Sustainable Development Networking Programme (SDNP)
without any remuneration. This document is an industrial compilation designed and created exclusively
for educational use and is distributed under the Softpanorama Content License.
Original materials copyright belong
to respective owners. Quotes are made for educational purposes only
in compliance with the fair use doctrine.
FAIR USE NOTICE This site contains
copyrighted material the use of which has not always been specifically
authorized by the copyright owner. We are making such material available
to advance understanding of computer science, IT technology, economic, scientific, and social
issues. We believe this constitutes a 'fair use' of any such
copyrighted material as provided by section 107 of the US Copyright Law according to which
such material can be distributed without profit exclusively for research and educational purposes.
This is a Spartan WHYFF (We Help You For Free)
site written by people for whom English is not a native language. Grammar and spelling errors should
be expected. The site contain some broken links as it develops like a living tree...
Disclaimer:
The statements, views and opinions presented on this web page are those of the author (or
referenced source) and are
not endorsed by, nor do they necessarily reflect, the opinions of the Softpanorama society. We do not warrant the correctness
of the information provided or its fitness for any purpose. The site uses AdSense so you need to be aware of Google privacy policy. You you do not want to be
tracked by Google please disable Javascript for this site. This site is perfectly usable without
Javascript.
Last modified: June, 10, 2020