|
|
Home | Switchboard | Unix Administration | Red Hat | TCP/IP Networks | Neoliberalism | Toxic Managers |
| (slightly skeptical) Educational society promoting "Back to basics" movement against IT overcomplexity and bastardization of classic Unix | |||||||
|
|
This is a difficult task to say the least. Some ideas:
Partitioning/File System Security via mounting options such as nosuid, noexec, etc.
Minimization of the installed software packages
Not much can be done here. Suse is a pretty convoluted beast and unless you want to sacrifices X11 you get more then you can chew.
Create baseline of /etc, /root directories burn it on CD and document the current configuration. Update the document on monthly basis.
Install host integrity checking package such as aide.
Install log analyzer such as Logdigest
Account security settings with YaST
Frequent patching
Configure logging to remote SYSLOG
|
|
Seccheck is simple set of four outdated bash scripts that need to be manually adapted for particular company to provide daily, weekly and monthly status reports. It's badly written and not modular but it is better then nothing. See also
For more ideas see Security Tools in Linux Distributions, Part II
Again, the first step to secure a system is to remove all the unwanted services. SuSE uses Inetd to listen for a connection and the YaST2 (yet another setup tool) configuration tool to graphically edit network services. YaST2 showed that time, Telnet, rlogin and finger services were activated by default and that Telnet, rlogin and finger were routed through tcpd for access control. We disabled all three as services we did not want, then checked to make sure OpenSSH was started as a dæmon in /etc/rc.d/sshd as a secure replacement for these services.
The next step in the security check is ensuring that the critical system files do not have weak file permissions. SuSE has a security script, Harden_suse, which secures the operating system and makes it resistant to attacks. A strange thing happens when using Harden_suse, however: the script issues a warning that the script is only verified to work on SuSE 5.3 up to 7.2. SuSE changed the filesystem in 8.0 to be Linux Standards Base compliant, which may have broken the script. This warning, followed by a second warning that said "the script will secure your system which means it will disable almost all services on the system and tamper with some configuration file", made me very wary. Rather than take a risk of an unsupported script that will disable my system, I left it alone.
Fortunately, SuSE's YaST2 control center also has a security setting control tool, part of the Security and Users menu. It allows root to define a set of local security configurations, including password settings, user creation settings, console behavior and file permissions. The security settings have the default filesystem permissions set to "easy". This means most system files are readable by root, but not by other users. The more stringent "secure" setting restricts the files that can be viewed by root. And the "paranoid" setting requires that users who run applications be predefined. A list of the system files, their ownership and file permissions is located in /etc/permission.easy, /etc/permission.secure and /etc/permissions.paranoid. Users can even customize their own file permission setting by adding themselves to /etc/permissions.local. The YaST2 security setting control tool performs many of the same functions as Harden_suse and uses an interactive graphical menu. Most users should be comfortable with the easy or secure settings. Select "paranoid" only if you are sure you need it.
SuSE includes Aide, Logdigest, Nmap, Seccheck and Tripwire as optional HIDS programs. Nmap works in the same way as it does in Red Hat.
Seccheck, security checker, is a host security analyzer with three different levels of scans. When Seccheck is installed, it automatically adds a crontab, /etc/cron.d/seccheck, to run daily, weekly and monthly security checks.
The Seccheck daily, run at midnight, checks for user security vulnerabilities, system abnormalities, modules changes and port changes. It also checks for changes in user and group information and for common weaknesses that may indicate an intrusion. The changes from the last daily Seccheck run are then mailed to root. See Table 2 for a list of checks in the daily scan.
Table 2: SuSE Daily Security Check| /etc/passwd check | Length/number/contents of fields, accounts with same uid accounts with uid/gid of 0 or 1 beside root and bin |
| /etc/shadow check | Length/number/contents of fields, accounts with no password |
| /etc/group check | Length/number/contents of fields |
| User root checks | Secure umask and PATH |
| /etc/ftpusers | Checks if important system users are put there |
| /etc/aliases | Checks for mail aliases which execute programs |
| .rhosts check | Checks if users' .rhosts file contain + signs |
| Home directory | Checks if home directories are writable or owned by someone else |
| dot-files check | Checks many dot-files in the home directories if they are writable or owned by someone else |
| Mailbox check | Checks if user mailboxes are owned by user and unreadable |
| NFS export check | Exports should not be exported globally |
| NFS import check | NFS mounts should have the "nosuid" option set |
| Promisc check | Checks if network cards are in promiscuous mode |
| list modules | Lists loaded modules |
| list sockets | Lists open ports |
The weekly security check is a more exhaustive user and file system check, checks that are important but too intensive to run daily. The weekly scripts are run every Monday at 1:00am. They include checks for weak passwords, changes in the system files, files and executables that are group or world writable and all system devices. Again, only the differences from the previous weekly security scan are mailed to root. See Table 3 for a list of checks in the weekly scan.
| Password check | Runs john to crack the password file, user will get an email notice to change his password |
| rpm md5 check | Checks for changed files via rpm's md5 checksum feature |
| suid/sgid check | Lists all suid and sgid files |
| exec group write | Lists all executables which are group/world writable |
| Writable check | Lists all files which are world writable (incl. Above) |
| Device check | Lists all devices |
The monthly security check is run on the first day of every month at 4:00am, and it sends a complete set of information in both daily and weekly checks to root. One pitfall of using Seccheck is that one has to pay attention to when changes are reported. Since only changes to the system from the last Seccheck analysis are e-mailed, anomalies appear only once. If you miss a change, you may not catch suspicious activity for a week or even a month.
Seccheck is a good set of security auditing tools that monitor many of the user-related vulnerabilities. It is surprising that is it not enabled by default.
Even though Seccheck has a filesystem integrity check, it is always better to install a separate system integrity checker with control of the file signature database.
Logdigest is a log analysis and reporting tool that can be optionally installed in SuSE. Based on Logcheck by Psionic Technologies, Logdigest scans log files, sorts the information and e-mails an analysis to the system administrator. Logdigest uses a keyword system to prioritize the log entries, presenting system attacks and unusual events first. It extends Logcheck's report by adding information about the system's mail queue, usage status, network device status and disk usage information to the report.
Logdigest is installed in /etc/cron.daily as aaa_base_logdigest. The Logdigest configuration file and keyword files are installed in /etc/logdigest. The configuration file and keyword files allow system administers to define which log entries to prioritize, which log entries to ignore, which logs to parse, who to send the report to and if extended system status information should be added. The Logdigest report is most useful if as much system information is analyzed as possible. By default, Logdigest only scans /var/log/messages, the system information log file, and /var/log/mail, the mail information log file. To increase Logdigest's efficiency, either add all the system logs to the list of logs scanned by Logdigest or reconfigure the syslog dæmon to log all information to /var/log/messages. Reconfiguring syslog, by editing /etc/syslog.conf, to log all message to /var/log/messages insures that no log files will be left out and no information will be missed. Logdigest should be run daily but before the log files are rotated.
The program /usr/bin/chkstat is a tool to check and set file permissions. Multiple permissions files can be given on the commandline. If the permission files contain multiple entries for a single file, the last entry found will be used.
chkstat [--set|-set] [--noheader] [[--examine file ]...] [[--files filelist ]...] [[--root directory ]...] permission-file ...
Options
The command
chkstat -set /etc/permissions.local
will parse the file /etc/permissions.local and set the access mode and the user- and group memberships each file listed. The format for the input file is
FILEPATH OWNER:GROUP MODE
and wildcards are not supported for the filepath. Lines starting with ’#’ and empty lines are treated as comments.
SUSE Linux includes a utility called chkstat (not the most imaginative name) that checks, and optionally corrects, the ownerships and permissions of key files in the filesystem. As such, it can be used as a low-grade system hardening tool or perhaps for intrusion detection, if an intruder has left permissions deliberately lax. chkstat reads one or more permissions files to find out what files to check, and what the ownership and permissions are supposed to be. The system ships with several permissions files, described in| File in /etc | Description |
|---|---|
| permissions | A really basic set of permissions. File modes that differ from the settings in this file should be considered broken, not merely insecure. |
| permissions.easy | A fairly lax set of permissions for use on standalone single-user systems. |
| permissions.secure | A more secure set of permissions for use on multiuser or networked systems. To quote from the comments in the file itself: "The primary target of this configuration is to make the basic things such as changing passwords, the basic networking programs as well as some of the all-day work programs properly function for the unprivileged user." |
| permissions.paranoid | A very secure set of permissions. This file is similar to permissions.secure but has all the set-user-id and set-group-id bits cleared. These settings will prove inconvenient for ordinary users and are probably best reserved for servers or firewalls which do not support ordinary user log-ins. |
| permissions.local | This file provides a place for administrators to add entries for locally installed programs; for example those in /opt or /usr/local. |
Entries in these files have the syntax:
filename owner:group mode
For example, here are a few lines from /etc/permissions.secure:
/usr/bin/passwd                       root:shadow       4755
/usr/bin/crontab                      root:trusted      4750
/etc/fstab                            root:root          644
/var/spool/fax/archive                fax:uucp           700
The file permissions (mode) are written in octal. The 4000 bit is the set-user-id bit; the bottom three digits correspond to the usual rwxrwxrwx permissions on the file.
Comparing permissions.secure with permissions.paranoid, you can see that (for example) in the paranoid settings the passwd command does not run set-uid to root:
/usr/bin/passwd root:shadow 0755
This means that nonroot users would not be able to change their passwords.
To run chkstat against the permissions.secure file (for example), just supply the file name as an argument. On my test system, the command:
# chkstat /etc/permissions.secure
produces no outputthe system passes with flying colors (whatever that means). Running chkstat against permissions.paranoid, however, produces a long list of warnings, mostly about config files that are readable by nonroot users, or about programs that have the set-user-id bit on.
Running chkstat with the --set option tells it to fix the problem automatically. Let's try making one of the permissions deliberately too lax, and re-run the program. The line numbers in this listing are for reference; they are not part of the input or output.
1 # chmod 666 /etc/fstab
2 # chkstat /etc/permissions.secure
3 Checking permissions and ownerships - using the permissions files
4         /etc/permissions.secure
5 /etc/fstab should be root:root 0644. (wrong permissions 0666)
6 # chkstat --set /etc/permissions.secure
7 Checking permissions and ownerships - using the permissions files
8         /etc/permissions.secure
9 setting /etc/fstab to root:root 0644. (wrong permissions 0666)
10 # ls -l /etc/fstab
11 -rw-rr--  1 root root 670 Oct 11 09:35 /etc/fstab
At line 1, I deliberately changed the permissions on /etc/fstab. At lines 25, I ran chkstat and it duly reported the problem. At lines 69, I ran chkstat again with the --set flag and at lines 10 and 11 verified that chkstat had indeed corrected the permissions problem.
It's time to tie all this up with the File Permissions setting in the YaST security module you've seen in this lab. The setting made within YaST sets a line in the file /etc/sysconfig/security; for example if I set the file permissions to "Easy," I will see a line in /etc/sysconfig/security like this:
PERMISSION_SECURITY="easy local"
This line says to run chkstat with the files permissions.easy and permissions.local as parameters.
The chkstat program is run by SuSEconfig, the script that YaST runs whenever it commits a configuration change. This means that the file permissions are checked pretty well every time you change something in YaST.
|
|
Switchboard | ||||
| Latest | |||||
| Past week | |||||
| Past month | |||||
Jun 01, 2017 | www.cyberciti.biz
There is a serious vulnerability in sudo command that grants root access to anyone with a shell account. It works on SELinux enabled systems such as CentOS/RHEL and others too. A local user with privileges to execute commands via sudo could use this flaw to escalate their privileges to root. Patch your system as soon as possible.
It was discovered that Sudo did not properly parse the contents of /proc/[pid]/stat when attempting to determine its controlling tty. A local attacker in some configurations could possibly use this to overwrite any file on the filesystem, bypassing intended permissions or gain root shell.
... ... ...
A list of affected Linux distro
- Red Hat Enterprise Linux 6 (sudo)
- Red Hat Enterprise Linux 7 (sudo)
- Red Hat Enterprise Linux Server (v. 5 ELS) (sudo)
- Oracle Enterprise Linux 6
- Oracle Enterprise Linux 7
- Oracle Enterprise Linux Server 5
- CentOS Linux 6 (sudo)
- CentOS Linux 7 (sudo)
- Debian wheezy
- Debian jessie
- Debian stretch
- Debian sid
- Ubuntu 17.04
- Ubuntu 16.10
- Ubuntu 16.04 LTS
- Ubuntu 14.04 LTS
- SUSE Linux Enterprise Software Development Kit 12-SP2
- SUSE Linux Enterprise Server for Raspberry Pi 12-SP2
- SUSE Linux Enterprise Server 12-SP2
- SUSE Linux Enterprise Desktop 12-SP2
- OpenSuse, Slackware, and Gentoo Linux
First of all this is kind of system error that is not easy to exploit. You need to locate the vulnerable functions in core image and be able to overwrite them via call (length of which any reasonable programmer will check). So whether this vulnerability is exploitable or not for applications that we are running is an open question.
In any case most installed systems are theoretically vilnerable. Practically too if they are running applications that do not check length for such system calls.
Only recently patched systems with glibc-2.11.3-17.74.13.x86_64 and above are not vulnerable.
September 25, 2014 | troyhunt.com
Remember Heartbleed? If you believe the hype today, Shellshock is in that league and with an equally awesome name albeit bereft of a cool logo (someone in the marketing department of these vulns needs to get on that). But in all seriousness, it does have the potential to be a biggie and as I did with Heartbleed, I wanted to put together something definitive both for me to get to grips with the situation and for others to dissect the hype from the true underlying risk.To set the scene, let me share some content from Robert Graham's blog post who has been doing some excellent analysis on this. Imagine an HTTP request like this:
target = 0.0.0.0/0
port = 80
banners = true
http-user-agent = shellshock-scan (http://blog.erratasec.com/2014/09/bash-shellshock-scan-of-internet.html)
http-header = Cookie:() { :; }; ping -c 3 209.126.230.74
http-header = Host:() { :; }; ping -c 3 209.126.230.74
http-header = Referer:() { :; }; ping -c 3 209.126.230.74
Which, when issued against a range of vulnerable IP addresses, results in this:
en.wikipedia.org
Analysis of the source code history of Bash shows that the vulnerabilities had existed undiscovered since approximately version 1.13 in 1992.[4] The maintainers of the Bash source code have difficulty pinpointing the time of introduction due to the lack of comprehensive changelogs.[1]
In Unix-based operating systems, and in other operating systems that Bash supports, each running program has its own list of name/value pairs called environment variables. When one program starts another program, it provides an initial list of environment variables for the new program.[14] Separately from these, Bash also maintains an internal list of functions, which are named scripts that can be executed from within the program.[15] Since Bash operates both as a command interpreter and as a command, it is possible to execute Bash from within itself. When this happens, the original instance can export environment variables and function definitions into the new instance.[16] Function definitions are exported by encoding them within the environment variable list as variables whose values begin with parentheses ("()") followed by a function definition. The new instance of Bash, upon starting, scans its environment variable list for values in this format and converts them back into internal functions. It performs this conversion by creating a fragment of code from the value and executing it, thereby creating the function "on-the-fly", but affected versions do not verify that the fragment is a valid function definition.[17] Therefore, given the opportunity to execute Bash with a chosen value in its environment variable list, an attacker can execute arbitrary commands or exploit other bugs that may exist in Bash's command interpreter.
The name "shellshock" is attributed[by whom?][not in citation given] to Andreas Lindh from a tweet on 24 September 2014.[18][non-primary source needed]
On October 1st, Zalewski released details of the final bugs, and confirmed that Florian's patch does indeed prevent them. Zalewski says fixed
CGI-based web server attack
When a web server uses the Common Gateway Interface (CGI) to handle a document request, it passes various details of the request to a handler program in the environment variable list. For example, the variable HTTP_USER_AGENT has a value that, in normal usage, identifies the program sending the request. If the request handler is a Bash script, or if it executes one for example using the system(3) call, Bash will receive the environment variables passed by the server and will process them as described above. This provides a means for an attacker to trigger the Shellshock vulnerability with a specially crafted server request.[4] The security documentation for the widely used Apache web server states: "CGI scripts can ... be extremely dangerous if they are not carefully checked."[20] and other methods of handling web server requests are often used. There are a number of online services which attempt to test the vulnerability against web servers exposed to the Internet.[citation needed]
SSH server example
OpenSSH has a "ForceCommand" feature, where a fixed command is executed when the user logs in, instead of just running an unrestricted command shell. The fixed command is executed even if the user specified that another command should be run; in that case the original command is put into the environment variable "SSH_ORIGINAL_COMMAND". When the forced command is run in a Bash shell (if the user's shell is set to Bash), the Bash shell will parse the SSH_ORIGINAL_COMMAND environment variable on start-up, and run the commands embedded in it. The user has used their restricted shell access to gain unrestricted shell access, using the Shellshock bug.[21]
DHCP example
Some DHCP clients can also pass commands to Bash; a vulnerable system could be attacked when connecting to an open Wi-Fi network. A DHCP client typically requests and gets an IP address from a DHCP server, but it can also be provided a series of additional options. A malicious DHCP server could provide, in one of these options, a string crafted to execute code on a vulnerable workstation or laptop.[9]
Note of offline system vulnerability
The bug can potentially affect machines that are not directly connected to the Internet when performing offline processing, which involves the use of Bash.[citation needed]
Initial report (CVE-2014-6271)
This original form of the vulnerability involves a specially crafted environment variable containing an exported function definition, followed by arbitrary commands. Bash incorrectly executes the trailing commands when it imports the function.[22] The vulnerability can be tested with the following command:
env x='() { :;}; echo vulnerable' bash -c "echo this is a test"In systems affected by the vulnerability, the above commands will display the word "vulnerable" as a result of Bash executing the command "echo vulnerable", which was embedded into the specially crafted environment variable named "x".[23][24]
There was an initial report of the bug made to the maintainers of Bash (Report# CVE-2014-6271). The bug was corrected with a patch to the program. However, after the release of the patch there were subsequent reports of different, yet related vulnerabilities. On 26 September 2014, two open-source contributors, David A. Wheeler and Norihiro Tanaka, noted that there were additional issues, even after patching systems using the most recently available patches. In an email addressed to the oss-sec list and the bash bug list, Wheeler wrote: "This patch just continues the 'whack-a-mole' job of fixing parsing errors that began with the first patch. Bash's parser is certain [to] have many many many other vulnerabilities".[25]
On 27 September 2014, Michal Zalewski announced his discovery of several other Bash vulnerabilities,[26] one based upon the fact that Bash is typically compiled without address space layout randomization.[27] Zalewski also strongly encouraged all concerned to immediately apply a patch made available by Florian Weimer.[26][27]CVE-2014-6277
CVE-2014-6277 relates to the parsing of function definitions in environment variables by Bash. It was discovered by Michał Zalewski.[26][27][28][29]
This causes a segfault.
() { x() { _; }; x() { _; } <<a; }CVE-2014-6278
CVE-2014-6278 relates to the parsing of function definitions in environment variables by Bash. It was discovered by Michał Zalewski.[30][29]
() { _; } >_[$($())] { echo hi mom; id; }CVE-2014-7169
On the same day the bug was published, Tavis Ormandy discovered a related bug which was assigned the CVE identifier CVE-2014-7169.[21] Official and distributed patches for this began releasing on 26 September 2014.[citation needed] Demonstrated in the following code:
env X='() { (a)=>\' sh -c "echo date"; cat echowhich would trigger a bug in Bash to execute the command "date" unintentionally. This would become CVE-2014-7169.[21]
- Testing example
Here is an example of a system that has a patch for CVE-2014-6271 but not CVE-2014-7169:
$ X='() { (a)=>\' bash -c "echo date"
bash: X: line 1: syntax error near unexpected token `='
bash: X: line 1: `'
bash: error importing function definition for `X'
$ cat echo
Fri Sep 26 01:37:16 UTC 2014
The patched system displays the same error, notifying the user that CVE-2014-6271 has been prevented. However, the attack causes the writing of a file named 'echo', into the working directory, containing the result of the 'date' call. The existence of this issue resulted in the creation of CVE-2014-7169 and the release patches for several systems.
A system patched for both CVE-2014-6271 and CVE-2014-7169 will simply echo the word "date" and the file "echo" will not be created.
$ X='() { (a)=>\' bash -c "echo date"
date
$ cat echo
cat: echo: No such file or directory
CVE-2014-7186
CVE-2014-7186 relates to an out-of-bounds memory access error in the Bash parser code.[31] While working on patching Shellshock, Red Hat researcher Florian Weimer found this bug.[23]
- Testing example
Here is an example of the vulnerability, which leverages the use of multiple "<<EOF" declarations:
bash -c 'true <<EOF <<EOF <<EOF <<EOF <<EOF <<EOF <<EOF <<EOF <<EOF <<EOF <<EOF <<EOF <<EOF <<EOF' ||
echo "CVE-2014-7186 vulnerable, redir_stack"
- A vulnerable system will echo the text "CVE-2014-7186 vulnerable, redir_stack".
CVE-2014-7187
CVE-2014-7187 relates to an off-by-one error, allowing out-of-bounds memory access, in the Bash parser code.[32] While working on patching Shellshock, Red Hat researcher Florian Weimer found this bug.[23]
- Testing example
Here is an example of the vulnerability, which leverages the use of multiple "done" declarations:
(for x in {1..200} ; do echo "for x$x in ; do :"; done; for x in {1..200} ; do echo done ; done) | bash ||
echo "CVE-2014-7187 vulnerable, word_lineno"
- A vulnerable system will echo the text "CVE-2014-7187 vulnerable, word_lineno".
Sep 26, 2014 | securityblog.redhat.com
Why are there four CVE assignments?
The original flaw in Bash was assigned CVE-2014-6271. Shortly after that issue went public a researcher found a similar flaw that wasn't blocked by the first fix and this was assigned CVE-2014-7169. Later, Red Hat Product Security researcher Florian Weimer found additional problems and they were assigned CVE-2014-7186 and CVE-2014-7187. It's possible that other issues will be found in the future and assigned a CVE designator even if they are blocked by the existing patches.
... ... ...
Why is Red Hat using a different patch then others?
Our patch addresses the CVE-2014-7169 issue in a much better way than the upstream patch, we wanted to make sure the issue was properly dealt with.
I have deployed web application filters to block CVE-2014-6271. Are these filters also effective against the subsequent flaws?If configured properly and applied to all relevant places, the "() {" signature will work against these additional flaws.
Does SELinux help protect against this flaw?
SELinux can help reduce the impact of some of the exploits for this issue. SELinux guru Dan Walsh has written about this in depth in his blog.
Are you aware of any new ways to exploit this issue?
Within a few hours of the first issue being public (CVE-2014-6271), various exploits were seen live, they attacked the services we identified at risk in our first post:
- from dhclient,
- CGI serving web servers,
- sshd+ForceCommand configuration,
- git repositories.
We did not see any exploits which were targeted at servers which had the first issue fixed, but were affected by the second issue. We are currently not aware of any exploits which target bash packages which have both CVE patches applied.
Why wasn't this flaw noticed sooner?
The flaws in Bash were in a quite obscure feature that was rarely used; it is not surprising that this code had not been given much attention. When the first flaw was discovered it was reported responsibly to vendors who worked over a period of under 2 weeks to address the issue.
This entry was posted in Vulnerabilities and tagged bash, CVE-2014-6271, CVE-2014-6277, CVE-2014-6278, CVE-2014-7169, CVE-2014-7186, CVE-2014-7187, shellshocked by Huzaifa Sidhpurwala. Bookmark the permalink.
>Update 2014-09-25 16:00 UTC
Red Hat is aware that the patch for CVE-2014-6271 is incomplete. An attacker can provide specially-crafted environment variables containing arbitrary commands that will be executed on vulnerable systems under certain conditions. The new issue has been assigned CVE-2014-7169.We are working on patches in conjunction with the upstream developers as a critical priority. For details on a workaround, please see the knowledgebase article.
Red Hat advises customers to upgrade to the version of Bash which contains the fix for CVE-2014-6271 and not wait for the patch which fixes CVE-2014-7169. CVE-2014-7169 is a less severe issue and patches for it are being worked on.
Bash or the Bourne again shell, is a UNIX like shell, which is perhaps one of the most installed utilities on any Linux system. From its creation in 1980, Bash has evolved from a simple terminal based command interpreter to many other fancy uses.
In Linux, environment variables provide a way to influence the behavior of software on the system. They typically consists of a name which has a value assigned to it. The same is true of the Bash shell. It is common for a lot of programs to run Bash shell in the background. It is often used to provide a shell to a remote user (via ssh, telnet, for example), provide a parser for CGI scripts (Apache, etc) or even provide limited command execution support (git, etc)
Coming back to the topic, the vulnerability arises from the fact that you can create environment variables with specially-crafted values before calling the Bash shell. These variables can contain code, which gets executed as soon as the shell is invoked. The name of these crafted variables does not matter, only their contents. As a result, this vulnerability is exposed in many contexts, for example:
- ForceCommand is used in sshd configs to provide limited command execution capabilities for remote users. This flaw can be used to bypass that and provide arbitrary command execution. Some Git and Subversion deployments use such restricted shells. Regular use of OpenSSH is not affected because users already have shell access.
- Apache server using mod_cgi or mod_cgid are affected if CGI scripts are either written in Bash, or spawn subshells. Such subshells are implicitly used by system/popen in C, by os.system/os.popen in Python, system/exec in PHP (when run in CGI mode), and open/system in Perl if a shell is used (which depends on the command string).
- PHP scripts executed with mod_php are not affected even if they spawn subshells.
- DHCP clients invoke shell scripts to configure the system, with values taken from a potentially malicious server. This would allow arbitrary commands to be run, typically as root, on the DHCP client machine.
- Various daemons and SUID/privileged programs may execute shell scripts with environment variable values set / influenced by the user, which would allow for arbitrary commands to be run.
- Any other application which is hooked onto a shell or runs a shell script as using Bash as the interpreter. Shell scripts which do not export variables are not vulnerable to this issue, even if they process untrusted content and store it in (unexported) shell variables and open subshells.
Like "real" programming languages, Bash has functions, though in a somewhat limited implementation, and it is possible to put these Bash functions into environment variables. This flaw is triggered when extra code is added to the end of these function definitions (inside the enivronment variable). Something like:
$ env x='() { :;}; echo vulnerable' bash -c "echo this is a test"
 vulnerable
 this is a test
The patch used to fix this flaw, ensures that no code is allowed after the end of a Bash function. So if you run the above example with the patched version of Bash, you should get an output similar to:
 $ env x='() { :;}; echo vulnerable' bash -c "echo this is a test"
 bash: warning: x: ignoring function definition attempt
 bash: error importing function definition for `x'
 this is a test
We believe this should not affect any backward compatibility. This would, of course, affect any scripts which try to use environment variables created in the way as described above, but doing so should be considered a bad programming practice.
Red Hat has issued security advisories that fixes this issue for Red Hat Enterprise Linux. Fedora has also shipped packages that fixes this issue.
We have additional information regarding specific Red Hat products affected by this issue that can be found at https://access.redhat.com/site/solutions/1207723
Information on CentOS can be found at http://lists.centos.org/pipermail/centos/2014-September/146099.html.
zdnet.com
The only thing you have to fear with Shellshock, the Unix/Linux Bash security hole, is fear itself. Yes, Shellshock can serve as a highway for worms and malware to hit your Unix, Linux, and Mac servers, but you can defend against it.
The real and present danger is for servers. According to the National Institute of Standards (NIST), Shellshock scores a perfect 10 for potential impact and exploitability. Red Hat reports that the most common attack vectors are:
- httpd (Your Web server): CGI [Common-Gateway Interface] scripts are likely affected by this issue: when a CGI script is run by the web server, it uses environment variables to pass data to the script. These environment variables can be controlled by the attacker. If the CGI script calls Bash, the script could execute arbitrary code as the httpd user. mod_php, mod_perl, and mod_python do not use environment variables and we believe they are not affected.
- Secure Shell (SSH): It is not uncommon to restrict remote commands that a user can run via SSH, such as rsync or git. In these instances, this issue can be used to execute any command, not just the restricted command.
- dhclient: The Dynamic Host Configuration Protocol Client (dhclient) is used to automatically obtain network configuration information via DHCP. This client uses various environment variables and runs Bash to configure the network interface. Connecting to a malicious DHCP server could allow an attacker to run arbitrary code on the client machine.
- CUPS (Linux, Unix and Mac OS X's print server): It is believed that CUPS is affected by this issue. Various user-supplied values are stored in environment variables when cups filters are executed.
- sudo: Commands run via sudo are not affected by this issue. Sudo specifically looks for environment variables that are also functions. It could still be possible for the running command to set an environment variable that could cause a Bash child process to execute arbitrary code.
- Firefox: We do not believe Firefox can be forced to set an environment variable in a manner that would allow Bash to run arbitrary commands. It is still advisable to upgrade Bash as it is common to install various plug-ins and extensions that could allow this behavior.
- Postfix: The Postfix [mail] server will replace various characters with a ?. While the Postfix server does call Bash in a variety of ways, we do not believe an arbitrary environment variable can be set by the server. It is however possible that a filter could set environment variables.
So much for Red Hat's thoughts. Of these, the Web servers and SSH are the ones that worry me the most. The DHCP client is also troublesome, especially if, as it the case with small businesses, your external router doubles as your Internet gateway and DHCP server.
Of these, Web server attacks seem to be the most common by far. As Florian Weimer, a Red Hat security engineer, wrote: "HTTP requests to CGI scripts have been identified as the major attack vector." Attacks are being made against systems running both Linux and Mac OS X.
Jaime Blasco, labs director at AlienVault, a security management services company, ran a honeypot looking for attackers and found "several machines trying to exploit the Bash vulnerability. The majority of them are only probing to check if systems are vulnerable. On the other hand, we found two worms that are actively exploiting the vulnerability and installing a piece of malware on the system."
Other security researchers have found that the malware is the usual sort. They typically try to plant distributed denial of service (DDoS) IRC bots and attempt to guess system logins and passwords using a list of poor passwords such as 'root', 'admin', 'user', 'login', and '123456.'
So, how do you know if your servers can be attacked? First, you need to check to see if you're running a vulnerable version of Bash. To do that, run the following command from a Bash shell:
env x='() { :;}; echo vulnerable' bash -c "echo this is a test"
If you get the result:
vulnerable this is a test
Bad news, your version of Bash can be hacked. If you see:
bash: warning: x: ignoring function definition attempt bash: error importing function definition for `x' this is a test
You're good. Well, to be more exact, you're as protected as you can be at the moment.
26 Sep 2014 | support.novell.com
We have fixed the critical issue CVE-2014-6271 (http://support.novell.com/security/cve/CVE-2014-6271.html) with updates for all supported and LTSS code streams.
SLES 10 SP3 LTSS, SP4 LTSS, SLES 11 SP1 LTSS, SLES 11 SP2 LTSS, SLES 11 SP3, openSUSE 12.3, 13.1.
The issue CVE-2014-7169 ( http://support.novell.com/security/cve/CVE-2014-7169.html) is less severe (no trivial code execution) but will also receive fixes for above. As more patches are under discussions around the bash parser, we will wait some days to collect them to avoid a third bash update.
February 23rd, 2006 | Paranoid Penguin
by Mick Bauer in
SUSE is a security-friendly distribution with a plethora of security-related tools.
Over the years, we've seen more and better security features incorporated into our favorite Linux distributions. Distribution-specific security awareness manifests itself in many ways, including:
- Availability of security-enhancing applications.
- "Hardening" functionality in setup/installation scripts.
- The way patches are handled.
- Default settings of network applications.
This month, I begin a series of three articles on distribution-specific security in SUSE Linux, Debian GNU/Linux and Red Hat Enterprise Linux. These are the three distributions with which I've had the most experience, and they are arguably the three most popular. (But as with anything, if you want to contribute an article about your own favorite distribution, go for it! See our author's guide at www.linuxjournal.com/xstatic/author/authguide.)
I'll start with SUSE 10.0. SUSE is a general-purpose, commercially produced Linux distribution developed for Intel 32- and 64-bit platforms. Originally based in Germany and still primarily developed there, SUSE is now owned by Novell. There are a number of different SUSE products, including SUSE Linux, a "personal" version available from numerous retail outlets; SUSE Linux Enterprise Server, an "enterprise-grade" version available directly from Novell; and OpenSUSE, which is essentially the same as SUSE Linux but without installation media (it's installable only over the Internet), printed manuals or installation support.
The basis of this article is SUSE Linux 10.0, that is, the commercial "personal use" version. Everything I say here should be equally applicable to OpenLinux 10.0, and mostly relevant to the Enterprise versions of SUSE. Presumably, the Enterprise versions include additional security-related packages and features.
Installing SUSE Linux 10.0System security begins with installation. This is your first opportunity to make crucial decisions concerning what role the system will play, which software the system will run and how the system will be configured. Therefore, it's useful to begin our discussion of SUSE security with the installation process.
All versions of SUSE use YaST (Yet Another Setup Tool) both for initial system installation and for ongoing system administration. Over the years, YaST has evolved from a simple RPM front end to a modular, comprehensive administration tool that can be used to configure not only low-level system software but also complex server applications such as Apache and Postfix.
We'll talk more about YaST shortly. Your immediate problem during initial OS installation, however, is deciding which software packages to install. And if you're security-focused, this is a happy problem. SUSE Linux 10.0 offers a wide variety of security applications from which to choose.
In my view, these applications fall into two categories: system security applications and security-scanning applications. The former include both general-purpose applications with strong security features-Postfix springs instantly to mind-and applications whose sole purpose is providing security controls to other applications or to the underlying operating system, of which tcpwrappers is a classic example. Table 1 lists the packages in SUSE Linux 10.0 that enhance system security.
Table 1. Some Security-Enhancing Packages in SUSE Linux 10.0
Package Name Description aide, fam File integrity checkers, both similar to Tripwire. bind-chrootenv Automatically creates a chroot environment in which to run BIND (the DNS daemon) more securely. clamav, antivir Antivirus packages-clamav is completely free, but antivir is commercial (free for personal use). cracklib Library and utilities to prevent users from choosing easily guessed passwords. gpg, gpg2, gpa GNU Privacy Guard (gpg), a versatile and ubiquitous e-mail- and file-encryption utility. ipsectools, openswan Tools for building IPsec-based virtual private networks. openldap, freeradius Open-source authentication daemons. proxy-suite An FTP security proxy developed by SUSE. seccheck SUSE-customized cron scripts that perform various security checks against logs, system state and so on, and send e-mail reports to you. subdomain-utils, subdomain-profiles, mod-change-hat and so on AppArmor, a mandatory access control (MAC) system that restricts the behavior of specific binaries. SUSE uses this instead of SELinux, which it closely resembles. squid, SquidGuard Squid is a popular HTTP/HTTPS proxy. SquidGuard adds access controls and other security features. SUSEfirewall SUSE's handy front end for Linux's netfilter/iptables. syslog-ng Advanced system logger, much more powerful than syslogd. syslog-ng is SUSE's default logger. tinyca2 Front end to OpenSSL for managing Certificate Authorities. yast2-firewall Firewall functionality. vsftpd The Very Secure FTP Daemon. xen, FAUmachine, uml-utilities, bochs The Xen, FAUmachine, User Mode Linux and BOCHS virtual machine environments. Actually, the lengthy list of packages in Table 1 represents only particular favorites of mine and SUSE-specific selections. SUSE includes many, many more system security tools, including tcpd (tcpwrappers), openssl, chkrootkit, sudo and wipe. You can view the full list of packages included in SUSE Linux 10.0 at www.novell.com/products/linuxpackages/professional/index_all.html.
Besides securing the system on which you install SUSE, you may be interested in using a SUSE system to validate the security of other systems or of entire networks. SUSE is a good choice for this. Table 2 shows some SUSE Linux 10.0 packages that can be used for security scanning. Note that you should never install these packages (except perhaps Snort) on any Internet-connected server. Each is of much greater use to an attacker than it is to you in that context. Scanning software should be performed from systems that are normally kept out of harm's way.
Table 2. Security Scanners in SUSE Linux 10.0
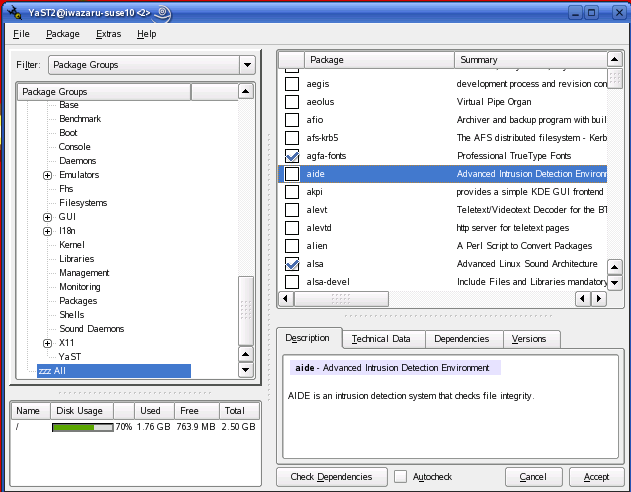
Package Name Description ethereal, tcpdump Excellent packet sniffers. fping Flood ping (multiple-target ping). john John the Ripper, a password-cracking tool (legitimately used for identifying weak passwords). kismet Wireless LAN sniffer. nessus-core, nessus-libraries The Nessus general-purpose security scanner. nmap Undisputed king of port scanners. snort Outstanding packet sniffer, packet logger and intrusion detection system. If you're new to SUSE, you should be aware that by default, YaST uses a Selections filter (view) for selecting packages, in which only a small subset of all available packages is offered to you. If you don't see something you need in this view, for example, nessus-core, use the Package Groups filter to see a more complete set of categories. If you want to see a single list of all packages in alphabetical order, simply set the filter to Package Groups and click on the group zzz All (Figure 1).

Figure 1. Viewing All Available Packages in YaST
You also can set the filter to Search to search for packages by name or keyword.
After you've selected and installed all software packages, YaST allows you to set the root password and create the first (nonroot) user account. By default, SUSE uses Blowfish for password encryption, and YaST checks the password you type for complexity. (Too-simple a password can be easily guessed or brute-force cracked by an attacker.)
You're also given the opportunity to enable local firewall scripts (enabled by default), and the SSH and VNC remote-shell daemons (both disabled by default). Note that of the latter two, SSH is the best choice for administering bastion hosts (hardened Internet servers)--among other reasons, you shouldn't be using the X Window System on bastion hosts unless you've got a very specific, very compelling reason. YaST, it should be noted, runs perfectly well in text (ncurses) mode, with exactly the same modules and options as the X version. Also, tightvnc, the version of the VNC remote-desktop tool shipped with SUSE, doesn't encrypt session data, only authentication data.
Note also that at installation time, you aren't given the opportunity to customize your local firewall settings. Initially, a default script is used that provides a simple "allow all outbound transactions, allow nothing inbound that wasn't initiated locally" policy. In other words, the default SUSEfirewall script is perfectly appropriate for most desktop systems, but it is inadequate for server use. You can change this later on by running YaST's Firewall module.
YaST then lets you choose from the following methods for authenticating nonroot users:
- local /etc/passwd file (default).
- LDAP.
- NIS.
- Samba (Windows NT Domains).
Active Directory authentication is also supported in SUSE Linux 10.0, via Kerberos.
Once you've selected an authentication method, you can create your first nonroot user account. Be sure to leave Automatic Logon disabled unless your system has very low security requirements indeed-enabling this causes the machine to log in your nonroot user automatically at boot time. (About the only situation in which this is a good idea, I think, is for kiosk-type systems!)
And that's it-SUSE installation is now finished! Your job as a security-conscious system administrator, however, is not.
Security-Related YaST ModulesAfter the first time you boot your newly minted SUSE Linux system, you immediately should log in as your unprivileged user and invoke YaST. If you do this from within KDE or GNOME, you'll be prompted for the root password automatically, but in a text-console session, you need to use su -c to invoke /sbin/yast.
As I mentioned earlier, YaST has a lot of security functionality built in. YaST modules particularly relevant to system security are listed in Table 3.
Table 3. Security-Related YaST Modules
YaST Section Module Name Description Software Online Update Sets up manual and automatic software updates. Software Management For installing and removing packages. Virtual Machine Installation (XEN) Creates virtual machines for the Xen 3 virtual machine environment. System /etc/sysconfig Editor Edits daemon startup parameters. System Services (Runlevel) Manages startup scripts. Powertweak Sets advanced kernel parameters, such as TCP timewait sockets. Network Services DNS Server Configures BIND. HTTP Server Configures Apache. LDAP Client Sets up LDAP authentication and lookups. Mail Transfer Agent Configures Postfix or Sendmail. Kerberos Client Sets up Kerberos authentication, including Active Directory. Remote Administration Configures TightVNC. Novell AppArmor Various For managing AppArmor mandatory access controls on specific binaries. Security and Users Firewall For managing netfilter/iptables settings. Local Security Determines password complexity and length, password aging, file-permission schemes and various other system security parameters. Group Management Used to create, edit and delete group accounts. User Management Used to create, edit and delete user accounts (actually the same module as Group Management, which is dual-purpose). Of these YaST modules, Online Update is one of the most important. You immediately should use it to configure automatic patch downloads and, unless your system is under a change-control process, automatic patch installation as well. YaST Online Update was one of the first automatic patch utilities offered in a major Linux distribution, and it's still one of the best. Use it to take advantage of SUSE's excellent record of providing prompt, well-tested security patches.
The Firewall module (Figure 2) is also extremely useful, especially if you're uncomfortable creating and managing your own firewall scripts (I acknowledge that people like me, who find this fascinating and fun, are rare). Similarly, Group/User Management eliminates the need for you ever to edit /etc/group or /etc/passwd manually.
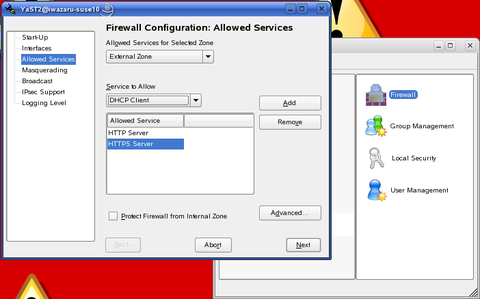
Figure 2. YaST's Firewall Module
The Virtual Machine Installation module and Novell AppArmor section are also especially noteworthy. So much so, in fact, that I should spend some time talking about SUSE's virtual machine and mandatory access control systems, respectively, in a little more depth.
Virtual Machines in SUSE LinuxYou may recall my article "The Future of Linux Security" [LJ, August 2005], in which I touted virtual machine environments and hypervisors (aka security monitors) as being an important new direction in system security. If you don't recall this, the gist of it is that it's because MAC schemes such as SELinux are viewed by many people as too complex. A simpler approach instead is to run each major application or service on its own virtual machine. That way, if for example a virtual machine in which Sendmail is running gets compromised, a virtual machine running Apache2 on the same physical hardware won't be in immediate or direct danger.
Virtual machines, therefore, provide a powerful and easy-to-understand means of isolating complex applications from each other. And, SUSE Linux 10.0 includes no fewer than three different virtual machine technologies.
The Xen 3 environment, which originated at Cambridge University, is provided by SUSE as a "technology preview". To the best of my determination, this simply means that because Xen 3 is an immature and potentially unstable application, SUSE is simply trying to lower people's expectations of its usability-the version of Xen 3 in SUSE Linux 10.0 isn't a special preview or evaluation version or anything like that. Xen 3 supports Linux, FreeBSD, NetBSD and Plan9 "guest" (virtual) systems.
Alternatively, the FAUmachine virtualization environment includes RPM packages that enable support for SUSE 9, Debian 3.0, OpenBSD 3.5/3.6 and Red Hat 9 guest systems. One advantage of FAUmachine over Xen 3 is that in FAUmachine, the guest systems' kernels run on the host system with nonroot (unprivileged-user) permissions.
User Mode Linux is another virtualization environment offered in SUSE Linux 10.0 via the uml-utilities package. Like FAUmachine, its guest kernels run without root privileges.
Novell (Immunix) AppArmorHowever, not everyone has given up on MAC-based system security, and SUSE has covered this area handsomely by acquiring and repackaging Immunix's AppArmor (aka Subdomain). AppArmor is similar to SELinux, in that it allows you to restrict the behavior of specific processes, with an effect similar to but more effective than running them in chroot jails.
(Note that although SUSE provides the libselinux package and includes SELinux functionality in its default kernel, SELinux isn't officially supported in SUSE Linux. You need the packages available at www.cip.ifi.lmu.de/~bleher/selinux to run SELinux in SUSE Linux.)
The document /usr/share/doc/packages/subdomain-docs/ug_apparmor.pdf, included in the subdomain-docs package, is the AppArmor User's Guide, and it tells you everything you need to know about configuring and using AppArmor. Suffice it to say for now that if you simply run the YaST AppArmor Control Panel module and enable AppArmor, a default profile is loaded that includes settings for many common daemons and commands, including netstat, ping, traceroute, firefox, evolution, gaim, syslogd, acroread, ethereal, appropos, procmail, postfix (smtpd, and so on), Apache2 (httpd2-prefork), nscd, identd, ntpd, sshd and squid.
This is a limited-feature version of AppArmor, so apparently it provides only a subset of features available in the full $1,250 US version. Personally, I'm not clear as to precisely what the difference is, though-everything I tried to do with the version in SUSE Linux 10.0 seemed to work fine, so this would not appear to be a too significantly crippled edition. Perhaps the full version includes a longer list of preconfigured applications.
ConclusionThese aren't SUSE Linux 10.0's only security features. I haven't talked about how secure many applications' default settings are (in general they're quite secure, with daemons running with nonroot privileges whenever possible, network listeners such as sshd typically disabled by default and so on).
This is a very security-friendly version of SUSE Linux indeed. Remember, though, that real security begins with you-little of SUSE's security potential is realized until you configure or at least enable it yourself! Hopefully, this article has helped you get a feel for what that potential is.
Next month, it's on to Debian 3.1. Until then, be safe!
Mick Bauer ([email protected]) is Network Security Architect for one of the US's largest banks. He is the author of the O'Reilly book Linux Server Security, 2nd edition (formerly called Building Secure Servers With Linux), an occasional presenter at information security conferences and composer of the "Network Engineering Polka".
Google matched content |
SUSE Linux Enterprise Security Announcements and Support
NASA Linux Installation and Security Check List
SUSE Security Lockdown - Hardening Your Linux System - openSUSE
Marc's (Security) Homepage @ SuSE
SUSE Security FAQ - Suntel Communications knowledgebase
ResourcesFor more detail discussions of the tools in this article, see:
"Using xinetd", Jose Nazario, Linux Journal, March 2001.
"Checking Your Work with Scanners, Part 1: nmap", Mick Bauer, Linux Journal, May 2001.
"Intrusion Detection for the Masses", Mick Bauer Linux Journal, July 2001.
"Understanding IDS for Linux", Pedro Bueno, Linux Journal, May 2002.
"Checking Your Work with Scanners, Part II: Nessus", Mick Bauer, Linux Journal, May 2001.
For more information about Linux distribution features, see "2001 Linux Functional Review", D.H. Brown Associates, Inc, September 2001.
For more information on widely used security tools, visit "Top 50 Security Tools"
Security Consensus Operational Readiness Evaluation, Linux.doc Checklist
For more information about Harden_Suse, visit Marc Heuse's web site.
For more about scanlogd, see the Scanlogd man page.
Bobby S. Wen is a senior technical manager with two engineering degrees and an MBA. He started playing with Linux in 1994 and has been addicted ever since. In his spare time, he tries to prevent his children from hacking into the home gateway server and turning on chat and file sharing.
email: bwen at yahoo.com
Marc's (Security) Homepage @ SuSE
Society
Groupthink : Two Party System as Polyarchy : Corruption of Regulators : Bureaucracies : Understanding Micromanagers and Control Freaks : Toxic Managers : Harvard Mafia : Diplomatic Communication : Surviving a Bad Performance Review : Insufficient Retirement Funds as Immanent Problem of Neoliberal Regime : PseudoScience : Who Rules America : Neoliberalism : The Iron Law of Oligarchy : Libertarian Philosophy
Quotes
War and Peace : Skeptical Finance : John Kenneth Galbraith :Talleyrand : Oscar Wilde : Otto Von Bismarck : Keynes : George Carlin : Skeptics : Propaganda : SE quotes : Language Design and Programming Quotes : Random IT-related quotes : Somerset Maugham : Marcus Aurelius : Kurt Vonnegut : Eric Hoffer : Winston Churchill : Napoleon Bonaparte : Ambrose Bierce : Bernard Shaw : Mark Twain Quotes
Bulletin:
Vol 25, No.12 (December, 2013) Rational Fools vs. Efficient Crooks The efficient markets hypothesis : Political Skeptic Bulletin, 2013 : Unemployment Bulletin, 2010 : Vol 23, No.10 (October, 2011) An observation about corporate security departments : Slightly Skeptical Euromaydan Chronicles, June 2014 : Greenspan legacy bulletin, 2008 : Vol 25, No.10 (October, 2013) Cryptolocker Trojan (Win32/Crilock.A) : Vol 25, No.08 (August, 2013) Cloud providers as intelligence collection hubs : Financial Humor Bulletin, 2010 : Inequality Bulletin, 2009 : Financial Humor Bulletin, 2008 : Copyleft Problems Bulletin, 2004 : Financial Humor Bulletin, 2011 : Energy Bulletin, 2010 : Malware Protection Bulletin, 2010 : Vol 26, No.1 (January, 2013) Object-Oriented Cult : Political Skeptic Bulletin, 2011 : Vol 23, No.11 (November, 2011) Softpanorama classification of sysadmin horror stories : Vol 25, No.05 (May, 2013) Corporate bullshit as a communication method : Vol 25, No.06 (June, 2013) A Note on the Relationship of Brooks Law and Conway Law
History:
Fifty glorious years (1950-2000): the triumph of the US computer engineering : Donald Knuth : TAoCP and its Influence of Computer Science : Richard Stallman : Linus Torvalds : Larry Wall : John K. Ousterhout : CTSS : Multix OS Unix History : Unix shell history : VI editor : History of pipes concept : Solaris : MS DOS : Programming Languages History : PL/1 : Simula 67 : C : History of GCC development : Scripting Languages : Perl history : OS History : Mail : DNS : SSH : CPU Instruction Sets : SPARC systems 1987-2006 : Norton Commander : Norton Utilities : Norton Ghost : Frontpage history : Malware Defense History : GNU Screen : OSS early history
Classic books:
The Peter Principle : Parkinson Law : 1984 : The Mythical Man-Month : How to Solve It by George Polya : The Art of Computer Programming : The Elements of Programming Style : The Unix Hater’s Handbook : The Jargon file : The True Believer : Programming Pearls : The Good Soldier Svejk : The Power Elite
Most popular humor pages:
Manifest of the Softpanorama IT Slacker Society : Ten Commandments of the IT Slackers Society : Computer Humor Collection : BSD Logo Story : The Cuckoo's Egg : IT Slang : C++ Humor : ARE YOU A BBS ADDICT? : The Perl Purity Test : Object oriented programmers of all nations : Financial Humor : Financial Humor Bulletin, 2008 : Financial Humor Bulletin, 2010 : The Most Comprehensive Collection of Editor-related Humor : Programming Language Humor : Goldman Sachs related humor : Greenspan humor : C Humor : Scripting Humor : Real Programmers Humor : Web Humor : GPL-related Humor : OFM Humor : Politically Incorrect Humor : IDS Humor : "Linux Sucks" Humor : Russian Musical Humor : Best Russian Programmer Humor : Microsoft plans to buy Catholic Church : Richard Stallman Related Humor : Admin Humor : Perl-related Humor : Linus Torvalds Related humor : PseudoScience Related Humor : Networking Humor : Shell Humor : Financial Humor Bulletin, 2011 : Financial Humor Bulletin, 2012 : Financial Humor Bulletin, 2013 : Java Humor : Software Engineering Humor : Sun Solaris Related Humor : Education Humor : IBM Humor : Assembler-related Humor : VIM Humor : Computer Viruses Humor : Bright tomorrow is rescheduled to a day after tomorrow : Classic Computer Humor
The Last but not Least Technology is dominated by two types of people: those who understand what they do not manage and those who manage what they do not understand ~Archibald Putt. Ph.D
Copyright © 1996-2021 by Softpanorama Society. www.softpanorama.org was initially created as a service to the (now defunct) UN Sustainable Development Networking Programme (SDNP) without any remuneration. This document is an industrial compilation designed and created exclusively for educational use and is distributed under the Softpanorama Content License. Original materials copyright belong to respective owners. Quotes are made for educational purposes only in compliance with the fair use doctrine.
FAIR USE NOTICE This site contains copyrighted material the use of which has not always been specifically authorized by the copyright owner. We are making such material available to advance understanding of computer science, IT technology, economic, scientific, and social issues. We believe this constitutes a 'fair use' of any such copyrighted material as provided by section 107 of the US Copyright Law according to which such material can be distributed without profit exclusively for research and educational purposes.
This is a Spartan WHYFF (We Help You For Free) site written by people for whom English is not a native language. Grammar and spelling errors should be expected. The site contain some broken links as it develops like a living tree...
|
|
You can use PayPal to to buy a cup of coffee for authors of this site |
Disclaimer:
The statements, views and opinions presented on this web page are those of the author (or referenced source) and are not endorsed by, nor do they necessarily reflect, the opinions of the Softpanorama society. We do not warrant the correctness of the information provided or its fitness for any purpose. The site uses AdSense so you need to be aware of Google privacy policy. You you do not want to be tracked by Google please disable Javascript for this site. This site is perfectly usable without Javascript.
Last modified: March 12, 2019