|
|
Home | Switchboard | Unix Administration | Red Hat | TCP/IP Networks | Neoliberalism | Toxic Managers |
| (slightly skeptical) Educational society promoting "Back to basics" movement against IT overcomplexity and bastardization of classic Unix | |||||||
|
|
GNU Screen is a simple, but at the same time very flexible and programmable windows manager. The latest version is 4.2.0. It is often called terminal multiplexer, but the key functionality of screen is in the area of windows management: creation, destruction and resizing of windows. For example it can split the console screen horizontally and display two windows at the same time. Screen is a Unix program (Cygwin version exists and is quite usable). For good Windows terminal emulator see Teraterm.
It can be called one of the most underappreciated Unix utilities, a real jewel of Unix programming art.
|
|
In addition to the ability to run many shell processes in a single terminal, screen provides classic windows management capabilities -- the ability to split terminal into regions (horizontal stripes of varying length, each containing its own session. To explain the value of screen to command line junkies is often difficult but I found that generally the following explanation let them think: often ls on command like is used as "temporary escape from current context" to which you return, often several times. Instead of doing this via ls each time it is much more productive to have two terminal windows open. And generally working with the server using two terminal windows instead of one is a better way to work. Screen provides this capability "out of the box". Moreover if you login to the server via terminal emulator and then close the session you lose all the context of your session and the next time need to start from level zero. If you detach you session from screen you can re-attach to it later saving a lot of keystrokes. If you are over 40 and have problems with carpal tunnel syndrome or other wrists or elbow problems due to overuse/abuse of keyboard, this is (along with programmable keyboard) a life saver. If you are not, why wait :-)
Screen allows sharing terminal with other users. See Sharing terminal with the other users via screen -x
Another important (or may be the most important) feature of screen is that like VNC it provides the ability to detach the terminal emulator from the running programs and then reattach the same or new terminal to them.
Autodetach setting might not be enabled by default so it make sense to put a corresponding directive in your .screenrc
autodetach on
This means screen will keep shells and programs running in all windows that you opened even if you accidentally disconnected from the remote server or closed the terminal emulator.
It is very important is you use connection that is flake. Lately this often happens with secure VPN connections even on very reliable networks.
That feature also gives you an ability to start a job at the office and check for it completion at home. Also if you have complex setup you can do it once and reuse during the next connection, saving you time on recreating the environment you need for productive work.
Screen also frees administrator from waiting until a particular task ends. He/she can be connected to any number of servers, start a task, detach from the task, and the task keeps running. Then reattach later, check the status and intervene of needed.
Like VNC screen also permits to share a terminal (in read-only mode) with someone else in real time. This permits to collaborate on a project by several remote users located in different places.
To watch actions of others by connecting to somebody else screen session use the command:
screen -x
| An important feature of screen is that like VNC it provides
the ability to detach the terminal emulator from the running programs and then reattach the
same or new terminal to them. Then you can reattach to the session using screen -R preserving
your environment, history and other session attributes. For sysadmin who administer multiple
machines (especially if there multiple cooks in the kitchen) this is a big time saver.
Another important feature that screen it can be used for watching actions of others by connecting to somebody else screen session screen -x |
Screen has a certain architectural affinity to the orthodox file managers (OFM ), especially deco as well as orthodox editors like vi and THE (the power of command line). Orthodox system interface has the following properties
Many of programs belonging to this type are descendants of Norton Commander, a file manager first released in 1986 by Norton Computing (since 1990 part of Symantec). But not only file managers can have this type of interface. There is a distinct, but very similar trend in editors such as vi and THE, windows multiplexers (GNU screen), and minimalist windows managers (ratpoison). We can talk about Orthodox interface as a distinct type of interface different in concepts from traditional GUI interface used in Microsoft Windows and Apple operating systems and simultaneously different (and richer) then plain vanilla command line interface. See my article Less is More: A rich functionality behind Spartan interface of Orthodox File Managers for more information on the topic.
We will discuss just for topics that are enough to start productively using screen
Like in vi in screen you have to hit certain prefix to get to command line. The default prefix is Ctrl-A. For example key combination Ctrl-A C (Press will Ctrl-A, release Ctrl key and press C) opens new window.
This availability of command line operations and related scriptability via .screenrc file makes screen attractive to system administrators who value blend of power and simplicity provided by "orthodox" tools. Like in all orthodox utilities there is an extensive set of commands (mini-language) that can used to modify the behavior of screen.
Ctrl-a is called attention/command key and is similar to Esc in vi (you also can change Ctrl-A to another sequence, if you wish). This sequence presuppose that you are using Sun keyboard (with Ctrl in place of CapsLock) or switched Ctrl and CapsLock keys (in Windows you can use RandyRants SharpKeys -- which provides a nice interface to various registry hacks that remap one key into another, including remapping CapsLock to Ctrl. ).
|
Remap Ctrl to CapsLock. On Windows that can be done using RandyRants SharpKeys |
If the colon (":") is entered after the attention key, then screen switches to command mode and you'll see a highlighted colon prompt at the bottom of the screen. After that, like in vi, you can enter commands that change the behavior of the screen and modify its current configuration. For example you can open and close windows, change size of windows, etc. For example you open new window also by typing command
Ctrl-A: screen
which is equivalent to the shortcut Ctrl-A C that we discussed above.
So shortcut Ctrl-A C and command Ctrl-A: screen are synonyms. This is just an association that is defined in .screenrc file - screen's dotfile. File .screenrc is a list of commands which are executed at startup. While by default screen is using the name .screenrc you can start screen using arbitrary screen's dotfile using option -c, for example
screen -c ~myhome/.screenrc_`uname`
This example demonstrated that you can have multiple .screenrc files and use the one that suits current environment (for example Linux, AIX, Solaris, etc) and the task in hand.
You can also execute predefined sequences of screen commands stored in the files (screen scripts) using the command source. One common application is the execution of the set of command creating a particular combination of windows and loading particular applications into each window. For example, you can load Perl in debugging mode on one window, vi in another and Perl POD browser in the third creating poor man IDE environment. For example
source .screenrc_perl
or
source ~myhome/perl.screenrc
That provides you with the flexibility to have several predefined sets of windows working on a particular task, the capability that improves your productivity dramatically as you can polish the arrangement and gradually connect a set of useful shortcuts as you gain experience with the environment (in the example above, working with Perl). System administrators can (and should) have a custom part of configuration encoded for particular hosts (that's the way I use screen at work) :
source ${HOME}/${HOST}.screenrc
|
Due to availability of command line interface and scriptability Screen can be considered to be a member of "orthodox" family of utilities which include orthodox file managers (mc, FAR, etc) and orthodox editors (vim, Xedit, THE, etc). Command line can be activated with Ctrl-A: after that you can enter any command from the screen command set to modify behavior of the screen or execute sets of commands (screen script) from particular file using command source. |
A typical and probably the simplest application of this capability is to launch a predefined set of windows at screen startup., for example:
source $HOME/.screenrc # read in your normal screenrc
screen top # now start opening windows
screen -t irc epic # with the -t option it's possible to set the window title
screen -t mail 8 mutt # you can also specify the window number to launch in
screen -t messages 9 tail -f /var/log/messages
In X-windows world screen inspired several minimalist windows managers which usually are bungled with linux mini-distributions. Classic example of this genre is ratpoison (the name suggest that it is one of the few that not support mouse "out of principle" ;-).
Screen is portable and is an almost a standard utility on all flavors of Unix. It is often preinstalled by default in Linux distributions (for example, Suse 10). And it is easily installed in Solaris, AIX and HP-UX. For example Solaris 10 package can be found on sunfreeware.com:
screen-4.0.2-sol10-intel-local.gz Screen provides an ANSI/vt100 terminal emulator, which can multiplex up to 10 pseudo-terminals - installs in /usr/local. There are further configuration steps in the /usr/local/doc/screen/INSTALL. The etc and terminfo directories containing other relevant files are in /usr/local/doc/screen. The screen package may also require that you install the ncurses package.
Using it, you can run any number of console-based applications -- interactive command shells, curses-based applications, text editors, etc. -- within a single terminal. Many administrators who use screen open a dozen or even more sessions.
Screen can be used in two ways (you can use both local and remote screen instances simultaneously by changing control character in local to say Ctrl-\ via .screenrc, see below):
A nested master-slave invocation of screen is also possible, but it is unclear how practical it is. See Jason White page and my screenrc and my slave screenrc by Tim Chambers. Here is how he explained this method in Slashdot post:
You run an "outer" screen session (the "slave" session) that in turn runs an "inner" (or "master") session. You use the regular escape sequence (Ctrl-A d) to detach from the master, and you map Ctrl-^ to be the control key for the slave session. If you press Ctrl-^ while using screen this way, you'll see one process in the slave session. It's running ssh-agent. That's the key to using ssh with screen. The slave's only purpose is to run ssh-agent. The master runs as a child of that. Consequently, all shells in the master session are running under the ssh-agent. Just run ssh-add from any master shell, and then all shells have your ssh identity.
As we mentioned above, after starting screen you need to open windows using the command Ctrl-a c. Every window in screen is identified by a unique number. The first window is usually numbered 0 (you can change this to one if you do not like counting from zero). For each created windows screen starts default shell. After that user for example can open remote session to a particular server and rename it to simplify recognition after switching to another (an optimal typical number of windows for one screen instance is around a dozen). You can use multiple screen instances each with its own set of servers to connect (DMZ servers, database servers, etc).
Minimal set of commands necessary to use screen productively includes just five commands:
- Ctrl-a c to create a new window (Ctrl-a N -- lists the number of the active windows)
- Ctrl-a <number> to switch between them (Ctrl-a n, Ctrl-a p or Ctrl-a Ctrl-a will work too providing previous and next windows, but are less convenient and there are two of them instead of one)
Ctrl-a " (windows) Show a list of active windows. You can navigate this list with the arrow keys (or vi-style, with j and k), and pick a window to activate by pressing Enter when it's highlighted. As this is one of the most often used commands you will be better off redefining this command as Ctrl-a space (see .screenrc examples on how to do that).
- Ctrl-a d. detach from current session. You can also detach just by closing the terminal emulator that contains the session. Neither of these actually end your session. All they do is unbind your session from the current terminal. All of the programs you started running within screen are still running. To reattach type screen -r from the command prompt
- Ctrl-a \ (quit) Kill all windows and terminate screen. You can close individual window by exiting shell with command exit.
There are also several more advanced features that can improve your productivity. Among them I would like first of all mention regions.
Regions can dramatically improves your productivity in pure command line environment.
This feature turns screen in rudimentary windows manager able to create "strips"
non-overlapping horizontal zones each of which corresponds to a separate shell window.
To split the screen into two regions just press C-a S. The current
window will split into two separate areas with the bottom area blank. To switch
to the bottom part press C-a [Tab]. If you need to create a new shell
in the new window, so press C-a c. If you want to see one of the existing
sessions press Ctrl-a " and select the necessary session. You can create
more regions by pressing C-a S again: each time the current "strip" will
be split into two. Tabs display the active region shell name in its title bar. You
can also switch between tabs being in a region, so e.g.: you have 4 tabs and 2 regions.
Each region can display one of these tabs. A nice trick is that upper region can
react on the change of the particular environment variable and display either file
you are editing or the listing of the current directory. This arrangement is close
for the OFM paradigm. You can change the size of each region by entering resize
[size], where size is the number of lines.
You can detach just by closing the terminal emulator that contains the session. Neither of these actually end your session. All they do is unbind your session from the current terminal. All of the programs you started running within screen are still running.
To detach a session, use Ctrl-a d. If that's the only session running (which is typical for novices) you can reattach with Ctrl-a r.
To reattach outside the screen type
screen -r
You can also use the command:
screen -x
If more than one session is detached, you'll need to provide session PID that you can obtain by listing sessions with the command screen -ls
List available screen sessions
screen -ls
Reconnect to specific session
screen -D -R main
Connect to specific session in "watching/spy mode"
screen -x screen_session_name
If there is a single session only screen -x will suffice.
Reattaching to session within the screen
If you have more than one session running, you will need to know the PID to attach or reattach to an existing session. To detach a session, use Ctrl-a d. If that's the only session running, you can reattach with Ctrl-a r If more than one session is detached, you'll need to run Ctrl-a r XXXXX where XXXXX is the PID.
We will cover the following topics here
| The key additional feature of Screen that you need to master after mastering basic commands and detach/reattach operation is split command. |
Ctrl-a S (split, capital s, please!). Screen can horizontally by split into regions(panels), each holding a different terminal. After you split the window you need to move to the new region using Ctrl-a Tab (Press Ctrl-A release control key and only then press Tab key) and create a session in it using Ctrl-a-c.
Note: It is easy to confuse with the lowercase Ctrl-a s which actually sends a command to freeze to the parent terminal. To reverse this effect one doesn't have to go as far as closing the terminal and re-attach again, but simply type Ctrl-a q.
Here is slightly more elaborate set of commands, which we will call Level 1 command set. It includes regions-related commands:
Ctrl-a d. detach from current session.
Ctrl-a A (title) Allow the user to enter a name for the current window (useful fo naming each window according to the purpose (for example each can represent a different directory).
Ctrl-a S (split, capital s, please!). Screen can horizontally by split into regions(panels), each holding a different terminal. After you split the window you need to move to the new region using Ctrl-a Tab (Press Ctrl-A release control key and only then press Tab key) and create a session in it using Ctrl-a-c.
Note: It is easy to confuse with the lowercase Ctrl-a s
which actually sends a command to freeze to the parent terminal. To reverse
this effect one doesn't have to go as far as closing the terminal and re-attach
again, but simply type Ctrl-a q.
As you progress you "screen vocabulary" extends and in some point you can switch from Level 1 command set to Level 2 command set which includes several additional useful commands (and first of all bindkey command):
- Ctrl-a ' (select)
- Prompt for a window name or number to switch to.
- Ctrl-a " (windowlist -b)
- Present a list of all windows for selection.
- Ctrl-a 0 (select 0)
- ... ...
- Ctrl-a 9 (select 9)
- Ctrl-a - (select -)
- Switch to window number 0 - 9, or to the blank window.
- Ctrl-a tab (focus)
- Switch the input focus to the next region.
- Ctrl-a Ctrl-a (other)
- Toggle to the window displayed previously.
Note that this binding defaults to the command character typed twice, unless overridden. For instance, if you use the option "-e]x", this command becomes "]]".- Ctrl-a a (meta)
- Send the command character (Ctrl-a) to window. See escape command.
- Ctrl-a A (title)
- Allow the user to enter a name for the current window (useful fo naming each window according to the purpose (for example each can represent a different directory).
- Ctrl-a b
- Ctrl-a Ctrl-b (break)
- Send a break to window.
- Ctrl-a B (pow_break)
- Reopen the terminal line and send a break.
- Ctrl-a c
- Ctrl-a Ctrl-c (screen)
- Create a new window with a shell and switch to that window.
- Ctrl-a C (clear)
- Clear the screen.
- Ctrl-a d
- Ctrl-a Ctrl-d (detach)
- Detach screen from this terminal.
- Ctrl-a D D (pow_detach)
- Detach and logout.
- Ctrl-a f
- Ctrl-a Ctrl-f (flow)
- Toggle flow on, off or auto.
- Ctrl-a F (fit)
- Resize the window to the current region size.
- Ctrl-a Ctrl-g (vbell)
- Toggles screen's visual bell mode.
- Ctrl-a h (hardcopy)
- Write a hardcopy of the current window to the file "hardcopy.n".
- Ctrl-a H (log)
- Begins/ends logging of the current window to the file "screenlog.n".
- Ctrl-a i
- Ctrl-a Ctrl-i (info)
- Show info about this window.
- Ctrl-a k
- Ctrl-a Ctrl-k (kill)
- Destroy current window.
- Ctrl-a l
- Ctrl-a Ctrl-l (redisplay)
- Fully refresh current window.
- Ctrl-a L (login)
- Toggle this windows login slot. Available only if screen is configured to update the utmp database.
- Ctrl-a m
- Ctrl-a Ctrl-m (lastmsg)
- Repeat the last message displayed in the message line.
- Ctrl-a M (monitor)
- Toggles monitoring of the current window.
- Ctrl-a space
- Ctrl-a n
- Ctrl-a Ctrl-n (next)
- Switch to the next window.
- Ctrl-a N (number)
- Show the number (and title) of the current window.
- Ctrl-a backspace
- Ctrl-a h
- Ctrl-a p
- Ctrl-a Ctrl-p (prev)
- Switch to the previous window (opposite of Ctrl-a n).
- Ctrl-a q
- Ctrl-a Ctrl-q (xon)
- Send a control-q to the current window.
- Ctrl-a Q (only)
- Delete all regions but the current one.
- Ctrl-a r
- Ctrl-a Ctrl-r (wrap)
- Toggle the current window's line-wrap setting (turn the current window's automatic margins on and off).
- Ctrl-a s
- Ctrl-a Ctrl-s (xoff)
- Send a control-s to the current window.
- Ctrl-a S (split)
- Split the current region into two new ones.
- Ctrl-a t
- Ctrl-a Ctrl-t (time)
- Show system information.
- Ctrl-a v (version)
- Display the version and compilation date.
- Ctrl-a Ctrl-v (digraph)
- Enter digraph.
- Ctrl-a w
- Ctrl-a Ctrl-w (windows)
- Show a list of window.
- Ctrl-a W (width)
- Toggle 80/132 columns.
- Ctrl-a x
- Ctrl-a Ctrl-x (lockscreen)
- Lock this terminal.
- Ctrl-a X (remove)
- Kill the current region.
- Ctrl-a z
- Ctrl-a Ctrl-z (suspend)
- Suspend screen. Your system must support BSD-style job-control.
- Ctrl-a Z (reset)
- Reset the virtual terminal to its "power-on" values.
- Ctrl-a . (dumptermcap)
- Write out a ".termcap" file.
- Ctrl-a ? (help)
- Show key bindings.
- Ctrl-a Ctrl-\ (quit)
- Kill all windows and terminate
screen.- Ctrl-a : (colon)
- Enter command line mode.
- Ctrl-a [
- Ctrl-a Ctrl-[
- Ctrl-a esc (copy)
- Enter copy/scrollback mode.
- Ctrl-a ] (paste .)
- Write the contents of the paste buffer to the stdin queue of the current window.
- Ctrl-a {
- Ctrl-a } (history)
- Copy and paste a previous (command) line.
- Ctrl-a > (writebuf)
- Write paste buffer to a file.
- Ctrl-a < (readbuf)
- Reads the screen-exchange file into the paste buffer.
- Ctrl-a = (removebuf)
- Removes the file used by Ctrl-a < and Ctrl-a >.
- Ctrl-a , (license)
- Shows where screen comes from, where it went to and why you can use it.
- Ctrl-a _ (silence)
- Start/stop monitoring the current window for inactivity.
- Ctrl-a * (displays)
- Show a listing of all currently attached displays.
Here are some examples of keyboard bindings:
bindkey -d # Show all of the default key bindings. The application mode entries are marked
	with [A].
bindkey -k k1 select 1 # Makes the "F1" key switch to window one.bindkey -k F1 command # Makes the F11 (not F1!) key an alternative screen escape (besides `Ctrl-a').
You can also easily change Ctrl-A (the default attention/command key sequence) to another sequence. This can be done either via putting command escape into .screenrc or via a switch when you start screen.
If you invoked screen by using "screen
-e ^Ww" you can see that ^W became attention/command
key combination. So ^W-? gets the
Help screen. Ctrl-A and then ? no longer worked.
escape xy
Set the command character to x and the character generating a literal command character (by triggering the "meta" command) to y (similar to the -e option). Each argument is either a single character, a two-character sequence of the form "^x" (meaning "Ctrl-x"), a backslash followed by an octal number (specifying the ASCII code of the character), or a backslash followed by a second character, such as "\^" or "\\". The default is "^Aa".
For example if you add
escape ^\\
into the .screenrc you will see that ^\ became attention key sequence instead of default ^A.
It is also important to make screen more user friendly. In order better see what open windows you have you can do it by adding the following lines to .screenrc :
	1 hardstatus alwayslastline
	2 hardstatus string '%{= kG}[ %{G}%H %{g}][%= %{=
kw}%?%-Lw%?%{r}(%{W}%n*%f %t%?(%u)%?%{r})%{w}%?%+Lw%?%?%= %{g}][%{B}
%Y-%m-%d %{W}%c %{g}]'
In his paper Screen Tips & Tricks Łukasz Olender suggests several other variants:
But so as not to get lost in these windows, I suggest you create tabs similar to those found in web browsers. You can do this by writing to your configuration file
~/.screenrcone of the following codes:hardstatus alwayslastline hardstatus string '%{= mK}%-Lw%{= KW}%50>%n%f* %t%{= mK} %+Lw%< %{= kG}%-=%D %d %M %Y %c:%s%{-}'or
hardstatus alwayslastline
hardstatus string '%{= kG}[ %{G}%H %{g}][%= %{= kw}%?%-Lw%?%{r}
(%{W}%n*%f%t%?(%u)%?%{r})%{w}%?%+Lw%?%?%= %{g}][%{B} %d/%m
%{W}%c %{g}]'
or
hardstatus alwayslastline
hardstatus string '%{gk}[ %{G}%H %{g}][%= %{wk}%?%-Lw%?%{=b kR}
(%{W}%n*%f %t%?(%u)%?%{=b kR})%{= kw}%?%+Lw%?%?%= %{g}][%{Y}%l%{g}]
%{=b C}[ %m/%d %c ]%{W}'
With the first code each tab will have a number, a name plus time and date. The second one will give you tabs that will be created in the center and the active tab will be highlighted in red and also have the hostname displayed. The last code will additionally display the processor usage. You can create your own codes but it is a rather specialized task - I refer you to the system manuals for more information.
You can combine ideas from those into you own status line that suits your need. But in any case it is important to improve visibility of windows by using this capability of screen.
Dr. Nikolai Bezroukov
|
|
Switchboard | ||||
| Latest | |||||
| Past week | |||||
| Past month | |||||
| 2011-2020 | 2001-2010 |
Apr 29, 2021 | opensource.com
Using GNU Screen
GNU Screen's basic usage is simple. Launch it with the
screencommand, and you're placed into the zeroeth window in a Screen session. You may hardly notice anything's changed until you decide you need a new prompt.When one terminal window is occupied with an activity (for instance, you've launched a text editor like Vim or Jove , or you're processing video or audio, or running a batch job), you can just open a new one. To open a new window, press Ctrl+A , release, and then press c . This creates a new window on top of your existing window.
You'll know you're in a new window because your terminal appears to be clear of anything aside from its default prompt. Your other terminal still exists, of course; it's just hiding behind the new one. To traverse through your open windows, press Ctrl+A , release, and then n for next or p for previous . With just two windows open, n and p functionally do the same thing, but you can always open more windows ( Ctrl+A then c ) and walk through them.
Split screenGNU Screen's default behavior is more like a mobile device screen than a desktop: you can only see one window at a time. If you're using GNU Screen because you love to multitask, being able to focus on only one window may seem like a step backward. Luckily, GNU Screen lets you split your terminal into windows within windows.
To create a horizontal split, press Ctrl+A and then s . This places one window above another, just like window panes. The split space is, however, left unpurposed until you tell it what to display. So after creating a split, you can move into the split pane with Ctrl+A and then Tab . Once there, use Ctrl+A then n to navigate through all your available windows until the content you want to be displayed is in the split pane.
You can also create vertical splits with Ctrl+A then | (that's a pipe character, or the Shift option of the \ key on most keyboards).
Mar 04, 2021 | www.redhat.com
Rather than trying to limit yourself to just one session or remembering what is running on which screen, you can set a name for the session by using the
-Sargument:[root@rhel7dev ~]# screen -S "db upgrade" [detached from 25778.db upgrade] [root@rhel7dev ~]# screen -ls There are screens on: 25778.db upgrade (Detached) 25706.pts-0.rhel7dev (Detached) 25693.pts-0.rhel7dev (Detached) 25665.pts-0.rhel7dev (Detached) 4 Sockets in /var/run/screen/S-root. [root@rhel7dev ~]# screen -x "db upgrade" [detached from 25778.db upgrade] [root@rhel7dev ~]#To exit a screen session, you can type
exitor hit Ctrl+A and then D .Now that you know how to start, stop, and label
Imagescreensessions let's get a little more in-depth. To split your screen session in half vertically hit Ctrl+A and then the | key ( Shift+Backslash ). At this point, you'll have your screen session with the prompt on the left:To switch to your screen on the right, hit Ctrl+A and then the Tab key. Your cursor is now in the right session, but there's no prompt. To get a prompt hit Ctrl+A and then C . I can do this multiple times to get multiple vertical splits to the screen:
ImageYou can now toggle back and forth between the two screen panes by using Ctrl+A+Tab .
What happens when you
catout a file that's larger than your console can display and so some content scrolls past? To scroll back in the buffer, hit Ctrl+A and then Esc . You'll now be able to use the cursor keys to move around the screen and go back in the buffer.There are other options for
Imagescreen, so to see them, hit Ctrl , then A , then the question mark :[ Free online course: Red Hat Enterprise Linux technical overview . ]
Further reading can be found in the man page for
screen. This article is a quick introduction to using thescreencommand so that a disconnected remote session does not end up killing a process accidentally. Another program that is similar toscreenistmuxand you can read abouttmuxin this article .
May 13, 2011 | blog.urfix.com
Screen or as I like to refer to it "Admin's little helper"
Screen is a window manager that multiplexes a physical terminal between several processeshere are a couple quick reasons you'd might use screen
Lets say you have a unreliable internet connection you can use screen and if you get knocked out from your current session you can always connect back to your session.
Or let's say you need more terminals, instead of opening a new terminal or a new tab just create a new terminal inside of screen
Here are the screen shortcuts to help you on your way Screen shortcuts
and here are some of the Top 10 Awesome Linux Screen tips urfix.com uses all the time if not daily.
1) Attach screen over sshssh -t remote_host screen -rDirectly attach a remote screen session (saves a useless parent bash process)
2) Share a terminal screen with others% screen -r someuser/3) Triple monitoring in screentmpfile=$(mktemp) && echo -e 'startup_message off\nscreen -t top htop\nsplit\nfocus\nscreen -t nethogs nethogs wlan0\nsplit\nfocus\nscreen -t iotop iotop' > $tmpfile && sudo screen -c $tmpfileThis command starts screen with 'htop', 'nethogs' and 'iotop' in split-screen. You have to have these three commands (of course) and specify the interface for nethogs – mine is wlan0, I could have acquired the interface from the default route extending the command but this way is simpler.
htop is a wonderful top replacement with many interactive commands and configuration options. nethogs is a program which tells which processes are using the most bandwidth. iotop tells which processes are using the most I/O.
The command creates a temporary "screenrc" file which it uses for doing the triple-monitoring. You can see several examples of screenrc files here: http://www.softpanorama.org/Utilities/Screen/screenrc_examples.shtml
4) Share a 'screen'-sessionscreen -xAter person A starts his screen-session with `screen`, person B can attach to the srceen of person A with `screen -x`. Good to know, if you need or give support from/to others.
5) Start screen in detached modescreen -d -m [<command>]Start screen in detached mode, i.e., already running on background. The command is optional, but what is the purpose on start a blank screen process that way?
6) Resume a detached screen session, resizing to fit the current terminal
It's useful when invoking from a script (I manage to run many wget downloads in parallel, for example).screen -raAd.By default, screen tries to restore its old window sizes when attaching to resizable terminals. This command is the command-line equivalent to typing ^A F to fit an open screen session to the window
7) use screen as a terminal emulator to connect to serial consolesscreen /dev/tty<device> 9600Use GNU/screen as a terminal emulator for anything serial console related.
screen /dev/tty
eg.
screen /dev/ttyS0 9600
8) ssh and attach to a screen in one line.ssh -t user@host screen -x <screen name>If you know the benefits of screen, then this might come in handy for you. Instead of ssh'ing into a machine and then running a screen command, this can all be done on one line instead. Just have the person on the machine your ssh'ing into run something like
9) connect to all screen instances running
screen -S debug
Then you would run
ssh -t user@host screen -x debug
and be attached to the same screen session.screen -ls | grep pts | gawk '{ split($1, x, "."); print x[1] }' | while read i; do gnome-terminal -e screen\ -dx\ $i; doneconnects to all the screen instances running.
10) Quick enter into a single screen sessionalias screenr='screen -r $(screen -ls | egrep -o -e '[0-9]+' | head -n 1)'There you have 'em folks the top 10 screen commands. enjoy!
Jan 01, 2013 | askubuntu.com
Reattaching to an existing screen session Ask Question Asked 6 years, 6 months ago Active 1 year, 3 months ago Viewed 262k times
JohnMerlino , 2013-06-01 01:39:54
I have a program running under screen. In fact, when I detach from the session and check netstat, I can see the program is still running (which is what I want):udp 0 0 127.0.0.1:1720 0.0.0.0:* 3759/rubyNow I want to reattach to the session running that process. So I start up a new terminal, and type screen -r
$ screen -r
There are several suitable screens on:
    5169.pts-2.teamviggy    (05/31/2013 09:30:28 PM)    (Detached)
    4872.pts-2.teamviggy    (05/31/2013 09:25:30 PM)    (Detached)
    4572.pts-2.teamviggy    (05/31/2013 09:07:17 PM)    (Detached)
    4073.pts-2.teamviggy    (05/31/2013 08:50:54 PM)    (Detached)
    3600.pts-2.teamviggy    (05/31/2013 08:40:14 PM)    (Detached)
Type "screen [-d] -r [pid.]tty.host" to resume one of them.
But how do I know which one is the session running that process I created?
Now one of the documents I came across said:
"When you're using a window, type C-a A to give it a name. This name will be used in the window listing, and will help you remember what you're doing in each window when you start using a lot of windows."
The thing is when I am in a new screen session, I try to press control+a A and nothing happens.
Paul ,
There are two levels of "listings" involved here. First, you have the "window listing" within an individual session, which is what ctrl-A A is for, and second there is a "session listing" which is what you have pasted in your question and what can also be viewed withscreen -ls.You can customize the session names with the
-Sparameter, otherwise it uses your hostname (teamviggy), for example:$ screen(ctrl-A d to detach)
$ screen -S myprogramrunningunderscreen(ctrl-A d to detach)
$ screen -ls

There are screens on:
    4964.myprogramrunningunderscreen    (05/31/2013 09:42:29 PM)    (Detached)
    4874.pts-1.creeper  (05/31/2013 09:39:12 PM)    (Detached)
2 Sockets in /var/run/screen/S-paul.
As a bonus, you can use an unambiguous abbreviation of the name you pass to
-Slater to reconnect:screen -r myprog(I am reconnected to the
myprogramrunningunderscreensession)njcwotx ,
I had a case wherescreen -rfailed to reattach. Adding the-dflag so it looked like thisscreen -d -rworked for me. It detached the previous screen and allowed me to reattach. See the Man Page for more information.
Dr K ,
An easy way is to simply reconnect to an arbitrary screen withscreen -rThen once you are running screen, you can get a list of all active screens by hitting
Ctrl-A "(i.e. control-A followed by a double quote). Then you can just select the active screens one at a time and see what they are running. Naming the screens will, of course, make it easier to identify the right one.Just my two cents
Lefty G Balogh ,
I tend to use the following combo where I need to work on several machines in several clusters:screen -S clusterXThis creates the new screen session where I can build up the environment.
screen -dRR clusterXThis is what I use subsequently to reattach to that screen session. The nifty bits are that if the session is attached elsewhere, it detaches that other display. Moreover, if there is no session for some quirky reason, like someone rebooted my server without me knowing, it creates one. Finally. if multiple sessions exist, it uses the first one.
Much kudos to https://support.dvsus.com/hc/en-us/articles/212925186-Linux-GNU-Screen-instructions for this tip a while back.
EDIT:
Also here's few useful explanations from
man screenon cryptic parameters-d -r Reattach a session and if necessary detach it first. -d -R Reattach a session and if necessary detach or even create it first. -d -RR Reattach a session and if necessary detach or create it. Use the first session if more than one session is available. -D -r Reattach a session. If necessary detach and logout remotely first.there is more with
-Dso be sure to checkman screentilnam , 2018-03-14 17:12:06
The output ofscreen -listis formatted likepid.tty.host. The pids can be used to get the first child process withpstree:screen -list|cut -f1 -d'.'|cut -f2|xargs -n 1 pstree -p|grep "^screen"You will get a list like this
screen(5169)---zsh(5170)---less(15268)
screen(4872)---zsh(4873)-+-cat(11364)
...
> ,
screen -d -r 4964or
screen -d -r 4874
$ screen -ls
There are screens on:
4964.myprogramrunningunderscreen    (05/31/2013 09:42:29 PM)    (Detached)
4874.pts-1.creeper  (05/31/2013 09:39:12 PM)    (Detached)
2 Sockets in /var/run/screen/S-paul.
Jun 10, 2019 | www.ostechnix.com

Screen Command Examples To Manage Multiple Terminal Sessions
- Command line utilities / FAQ / Linux / Linux Admnistration / Linux Basics / Linux Commands / Tips and Tricks / Unix/Linux Beginners / Utilities
by sk · Published June 6, 2019 · Updated June 7, 2019
GNU Screen is a terminal multiplexer (window manager). As the name says, Screen multiplexes the physical terminal between multiple interactive shells, so we can perform different tasks in each terminal session. All screen sessions run their programs completely independent. So, a program or process running inside a screen session will keep running even if the session is accidentally closed or disconnected. For instance, when upgrading Ubuntu server via SSH, Screen command will keep running the upgrade process just in case your SSH session is terminated for any reason.
The GNU Screen allows us to easily create multiple screen sessions, switch between different sessions, copy text between sessions, attach or detach from a session at any time and so on. It is one of the important command line tool every Linux admins should learn and use wherever necessary. In this brief guide, we will see the basic usage of Screen command with examples in Linux.
Installing GNU ScreenGNU Screen is available in the default repositories of most Linux operating systems.
To install GNU Screen on Arch Linux, run:
$ sudo pacman -S screenOn Debian, Ubuntu, Linux Mint:
$ sudo apt-get install screenOn Fedora:
$ sudo dnf install screenOn RHEL, CentOS:
$ sudo yum install screenOn SUSE/openSUSE:
$ sudo zypper install screenLet us go ahead and see some screen command examples.
Screen Command Examples To Manage Multiple Terminal SessionsThe default prefix shortcut to all commands in Screen is Ctrl+a . You need to use this shortcut a lot when using Screen. So, just remember this keyboard shortcut.
Create new Screen sessionLet us create a new Screen session and attach to it. To do so, type the following command in terminal:
screenNow, run any program or process inside this session. The running process or program will keep running even if you're disconnected from this session.
Detach from Screen sessionsTo detach from inside a screen session, press Ctrl+a and d . You don't have to press the both key combinations at the same time. First press Ctrl+a and then press d . After detaching from a session, you will see an output something like below.
[detached from 29149.pts-0.sk]Here, 29149 is the screen ID and pts-0.sk is the name of the screen session. You can attach, detach and kill Screen sessions using either screen ID or name of the respective session.
Create a named sessionYou can also create a screen session with any custom name of your choice other than the default username like below.
screen -S ostechnixThe above command will create a new screen session with name "xxxxx.ostechnix" and attach to it immediately. To detach from the current session, press Ctrl+a followed by d .
Naming screen sessions can be helpful when you want to find which processes are running on which sessions. For example, when a setup LAMP stack inside a session, you can simply name it like below.
screen -S lampstackCreate detached sessionsSometimes, you might want to create a session, but don't want to attach it automatically. In such cases, run the following command to create detached session named "senthil" :
screen -S senthil -d -mOr, shortly:
screen -dmS senthilThe above command will create a session called "senthil", but won't attach to it.
List Screen sessionsTo list all running sessions (attached or detached), run:
screen -lsSample output:
There are screens on:
	29700.senthil	(Detached)
	29415.ostechnix	(Detached)
	29149.pts-0.sk	(Detached)
3 Sockets in /run/screens/S-sk.
As you can see, I have three running sessions and all are detached.
Attach to Screen sessionsIf you want to attach to a session at any time, for example 29415.ostechnix , simply run:
screen -r 29415.ostechnixOr,
screen -r ostechnixOr, just use the screen ID:
screen -r 29415To verify if we are attached to the aforementioned session, simply list the open sessions and check.
screen -lsSample output:
There are screens on:
        29700.senthil   (Detached)
        29415.ostechnix (Attached)
        29149.pts-0.sk  (Detached)
3 Sockets in /run/screens/S-sk.
As you see in the above output, we are currently attached to 29415.ostechnix session. To exit from the current session, press ctrl+a, d.
Create nested sessionsWhen we run "screen" command, it will create a single session for us. We can, however, create nested sessions (a session inside a session).
First, create a new session or attach to an opened session. I am going to create a new session named "nested".
screen -S nestedNow, press Ctrl+a and c inside the session to create another session. Just repeat this to create any number of nested Screen sessions. Each session will be assigned with a number. The number will start from 0 .
You can move to the next session by pressing Ctrl+n and move to previous by pressing Ctrl+p .
Here is the list of important Keyboard shortcuts to manage nested sessions.
- Ctrl+a " – List all sessions
- Ctrl+a 0 – Switch to session number 0
- Ctrl+a n – Switch to next session
- Ctrl+a p – Switch to the previous session
- Ctrl+a S – Split current region horizontally into two regions
- Ctrl+a l – Split current region vertically into two regions
- Ctrl+a Q – Close all sessions except the current one
- Ctrl+a X – Close the current session
- Ctrl+a \ – Kill all sessions and terminate Screen
- Ctrl+a ? – Show keybindings. To quit this, press ENTER.
Lock sessionsScreen has an option to lock a screen session. To do so, press Ctrl+a and x . Enter your Linux password to lock the screen.
Screen used by sk <sk> on ubuntuserver.
Password:
Logging sessionsYou might want to log everything when you're in a Screen session. To do so, just press Ctrl+a and H .
Alternatively, you can enable the logging when starting a new session using -L parameter.
screen -LFrom now on, all activities you've done inside the session will recorded and stored in a file named screenlog.x in your $HOME directory. Here, x is a number.
You can view the contents of the log file using cat command or any text viewer applications.
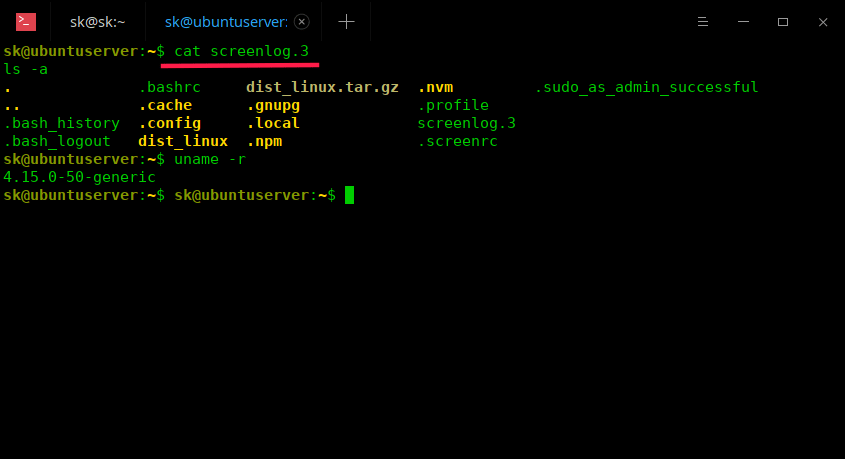
Log screen sessions
Suggested read:
Kill Screen sessionsIf a session is not required anymore, just kill it. To kill a detached session named "senthil":
screen -r senthil -X quitOr,
screen -X -S senthil quitOr,
screen -X -S 29415 quitIf there are no open sessions, you will see the following output:
$ screen -ls
No Sockets found in /run/screens/S-sk.
For more details, refer man pages.
$ man screenThere is also a similar command line utility named "Tmux" which does the same job as GNU Screen. To know more about it, refer the following guide.
Resource:
Nov 02, 2018 | www.rosehosting.com
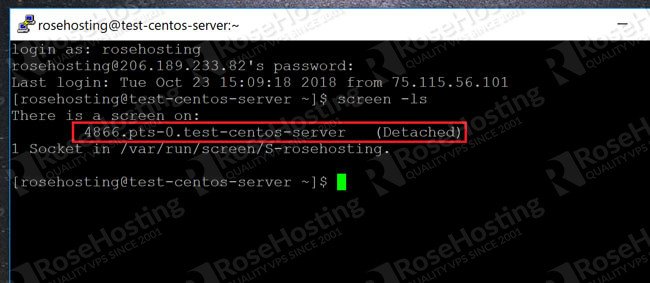
... I can get a list of all previous screens using the command:
screen -lsAnd this gives me the output as shown here:
As you can see, there is a screen session here with the name:
pts-0.test-centos-server
To reconnect to it, just type:
screen -rAnd this will take you back to where you were before the SSH connection was terminated! It's an amazing tool that you need to use for all important operations as insurance against accidental terminations.
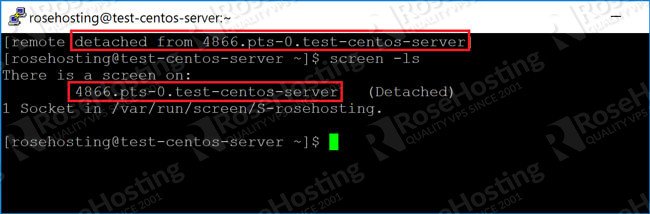
Manually Detaching ScreensWhen you break an SSH session, what actually happens is that the screen is automatically detached from it and exists independently. While this is great, you can also detach screens manually and have multiple screens existing at the same time.
For example, to detach a screen just type:
screen -dAnd the current screen will be detached and preserved. However, all the processes inside it are still running, and all the states are preserved:
You can re-attach to a screen at any time using the "screen -r" command. To connect to a specific screen instead of the most recent, use:
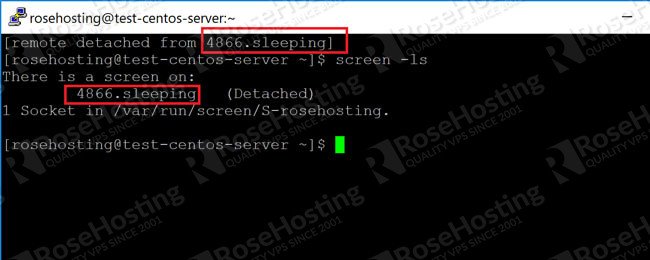
screen -r [screenname]Changing the Screen Names to Make Them More RelevantBy default, the screen names don't mean much. And when you have a bunch of them present, you won't know which screens contain which processes. Fortunately, renaming a screen is easy when inside one. Just type:
ctrl+a :
We saw in the previous article that "ctrl+a" is the trigger condition for screen commands. The colon (:) will take you to the bottom of the screen where you can type commands. To rename, use:
sessionname [newscreenname]As shown here:
And now when you detach the screen, it will show with the new name like this:
Now you can have as many screens as you want without getting confused about which one is which!
If you are one of our Managed VPS hosting clients, we can do all of this for you. Simply contact our system administrators and they will respond to your request as soon as possible.
If you liked this blog post on how to recover from an accidental SSH disconnection on Linux, please share it with your friends on social media networks, or if you have any question regarding this blog post, simply leave a comment below and we will answer it. Thanks!
Oct 16, 2018 | www.linux.com
Can I have a Copy of That?
Want a quick and dirty way to take notes of what's on your screen? Yep, there's a command for that. Run Ctrl-a h and screen will save a text file called "hardcopy.n" in your current directory that has all of the existing text. Want to get a quick snapshot of the top output on a system? Just run Ctrl-a h and there you go.
You can also save a log of what's going on in a window by using Ctrl-a H . This will create a file called screenlog.0 in the current directory. Note that it may have limited usefulness if you're doing something like editing a file in Vim, and the output can look pretty odd if you're doing much more than entering a few simple commands. To close a screenlog, use Ctrl-a H again.
Note if you want a quick glance at the system info, including hostname, system load, and system time, you can get that with Ctrl-a t .
Simplifying Screen with ByobuIf the screen commands seem a bit too arcane to memorize, don't worry. You can tap the power of GNU Screen in a slightly more user-friendly package called byobu . Basically, byobu is a souped-up screen profile originally developed for Ubuntu. Not using Ubuntu? No problem, you can find RPMs or a tarball with the profiles to install on other Linux distros or Unix systems that don't feature a native package.
Note that byobu doesn't actually do anything to screen itself. It's an elaborate (and pretty groovy) screen configuration customization. You could do something similar on your own by hacking your ~/.screenrc, but the byobu maintainers have already done it for you.
Since most of byobu is self-explanatory, I won't go into great detail about using it. You can launch byobu by running byobu . You'll see a shell prompt plus a few lines at the bottom of the screen with additional information about your system, such as the system CPUs, uptime, and system time. To get a quick help menu, hit F9 and then use the Help entry. Most of the commands you would use most frequently are assigned F keys as well. Creating a new window is F2, cycling between windows is F3 and F4, and detaching from a session is F6. To re-title a window use F8, and if you want to lock the screen use F12.
The only downside to byobu is that it's not going to be on all systems, and in a pinch it may help to know your way around plain-vanilla screen rather than byobu.
For an easy reference, here's a list of the most common screen commands that you'll want to know. This isn't exhaustive, but it should be enough for most users to get started using screen happily for most use cases.
- Start Screen: screen
- Detatch Screen: Ctrl-a d
- Re-attach Screen: screen -x or screen -x PID
- Split Horizontally: Ctrl-a S
- Split Vertically: Ctrl-a |
- Move Between Windows: Ctrl-a Tab
- Name Session: Ctrl-a A
- Log Session: Ctrl-a H
- Note Session: Ctrl-a h
Finally, if you want help on GNU Screen, use the man page (man screen) and its built-in help with Ctrl-a :help. Screen has quite a few advanced options that are beyond an introductory tutorial, so be sure to check out the man page when you have the basics down.
Oct 16, 2018 | linuxize.com
Working with Linux Screen Windows
When you start a new screen session by default it creates a single window with a shell in it.
You can have multiple windows inside a Screen session.
To create a new window with shell type
Ctrl+ac, the first available number from the range0...9will be assigned to it.Bellow are some most common commands for managing Linux Screen Windows:
Ctrl+acCreate a new window (with shell)Ctrl+a"List all windowCtrl+a0Switch to window 0 (by number )Ctrl+aARename the current windowCtrl+aSSplit current region horizontally into two regionsCtrl+a|Split current region vertically into two regionsCtrl+atabSwitch the input focus to the next regionCtrl+aCtrl+aToggle between current and previous regionCtrl+aQClose all regions but the current oneCtrl+aXClose the current regionDetach from Linux Screen Session
You can detach from the screen session at anytime by typing:
Ctrl+adThe program running in the screen session will continue to run after you detach from the session.
To resume your screen session use the following command:
screen -rCopyIn case you have multiple screen sessions running on you machine you will need to append the screen session ID after the
rswitch.To find the session ID list the current running screen sessions with:
screen -lsCopyThere are screens on: 10835.pts-0.linuxize-desktop (Detached) 10366.pts-0.linuxize-desktop (Detached) 2 Sockets in /run/screens/S-linuxize.CopyIf you want to restore screen 10835.pts-0, then type the following command:
screen -r 10835CopyWhen screen is started it reads its configuration parameters from
/etc/screenrcand~/.screenrcif the file is present. We can modify the default Screen settings according to our own preferences using the.screenrcfile.Here is a sample
~/.screenrc~/.screenrcconfiguration with customized status line and few additional options:# Turn off the welcome message startup_message off # Disable visual bell vbell off # Set scrollback buffer to 10000 defscrollback 10000 # Customize the status line hardstatus alwayslastline hardstatus string '%{= kG}[ %{G}%H %{g}][%= %{= kw}%?%-Lw%?%{r}(%{W}%n*%f%t%?(%u)%?%{r})%{w}%?%+
February 23, 2012 | sanctum.geek.nz
Using 256 colours in terminals is well-supported in GNU/Linux distributions these days, and also in Windows terminal emulators like PuTTY. Using 256 colours is great for Vim colorschemes in particular, but also very useful for Tmux colouring or any other terminal application where a slightly wider colour space might be valuable. Be warned that once you get this going reliably, there's no going back if you spend a lot of time in the terminal. Xterm
To set this up for
xtermor emulators that usextermas the default value for$TERM, such asxfce4-terminalorgnome-terminal, it generally suffices to check the options for your terminal emulator to ensure that it will allow 256 colors, and then use the TERM stringxterm-256colorfor it.An earlier version of this post suggested changing the
TERMdefinition in.bashrc, which is generally not a good idea, even if bounded with conditionals as my example was. You should always set the terminal string in the emulator itself if possible, if you do it at all.Be aware that older systems may not have
Tmuxterminfodefinitions for this terminal, but you can always copy them in using a private.terminfodirectory if need be.To use 256 colours in Tmux, you should set the default terminal in
.tmux.confto bescreen-256color:set -g default-terminal "screen-256color"This will allow you to use color definitions like
GNU Screencolour231in your status lines and other configurations. Again, this particularterminfodefinition may not be present on older systems, so you should copy it into~/.terminfo/s/screen-256coloron those systems if you want to use it everywhere.Similarly, to use 256 colours in GNU Screen, add the following to your
.screenrc:term screen-256colorVimWith the applicable options from the above set, you should not need to change anything in Vim to be able to use 256-color colorschemes. If you're wanting to write or update your own 256-colour compatible scheme, it should either begin with
set t_Co=256, or more elegantly, check the value of the corresponding option value is&t_Cois 256 before trying to use any of the extra colour set.The Vim Tips Wiki contains a detailed reference of the colour codes for schemes in 256-color terminals.
Feb 14, 2017 | www.linuxized.com
ed says: June 16, 2010 at 15:15
screen is really cool, and does somethings that I've yet to find counterparts to with tmux, such as the -x option:
October 6th, 2009
Screen is awesome. Once you become comfortable navigating around it, you start using it ALL the time. No more dropped sessions, no having 10 Putty windows open at the same time, no more nohup.
However, with default screen settings I've always felt a bit lost and out of place, mostly because there was no "taskbar" with a bird's eye view of all windows. Pressing ctrl-a, " really does get annoying fast (that's the command that brings up the window selector – screenshot below).
image
So instead I modded my screen to have a "taskbar" which sits at the bottom of screen and adds:
- the name of each window
- a clear marking of window states, such as ◦the currently active window (* and different background)
- last used window (-)
- if you're sharing the current window with someone else (&)
- the current incoming/outgoing bandwidth in bytes/sec, updating every 5 seconds
- the current time
... ... ...
hardstatus alwayslastline "%{bw}[%H] [%?%-Lw%?%{wb}%n*%f %t%{bw}%?%+Lw%?]%=%{bw} [%1`] [%c:%s] [%l]" # modified from http://lists.gnu.org/archive/html/screen-users/2007-08/msg00008.html
# Set the scrollback length:
defscrollback 10000# Select whether you want to see the copyright notice during startup:
startup_message off
start a new screen session with session name screen -S <name>list running sessions/screens screen -lsattach to a running session screen -x… to session with name screen -r <name>the "ultimate attach" screen -dRR(Attaches to a screen session. If the session is attached elsewhere, detaches that other display. If no session exists, creates one. If multiple sessions exist, uses the first one.)
detach a running session screen -d <name>All screen commands are prefixed by an escape key, by default
C-a(that's Control-a, sometimes written^a). To send a literalC-ato the programs in screen, useC-a a. This is useful when when working with screen within screen. For exampleC-a a nwill move screen to a new window on the screen within screen.
detach C-a ddetach and logout (quick exit) C-a D Dexit screen C-a \Exit all of the programs in screen.force-exit screen C-a C-\(not recommended)
See help C-a ?(lists keybindings)The man page is the complete reference, but it's very long.
create new window C-a cchange to last-visited active window C-a C-a(commonly used to flip-flop between two windows)change to window by number C-a <number>(only for windows 0 to 9)change to window by number or name C-a ' <number or title>change to next window in list C-a norC-a <space>change to previous window in list C-a porC-a <backspace>see window list C-a "(allows you to select a window to change to)show window bar C-a w(if you don't have window bar)close current window Close all applications in the current window (including shell) kill current window C-a k(not recommended)kill all windows C-a \(not recommended)rename current window C-a A
split display horizontally C-a Ssplit display vertically C-a | or C-a V (for the vanilla vertical screen patch)jump to next display region C-a tabremove current region C-a Xremove all regions but the current one C-a Q
send a command to a named session screen -S <name> -X <command>create a new window and run ping example.com screen -S <name> -X screen ping example.comstuff characters into the input buffer
using bash to expand a newline character
(from here)a full example
redraw window C-a C-lenter copy mode C-a [orC-a <esc>(also used for viewing scrollback buffer)paste C-a ]monitor window for activity C-a Mmonitor window for silence C-a _enter digraph (for producing non-ASCII characters) C-a C-vlock (password protect) display C-a xenter screen command C-a :enable logging in the screen session C-a H
Vertical split is now provided.
After six years since the last release and 27 years of existence of the project, a new release of GNU screen was presented by Amadeusz Sławiński, the new maintainer of the project, who was selected at the beginning of April.
He was previously was responsible for the support of a branch of screen on GitHub, which, compared to the official line contained 300 patches and enhancements.
Now all these changes are transferred back to to the main project and will be available in screen 5.
Release 4.2 was chosen as the 4.1 branch has already been created at the time of the merger. By its composition, the branch 4.2 similar 4.1. Packages with a new release is already available for users of Arch Linux and Debian Unstable (coming soon in Debian Testing).
the new version introduces support for layouts, added Association of funts installed the Windows, improved mouse support. Vertical split is now also provided. It also supports 256-color terminal, the ability to have multiple stories input, auto-completion of commands by pressing the tab key, initial support connection scripts-handlers, new commands (layout, group, unbindall, rendition, mousetrack).
As some of the changes affect compatibility with previous version (for example interaction with the back-end process rather than named pipes now uses sockets), soall sessions should be closed before performing the update.
Version 5, which is in words will contain substantial clean up of the code base. Some innovations developed prepared outside the official branch might be included too, such as 256-color status bar, support of full-color palettes, and placement of banner at the top line and the possibility of moving status bar in the upper part.
From: Amadeusz Sławiński Subject: [screen-devel] GNU Screen v.4.2.0 Date: Thu, 17 Apr 2014 00:53:22 +0200 Hello everyone, it is my pleasure to announce release of GNU Screen v.4.2.0 available at http://download.savannah.gnu.org/releases/screen/ (I will also upload to ftp.gnu.org as soon as my access is authorized) Many are probably using it due to their distributions packaging development versions, so they know at least some of changes. Short list of them: * layouts * window groups * better mouse support * vertical split * new and expanded commands For full list of changes please check Changelog. Please note that due to some changes it may be not possible to attach to sessions created with older binaries. With this I also plan to put v.4 into maintenance mode and start developing v.5 with cleaned up source code, new features (some already in development tree, currently outside of official repository): * 256 color hardstatus * truecolor * firstline hardstatus * top line caption and more Amadeusz SlawinskiRe: [screen-devel] GNU Screen v.4.2.0
From: Axel Beckert Subject: Re: [screen-devel] GNU Screen v.4.2.0 Date: Thu, 17 Apr 2014 09:10:41 +0200 User-agent: Mutt/1.5.20 (2009-06-14)
Hi Amadeusz,

On Thu, Apr 17, 2014 at 12:53:22AM +0200, Amadeusz Sławiński wrote:
> it is my pleasure to announce release of GNU Screen v.4.2.0

Not a bad idea to _not_ call this 4.1.0 -- a version number floating
around with -dev suffixes in quite many distros. :-)

Good to see that you got commit access, etc.

> Please note that due to some changes it may be not possible to attach
> to sessions created with older binaries.

There's a patch for that at
http://patch-tracker.debian.org/patch/series/view/screen/4.1.0~20120320gitdb59704-9/60-644788-screen-4.1.0-4.0.3-interoperability.patch

Feel free to include it in 4.2.1. (Not tried if it still applies, but
I will try soon. :-)

P.S.: I recently got one report that someone uses Screen's Zmodem
support for some embedded board (Soekris) maintenance. No further
details though as I didn't get that first hand.

                Kind regards, Axel
Re: [screen-devel] GNU Screen v.4.2.0
From: Jürgen Weigert Subject: Re: [screen-devel] GNU Screen v.4.2.0 Date: Thu, 17 Apr 2014 15:44:05 +0200
config.h.in is generated when you run autogen.sh
Several other autogenerated files are also no longer included. Which is a good thing for maintenance, as they can no longer go out of sync.
I patched the specfile to run autogen.sh and make depend. The later is a horrible hack. It patches the Makefile, and would fail if the osdef.h and comm.h are not yet generated.
On Thu, Apr 17, 2014 at 2:22 PM, Jeroen Roovers <address@hidden> wrote:
On Thu, 17 Apr 2014 00:53:22 +0200
Amadeusz Sławiński <address@hidden> wrote:> it is my pleasure to announce release of GNU Screen v.4.2.0
Very nice.
> available at http://download.savannah.gnu.org/releases/screen/
> (I will also upload to ftp.gnu.org as soon as my access is authorized)
config.h.in is missing from the tarball.
Re: [screen-devel] GNU Screen v.4.2.0
From: Jürgen Weigert Subject: Re: [screen-devel] GNU Screen v.4.2.0 Date: Thu, 17 Apr 2014 15:52:37 +0200
Amadeusz et all:
At opensuse, we have a wagonload of patches, that I'd like to offer for your review and merge into upstream.
See attached.* added msg_version_3.patch (ouch, incompatible protocol, to be upstreamed asap)
* keep screen-man-loginshell.diff (to be upstreamed)
* keep term_too_long.diff (savannah#30880, to be upstreamed)
* keep use_locale.diff (from address@hidden 2012, check?)
* keep screen-4.0.3-ipv6.patch (builtin telnet, to be upstreamed)
* keep screen_enhance_windows_list.patch (to be upstreamed)
* keep screen-poll-zombies.patch (to be upstreamed)
* keep xX_string_escape.patch (renamed from show_all_active.patch, to be upstreamed)
* keep sort_command.patch (from trenn 2011, to be upstreamed)
* keep libtinfo.diff (from coolo 2011, why exactly?)
* keep global_screenrc.patch (renamed from screen-4.0.2.dif)
CCed Thomas, Michael: submit requests 230477 and 230482
sent to Factory and 13.1:Update
Re: [screen-devel] GNU Screen v.4.2.0
From: Amadeusz Sławiński
Subject: Re: [screen-devel] GNU Screen v.4.2.0
Date: Fri, 18 Apr 2014 18:54:03 +0200On Thu, 17 Apr 2014 15:52:37 +0200
Jürgen Weigert <address@hidden> wrote:> Amadeusz et all:
> At opensuse, we have a wagonload of patches, that I'd like to offer
> for your review and merge into upstream.If anyone else has any patches, please share ;)
>
> * added msg_version_3.patch (ouch, incompatible protocol, to be
> upstreamed asap)on screen-v4 branch
> * keep screen-man-loginshell.diff (to be upstreamed)
> * keep term_too_long.diff (savannah#30880, to be upstreamed)I used a bit different version based on what I found in manpages
http://git.savannah.gnu.org/cgit/screen.git/commit/?h=screen-v4&id=44020241d033555e8e90fad3c88617dce1aed0bb> * keep use_locale.diff (from address@hidden 2012, check?)
> * keep screen-4.0.3-ipv6.patch (builtin telnet, to be upstreamed)
> * keep screen_enhance_windows_list.patch (to be upstreamed)
> * keep screen-poll-zombies.patch (to be upstreamed)
> * keep xX_string_escape.patch (renamed from show_all_active.patch,
> to be upstreamed)
> * keep sort_command.patch (from trenn 2011, to be upstreamed)
> * keep libtinfo.diff (from coolo 2011, why exactly?)For this I used patch from gentoo, as it seems to provide better
checks, it checks for alternative libraries to use instead of curses one> * keep global_screenrc.patch (renamed from screen-4.0.2.dif)
With regards to rest of the patches, I would like to merge them when I
start merging my tree (some of them are already in there).Amadeusz
Re: [screen-devel] GNU Screen v.4.2.0
From: Axel Beckert Subject: Re: [screen-devel] GNU Screen v.4.2.0 Date: Fri, 18 Apr 2014 22:38:54 +0200 User-agent: Mutt/1.5.20 (2009-06-14)
Hi,

On Fri, Apr 18, 2014 at 06:54:03PM +0200, Amadeusz Sławiński wrote:
> On Thu, 17 Apr 2014 15:52:37 +0200
> > At opensuse, we have a wagonload of patches, that I'd like to offer
> > for your review and merge into upstream.

Same counts for Debian as mentioned before. :-)

> If anyone else has any patches, please share ;)

The patches I used against 4.2.0 for the Debian package (available in
Debian Experimental for now) should be available for easy reviewing at
http://patch-tracker.debian.org/package/screen/4.2.0-1 but Debian's
patch tracker seems down for the moment. :-(

A less comfortable variant is at
http://anonscm.debian.org/gitweb/?p=collab-maint/screen.git;a=tree;f=debian/patches

Most of the patches should be suitable for upstream inclusion.

Solely those which change the size of some string lengths (user name,
$TERM, etc.) may cause issues as they may change the internal protocol
between client and server processs as far as I understood it.

The patch 80EXP_session_creation_time.patch should be regarded as
feature as it changes default behaviour. It sorts "screen -ls" output
by creation time and also affects "screen -rr" and friends -- IIRC it
makes them more deterministic. Maybe something for the development
branch and the 5.x releases.

                Kind regards, Axel
Re: [screen-devel] GNU Screen v.4.2.0
From: Amadeusz Sławiński Subject: Re: [screen-devel] GNU Screen v.4.2.0 Date: Fri, 25 Apr 2014 15:09:30 +0200
> A less comfortable variant is at
> http://anonscm.debian.org/gitweb/?p=collab-maint/screen.git;a=tree;f=debian/patches
>
> Most of the patches should be suitable for upstream inclusion.
>
> Solely those which change the size of some string lengths (user name,
> $TERM, etc.) may cause issues as they may change the internal protocol
> between client and server processs as far as I understood it.
>
> The patch 80EXP_session_creation_time.patch should be regarded as
> feature as it changes default behaviour. It sorts "screen -ls" output
> by creation time and also affects "screen -rr" and friends -- IIRC it
> makes them more deterministic. Maybe something for the development
> branch and the 5.x releases.
>
>               Kind regards, Axel

Hey,

I've went through debian patches and I've applied most of them.
Here are the ones I've not applied with comments.

11replace_doc_paths.patch - seems debian specific

13split_info_files.patch - also debian specific?

26source_encoding.patch - cosmetic change for source code

45suppress_remap.patch - I've checked the logs and it seems like there
was already a revert of revert... are you sure it doesn't break
anything?

47screen-cc.patch - I will first check patches from Fedora, instead of
monolithic one ;)

48screen-ipv6.patch - it's a feature -> v5

49long-usernames.patch - already fixed

50increase-max-TERM-length.patch - already fixed

58-show-encoding-hardstatus.patch - feature -> v5

60-644788-screen-4.1.0-4.0.3-interoperability.patch - still not sure
about this one

80EXP_session_creation_time.patch - not applied -> v5

Amadeusz
October 5, 2007 Red Hat Magazine
Sharing a session with others
Another great application of Screen is to allow other people to login to your station and to watch the work you are doing. It is a great way to teach someone how to do things on the shell.
Setup to allow screen to be shared
- As root:
chmod u+s /usr/bin/screen(Screen has to be SUID if you want to share a term between two users.)
Note: SUID allows an executable to be run by the owner of that file, instead of with the user's own permission. There are some security concerns when doing this, so use this tip at your own discretion.chmod 755 /var/run/screen- Log out of root, and run Screen as the user who is going to share the session:
screen- Press Ctrl+a, then type :multiuser on and press Enter.
- Press Ctrl+a, then type :acladd steve ("steve" is the username of the person who will connect to your screen session).
Connecting to the shared screen:
- SSH into the workstation that you are going to watch the screen session on.
- On your terminal type: screen -x anderson/ ("anderson" is the username of the person who is sharing the screen session. You need the / at the end.).
And now both users (from the host and guest) will be sharing a screen session and can run commands on the terminal.
Working from multiple locations
Let's say you have a screen session open at work with X number of windows on it. Within those screens you may be running an IRC client, an SSH connection to the web server, and your favorite text-based email client. It's 5 p.m. and you have to go home, but you still have work left to do.
Without Screen you would probably go home, VPN into your company's network, and fire up all the shells you need to keep working from home. With Screen, life gets a little easier.
You can simply SSH into your workstation at work and list your available screen sessions with the command:
screen -lsAnd connect to the sessions you were running at work with the command:
screen -x screen_session_nameThis way screen will let you pick things up exactly from where you left off.
Applications to make Screen your window manager
Now that you have seen what Screen can do for you, you probably are wondering how to make it your main interaction point, like a terminal window manager.
Let's start with IRC, a very common and popular chat system. Instead of using a graphical client like Pidgin, install Irssi. Irssi sports a slick console interface, tons of add-ons and scripts, and can be enhanced with Perl. It's even theme-able!
Another important part of any user's setup is email. Today most people use graphical clients such as Thunderbird, Evolution, or Sylpheed. My favorite client happens to run in a terminal: Mutt. While Mutt isn't the easiest client in the world to set up, it sure is a joy to use. You can even use your favorite console text editor for doing emails.
Speaking of favorite text editors, there is a good chance that you work on some code projects or configurations. Instead of using gedit/kedit or powering up a heavy IDE such as Eclipse, you can pick up on Vim. Vim is a powerful text editor which, as is stated on the Vim website, could be considered an entire IDE in itself and sports syntax coloring in over 200 programming languages. If Vim doesn't fit your style, there is always emacs, nano, or JOE.
Now all you need you need to do is edit your ~/.screenrc to meet your needs.
My ~/.screenrc looks like the following:
	1 hardstatus alwayslastline
	2 hardstatus string '%{= kG}[ %{G}%H %{g}][%= %{=
kw}%?%-Lw%?%{r}(%{W}%n*%f %t%?(%u)%?%{r})%{w}%?%+Lw%?%?%= %{g}][%{B}
%Y-%m-%d %{W}%c %{g}]'
	3
	4 # Default screens
	5 screen -t shell1	0
	6 screen -t shell2	1
	7 screen -t server	2 	sh me@myserver
	8 screen -t IRC	7	irssi
	9 screen -t Mail	8	mutt
Once you get used to the shortcuts in GNU screen, not only will your desktop become more organized (due to the lower number of open windows), but your efficiency as a developer or system administrator will increase not only at work but at your home office as well.
Richard :
Just like abeowitz, I'm wondering whether it is possible to use screen to send commands to multiple screens.
According the documentation this should be possible with the "at" command, but I don't get it to work.
So the command sequence:
C-a :at # date
Should result in a date executed on all windows (to my understanding, but the result I get is:
": at: at least two arguments required")OTOH according the TODO file at:
ftp://ftp.uni-erlangen.de/pub/utilities/screen/screen-4.0.3.tar.gz
states: "- type into several windows at once (for cluster admins)"
That file has been changed in august 2003 for the last time…Hopefully someone reading this article knows how to use the at command???
Hey Richard!:
With the 'at' command, you can send commands to other windows that have to be typed when you press C-a :
This changes the title of a window in a certain screen session:
screen -X at 1 title blublubluRichard:
A way to broadcast commands to all windows is the following:
^a:at \# stuff "ls12?Thanks goes to Michael, (one of the screen devs) who provided this information to me.The command above should read: double quote ls backslash zero twelve double quote. Somehow the parser removes the blackslash zero. One more try:
^a:at \# stuff "ls\\12″Rob Nichols:
This is a great intro. I've used screen for many years. (Just stopped to count. I think it's been a decade!) However, I'd never bothered with learning about the hardstatus line until this article. It's a nice addition. Thanks!
P.S. I think there are two mistakes in the example given. Again, this is my first foray in screen's string escapes, so I might be way off. I think "%{=kw}" should have a space, as "%{= kw}". Without this change on my system windows before the current are green instead of white. I also think there is an extra "%?" before the the closing "]" on the window list. This made no difference on my system. Here's a version with these changes.
hardstatus string '%{= kG}[ %{G}%H %{g}][%= %{= kw}%?%-Lw%?%{r}(%{W}%n*%f%t%?(%u)%?%{r})%{w}%?%+Lw%?%= %{g}][%{B}%Y-%m-%d %{W}%c %{g}]'John:
I've used Screen for more than a decade. For years now I've used it to keep open ssh sessions to various systems, doing things like tailing logs and such, and disconnecting then reconnecting when necessary. My latest session has been running upwards of 2 years, only ever bringing it down for critical patching. Sometimes I connect to the same session from multiple windows, displaying different screen "windows" for multiple views. I also use an always on statis as well.
The few modifications I've made are to increase the MAXWIN param to allow for more windows, and change the command key to ^w so I don't have to unlearn my emacs ^a habits.
John Pye:
One good use of Screen is when performing remote updates of systems using apt-get or yum. You can start the update going, then disconnect, then come back later and check that it finished OK. If your remote connection goes down, it doesn't mess everything up. Also, using the screen 'logging' function, you can keep a full history of the update, and check it for error messages that you might have missed.
Here's a list of all the commands we've covered:
- screen
- Run a new screen session
- screen -R
- Reattach to a previously detatched session
- Ctrl-a c
- Create a new window.
- Ctrl-a k
- Kill the current window - after confirmation
- Ctrl-a Ctrl-a
- Switch to the other window
- Ctrl-a S
- Split the current window in two.
- Ctrl-a TAB
- Move between split sections of the screen.
- Ctrl-a A
- Give the the current window a name.
- Ctrl-a "
- List all windows - move around to change the window with the arrow keys
[Feb 12, 2004] Curiosity is bliss Essential utility screen
Screen is a command line utility that comes with lots of Unix variants (including Linux). It is a bit hard to describe and to discover. It provides two main features: multiplexing a terminal and detaching/re-attaching sessions.
I originally got shown this by my "System programming" TA, when I asked him if I could disconnect X11 application from one terminal and have them re-open (in the same state) onto another terminal. It turns out this is possible for X11 applications (see xmove or xmx, proxy-based redirections, or guiEvict <via sweetcode>, described in this paper). But "screen" although limited to text applications is so useful that I dropped my search for its X11 equivalent.
Multiplexing: If you start a remote shell (say SSH) but want to do more than one thing at a time, you may want to open more sessions, but you can also use screen. It allows you to switch between multiple shells on the same connection.
You need to first run "screen", then use "Ctrl-A Ctrl-C" (control A, control C) to create a new shell, and you now can switch between shells with "Ctrl-A Ctrl-*" where * is the number for you shell (for ex, use "Ctrl-A Ctrl-1" to switch to shell 1).Session migration: Let's say you need to disconnect from that session, but you want to continue it from another computer. You can use "Ctrl-A Ctrl-D" to detach screen. All the shells will be maintained, and you can reconnect to the remote machine again and type "screen -R" to re-attach to the original session. This is also very useful in can the connection is lost by accident.
macosxhints.com - Use 'screen' as a serial terminal emulator
I often have to do router configuration via a console port, so I use a Keyspan Serial Adapter to get access. Two problems then present themselves:Solution: Use screen, Terminal, and a little AppleScripting.
- ZTerm is a horrible Mac OS X app. It hasn't been updated in five years or so, and isn't a Universal Binary. The developer doesn't seem in any hurry to rectify the situation. It is not worth the shareware fee in its current form.
- Minicom requires installation of Fink or MacPorts and is overly complex.
First, launch Script Editor and type/paste in the following code:
tell application "Terminal"
  do script with command "screen /dev/tty.KeySerial1"
  set number of rows of window 1 to 100
  set number of columns of window 1 to 80
  set background color of window 1 to "black"
  set normal text color of window 1 to "green"
  set custom title of window 1 to "SerialOut"
end tell
Compile and save as an app from within Script Editor, and you have a double-clickable application to launch a serial Terminal session. You may want to customize this slightly -- you can change the screen colors or number of columns or rows. You may also need to customize the screen command with a different device name if you are using something other than the Keyspan Serial Adapter (do an ls tty* of the /dev/ directory to get the right name).screen uses Control-A to take commands directed to it. So type Control-A followed by Control-\ to exit your screen session. If you fail to do this and exit a Terminal session, you'll leave the screen session alive and the serial resource unavailable until you kill the screen session manually. man screen will show you further commands to send to a screen session.
If anyone can reply with a link to a tutorial on how to wrap an interactive Unix App in Cocoa, that would be the next step -- it would be nice to do this without involving Terminal. If you prefer to use Minicom, you could still use the AppleScript to wrap it into a nice launchable app -- use this older hint to find the right command line commands.
Google matched content |
Etc
Solaris Packages
Solaris Package Archive -- GNU screen 3.9.4
GNU screen 3.9.4 provides you with an ANSI/vt100 terminal emulator, which can multiplex up to 10 pseudo-terminals. On startup, it executes $SHELL in window 0. Then it reads $HOME/.screenrc to learn configuration, keybindings, and possibly open more windows. GNU screen has the ability to detach from your virtual screens and re-attach at a later time.
Email To
Send bug reports or queries to [email protected].Upgrading Packages
When upgrading from an earlier GNU screen package, remember to pkgrm GNUscreen before you pkgadd the new version.Solaris Issues
Click here to read about 32 bit and 64 bit packages.Source Code
You can ftp the source code from ftp://ftp.gnu.org/pub/gnu/screen/screen-3.9.4.tar.gzSpecial Issues
You may need to configure your terminal definitiosn to get the most out of GNU screen. See the files in the /usr/local/share/screen directory for more information.See the main packages README for installation information.
Screen User's Manual - Table of Contents
Each window in a screen session emulates a VT100 terminal, with some extra functions added. The VT100 emulator is hardcoded; no other terminal types can be emulated.
Usually screen tries to emulate as much of the VT100/ANSI standard as possible. But if your terminal lacks certain capabilities, the emulation may not be complete. In these cases screen has to tell the applications that some of the features are missing. This is no problem on machines using termcap, because screen can use the $TERMCAP variable to customize the standard screen termcap.
But if you do a rlogin on another machine or your machine supports only terminfo this method fails. Because of this, screen offers a way to deal with these cases. Here is how it works:
When screen tries to figure out a terminal name for itself, it first looks for an entry named "screen.<term>", where <term> is the contents of your $TERM variable. If no such entry exists, screen tries "screen" (or "screen-w" if the terminal is wide (132 cols or more)). If even this entry cannot be found, "vt100" is used as a substitute.
The idea is that if you have a terminal which doesn't support an important feature (e.g. delete char or clear to EOS) you can build a new termcap/terminfo entry for screen (named "screen.<dumbterm>") in which this capability has been disabled. If this entry is installed on your machines you are able to do a rlogin and still keep the correct termcap/terminfo entry. The terminal name is put in the $TERM variable of all new windows. Screen also sets the $TERMCAP variable reflecting the capabilities of the virtual terminal emulated. Notice that, however, on machines using the terminfo database this variable has no effect. Furthermore, the variable $WINDOW is set to the window number of each window.
The actual set of capabilities supported by the virtual terminal depends on the
capabilities supported by the physical terminal. If, for instance, the physical
terminal does not support underscore mode, screen does not put the us
and ue capabilities into the window's $TERMCAP variable, accordingly.
However, a minimum number of capabilities must be supported by a terminal in order
to run screen; namely scrolling, clear screen, and direct cursor addressing (in
addition, screen does not run on hardcopy terminals or on terminals that overstrike).
Also, you can customize the $TERMCAP value used by screen by using the "termcap" .screenrc command, or by defining the variable $SCREENCAP prior to startup. When the is latter defined, its value will be copied verbatim into each window's $TERMCAP variable. This can either be the full terminal definition, or a filename where the terminal "screen" (and/or "screen-w") is defined.
Note that screen honors the "terminfo" .screenrc command if the system uses the terminfo database rather than termcap.
When the boolean 'G0' capability is present in the termcap entry for the terminal
on which screen has been called, the terminal emulation of screen supports multiple
character sets. This allows an application to make use of, for instance, the VT100
graphics character set or national character sets. The following control functions
from ISO
2022 are supported: lock shift G0 (SI), lock shift G1 (SO),
lock shift G2, lock shift G3, single shift G2, and single shift G3. When a virtual
terminal is created or reset, the
ASCII
character set is designated as G0 through G3. When the G0 capability
is present, screen evaluates the capabilities S0, E0,
and C0 if present. S0 is the sequence the terminal uses
to enable and start the graphics character set rather than SI.
E0 is the corresponding replacement for SO. C0
gives a character by character translation string that is used during semi-graphics
mode. This string is built like the acsc terminfo capability.
When the po and pf capabilities are present in the
terminal's termcap entry, applications running in a screen window can send output
to the printer port of the terminal. This allows a user to have an application in
one window sending output to a printer connected to the terminal, while all other
windows are still active (the printer port is enabled and disabled again for each
chunk of output). As a side-effect, programs running in different windows can send
output to the printer simultaneously. Data sent to the printer is not displayed
in the window. The info command displays a line starting 'PRIN' while the printer
is active.
Screen maintains a hardstatus line for every window. If a window gets selected,
the display's hardstatus will be updated to match the window's hardstatus line.
If the display has no hardstatus the line will be displayed as a standard screen
message. The hardstatus line can be changed with the ANSI Application Program Command
(APC): ESC_<string>ESC\. As a convenience for xterm users the
sequence ESC]0..2;<string>^G is also accepted.
Some capabilities are only put into the $TERMCAP variable of the virtual terminal
if they can be efficiently implemented by the physical terminal. For instance,
dl (delete line) is only put into the $TERMCAP variable if the terminal
supports either delete line itself or scrolling regions. Note that this may provoke
confusion, when the session is reattached on a different terminal, as the value
of $TERMCAP cannot be modified by parent processes.
The "alternate screen" capability is not enabled by default. Set the altscreen
.screenrc command to enable it.
The following is a list of control sequences recognized by screen. "(V)" and "(A)" indicate VT100-specific and ANSI- or ISO-specific functions, respectively.
ESC E |
Next Line | |||
ESC D |
Index | |||
ESC M |
Reverse Index | |||
ESC H |
Horizontal Tab Set | |||
ESC Z |
Send VT100 Identification String | |||
ESC 7 |
(V) | Save Cursor and Attributes | ||
ESC 8 |
(V) | Restore Cursor and Attributes | ||
ESC [s |
(A) | Save Cursor and Attributes | ||
ESC [u |
(A) | Restore Cursor and Attributes | ||
ESC c |
Reset to Initial State | |||
ESC g |
Visual Bell | |||
ESC Pn p |
Cursor Visibility (97801) | |||
Pn = |
6 | Invisible | ||
| 7 | Visible | |||
ESC = |
(V) | Application Keypad Mode | ||
ESC > |
(V) | Numeric Keypad Mode | ||
ESC # 8 |
(V) | Fill Screen with Es | ||
ESC \ |
(A) | String Terminator | ||
ESC ^ |
(A) | Privacy Message String (Message Line) | ||
ESC ! |
Global Message String (Message Line) | |||
ESC k |
A.k.a. Definition String | |||
ESC P |
(A) | Device Control String. Outputs a string directly to the host terminal without interpretation. | ||
ESC _ |
(A) | Application Program Command (Hardstatus) | ||
ESC ] 0 ; string ^G |
(A) | Operating System Command (Hardstatus, xterm title hack) | ||
ESC ] 83 ; cmd ^G |
(A) | Execute screen command. This only works if multi-user support is compiled
into screen. The pseudo-user ":window:" is used to check the access control
list. Use aclchg :window: -rwx #? to create a user with no
rights and allow only the needed commands. |
||
Control-N |
(A) | Lock Shift G1(SO) | ||
Control-O |
(A) | Lock Shift G0 (SI) | ||
ESC n |
(A) | Lock Shift G2 | ||
ESC o |
(A) | Lock Shift G3 | ||
ESC N |
(A) | Single Shift G2 | ||
ESC O |
(A) | Single Shift G3 | ||
ESC ( Pcs |
(A) | Designate character set as G0 | ||
ESC ) Pcs |
(A) | Designate character set as G1 | ||
ESC * Pcs |
(A) | Designate character set as G2 | ||
ESC + Pcs |
(A) | Designate character set as G3 | ||
ESC [ Pn ; Pn H |
Direct Cursor Addressing | |||
ESC [ Pn ; Pn f |
same as above | |||
ESC [ Pn J |
Erase in Display | |||
Pn = |
None or 0 | From Cursor to End of Screen | ||
| 1 | From Beginning of Screen to Cursor | |||
| 2 | Entire Screen | |||
ESC [ Pn K |
Erase in Line | |||
Pn = |
None or 0 | From Cursor to End of Line | ||
| 1 | From Beginning of Line to Cursor | |||
| 2 | Entire Line | |||
ESC [ Pn X |
Erase character | |||
ESC [ Pn A |
Cursor Up | |||
ESC [ Pn B |
Cursor Down | |||
ESC [ Pn C |
Cursor Right | |||
ESC [ Pn D |
Cursor Left | |||
ESC [ Pn E |
Cursor next line | |||
ESC [ Pn F |
Cursor previous line | |||
ESC [ Pn G |
Cursor horizontal position | |||
ESC [ Pn ' |
same as above | |||
ESC [ Pn d |
Cursor vertical position | |||
ESC [ Ps ;...; Ps m |
Select Graphic Rendition | |||
Ps = |
None or 0 | Default Rendition | ||
| 1 | Bold | |||
| 2 | (A) | Faint | ||
| 3 | (A) | Standout Mode (ANSI: Italicized) | ||
| 4 | Underlined | |||
| 5 | Blinking | |||
| 7 | Negative Image | |||
| 22 | (A) | Normal Intensity | ||
| 23 | (A) | Standout Mode off (ANSI: Italicized off) | ||
| 24 | (A) | Not Underlined | ||
| 25 | (A) | Not Blinking | ||
| 27 | (A) | Positive Image | ||
| 30 | (A) | Foreground Black | ||
| 31 | (A) | Foreground Red | ||
| 32 | (A) | Foreground Green | ||
| 33 | (A) | Foreground Yellow | ||
| 34 | (A) | Foreground Blue | ||
| 35 | (A) | Foreground Magenta | ||
| 36 | (A) | Foreground Cyan | ||
| 37 | (A) | Foreground White | ||
| 39 | (A) | Foreground Default | ||
| 40 | (A) | Background Black | ||
| ... | ||||
| 49 | (A) | Background Default | ||
ESC [ Pn g |
Tab Clear | |||
Pn = |
None or 0 | Clear Tab at Current Position | ||
| 3 | Clear All Tabs | |||
ESC [ Pn ; Pn r |
(V) | Set Scrolling Region | ||
ESC [ Pn I |
(A) | Horizontal Tab | ||
ESC [ Pn Z |
(A) | Backward Tab | ||
ESC [ Pn L |
(A) | Insert Line | ||
ESC [ Pn M |
(A) | Delete Line | ||
ESC [ Pn @ |
(A) | Insert Character | ||
ESC [ Pn P |
(A) | Delete Character | ||
ESC [ Pn S |
Scroll Scrolling Region Up | |||
ESC [ Pn T |
Scroll Scrolling Region Down | |||
ESC [ Pn ^ |
same as above | |||
ESC [ Ps ;...; Ps h |
Set Mode | |||
ESC [ Ps ;...; Ps l |
Reset Mode | |||
Ps = |
4 | (A) | Insert Mode | |
| 20 | (A) | Automatic Linefeed Mode | ||
| 34 | Normal Cursor Visibility | |||
| ?1 | (V) | Application Cursor Keys | ||
| ?3 | (V) | Change Terminal Width to 132 columns | ||
| ?5 | (V) | Reverse Video | ||
| ?6 | (V) | Origin Mode | ||
| ?7 | (V) | Wrap Mode | ||
| ?9 | X10 mouse tracking | |||
| ?25 | (V) | Visible Cursor | ||
| ?47 | Alternate Screen (old xterm code) | |||
| ?1000 | (V) | VT200 mouse tracking | ||
| ?1047 | Alternate Screen (new xterm code) | |||
| ?1049 | Alternate Screen (new xterm code) | |||
ESC [ 5 i |
(A) | Start relay to printer (ANSI Media Copy) | ||
ESC [ 4 i |
(A) | Stop relay to printer (ANSI Media Copy) | ||
ESC [ 8 ; Ph ; Pw t |
Resize the window to Ph lines and Pw columns (SunView special) | |||
ESC [ c |
Send VT100 Identification String | |||
ESC [ x |
Send Terminal Parameter Report | |||
ESC [ > c |
Send VT220 Secondary Device Attributes String | |||
ESC [ 6 n |
Send Cursor Position Report | |||
Screen has the following command-line options:
dtach is a tiny program that emulates the detach feature of screen, allowing you to run a program in an environment that is protected from the controlling terminal and attach to it later. dtach does not keep track of the contents of the screen, and thus works best with programs that know how to redraw themselves.dtach does not, however, have the other features of screen, such as its support of multiple terminals or its terminal emulation support. This makes dtach extremely tiny compared to screen, making it more easily audited for bugs and security holes, and also allows it to fit in environments where space is limited, such as on rescue disks.
dtach has many possible uses, even though it is tiny. With dtach, you can:
- Attach multiple times to the same program. Access to the dtach session is controlled through the Unix filesystem permissions; thus, you can trivially allow other people to watch your session.
- Run a program in an environment that is protected from the controlling terminal. This means that, for instance, the program running under dtach would not be affected by the terminal being disconnected for some reason.
- Run programs such as emacs, which tend to want full control over the terminal. dtach mostly acts as a relay, and does not mangle the text between the application and your terminal.
- Suspend dtach without suspending the running program. dtach can handle the suspend key itself instead of passing it to the running program, which may be useful for certain programs such as ircII.
The latest version of dtach is version 0.7, which you can fetch here. Other download formats may be available at the sourceforge download area for dtach.The changes in version 0.7 are:
The changes in version 0.6 are:
- The redraw method can now be explicitly specified on the command line (either no redraw at all, the old ^L character method, and the new WINCH signal method), since many programs only handle one or the other properly.
- Changed the default redraw method back to the old ^L character method.
- Changed the attach code to check the return value of select more carefully.
- Changed the SIGWINCH handler to reinstall itself, to handle systems that always reset the handler.
- Added more proper process group handling.
The changes in version 0.5 are:
- Redraws are now handled by sending the child process a WINCH signal instead of by sending a ^L character. This should help prevent line-oriented programs (such as bash) from clearing the screen excessively.
- Flow control is now disabled when setting raw mode on the terminal.
- Switched to using select instead of poll.
- Changed some exits to exit succesfully instead of non-sucessfully.
- Updated my email address.
- Updated to Autoconf 2.59, renaming some files in the process.
The changes in version 0.4 are:
- Fix fd leakage.
- Prevent atexit from being called twice on dtach -A.
The changes in version 0.3 are:
- Slightly improved README and dtach.1
- Portability updates thanks to sourceforge's compile farm. dtach should now work on: FreeBSD, Debian/alpha, Debian/sparc, Debian/PPC, and Solaris.
You can also obtain information on how to access the CVS tree here, and access the sourceforge project page here.
- Fixed a typo in dtach.1
- Changed the attach code so that it tells the master when a suspend occurs.
- Decreased the client <-> master packet size.
- Changed the master to send a stream of text to attaching clients instead of sending a huge packet all the time.
- Use getrlimit and dynamically allocate the data structures, if possible.
- Added some more autoconf checks.
- Initial sourceforge release.
You can send any comments or questions about dtach to the author. Comments and suggestions are welcome.
Society
Groupthink : Two Party System as Polyarchy : Corruption of Regulators : Bureaucracies : Understanding Micromanagers and Control Freaks : Toxic Managers : Harvard Mafia : Diplomatic Communication : Surviving a Bad Performance Review : Insufficient Retirement Funds as Immanent Problem of Neoliberal Regime : PseudoScience : Who Rules America : Neoliberalism : The Iron Law of Oligarchy : Libertarian Philosophy
Quotes
War and Peace : Skeptical Finance : John Kenneth Galbraith :Talleyrand : Oscar Wilde : Otto Von Bismarck : Keynes : George Carlin : Skeptics : Propaganda : SE quotes : Language Design and Programming Quotes : Random IT-related quotes : Somerset Maugham : Marcus Aurelius : Kurt Vonnegut : Eric Hoffer : Winston Churchill : Napoleon Bonaparte : Ambrose Bierce : Bernard Shaw : Mark Twain Quotes
Bulletin:
Vol 25, No.12 (December, 2013) Rational Fools vs. Efficient Crooks The efficient markets hypothesis : Political Skeptic Bulletin, 2013 : Unemployment Bulletin, 2010 : Vol 23, No.10 (October, 2011) An observation about corporate security departments : Slightly Skeptical Euromaydan Chronicles, June 2014 : Greenspan legacy bulletin, 2008 : Vol 25, No.10 (October, 2013) Cryptolocker Trojan (Win32/Crilock.A) : Vol 25, No.08 (August, 2013) Cloud providers as intelligence collection hubs : Financial Humor Bulletin, 2010 : Inequality Bulletin, 2009 : Financial Humor Bulletin, 2008 : Copyleft Problems Bulletin, 2004 : Financial Humor Bulletin, 2011 : Energy Bulletin, 2010 : Malware Protection Bulletin, 2010 : Vol 26, No.1 (January, 2013) Object-Oriented Cult : Political Skeptic Bulletin, 2011 : Vol 23, No.11 (November, 2011) Softpanorama classification of sysadmin horror stories : Vol 25, No.05 (May, 2013) Corporate bullshit as a communication method : Vol 25, No.06 (June, 2013) A Note on the Relationship of Brooks Law and Conway Law
History:
Fifty glorious years (1950-2000): the triumph of the US computer engineering : Donald Knuth : TAoCP and its Influence of Computer Science : Richard Stallman : Linus Torvalds : Larry Wall : John K. Ousterhout : CTSS : Multix OS Unix History : Unix shell history : VI editor : History of pipes concept : Solaris : MS DOS : Programming Languages History : PL/1 : Simula 67 : C : History of GCC development : Scripting Languages : Perl history : OS History : Mail : DNS : SSH : CPU Instruction Sets : SPARC systems 1987-2006 : Norton Commander : Norton Utilities : Norton Ghost : Frontpage history : Malware Defense History : GNU Screen : OSS early history
Classic books:
The Peter Principle : Parkinson Law : 1984 : The Mythical Man-Month : How to Solve It by George Polya : The Art of Computer Programming : The Elements of Programming Style : The Unix Hater’s Handbook : The Jargon file : The True Believer : Programming Pearls : The Good Soldier Svejk : The Power Elite
Most popular humor pages:
Manifest of the Softpanorama IT Slacker Society : Ten Commandments of the IT Slackers Society : Computer Humor Collection : BSD Logo Story : The Cuckoo's Egg : IT Slang : C++ Humor : ARE YOU A BBS ADDICT? : The Perl Purity Test : Object oriented programmers of all nations : Financial Humor : Financial Humor Bulletin, 2008 : Financial Humor Bulletin, 2010 : The Most Comprehensive Collection of Editor-related Humor : Programming Language Humor : Goldman Sachs related humor : Greenspan humor : C Humor : Scripting Humor : Real Programmers Humor : Web Humor : GPL-related Humor : OFM Humor : Politically Incorrect Humor : IDS Humor : "Linux Sucks" Humor : Russian Musical Humor : Best Russian Programmer Humor : Microsoft plans to buy Catholic Church : Richard Stallman Related Humor : Admin Humor : Perl-related Humor : Linus Torvalds Related humor : PseudoScience Related Humor : Networking Humor : Shell Humor : Financial Humor Bulletin, 2011 : Financial Humor Bulletin, 2012 : Financial Humor Bulletin, 2013 : Java Humor : Software Engineering Humor : Sun Solaris Related Humor : Education Humor : IBM Humor : Assembler-related Humor : VIM Humor : Computer Viruses Humor : Bright tomorrow is rescheduled to a day after tomorrow : Classic Computer Humor
The Last but not Least Technology is dominated by two types of people: those who understand what they do not manage and those who manage what they do not understand ~Archibald Putt. Ph.D
Copyright © 1996-2021 by Softpanorama Society. www.softpanorama.org was initially created as a service to the (now defunct) UN Sustainable Development Networking Programme (SDNP) without any remuneration. This document is an industrial compilation designed and created exclusively for educational use and is distributed under the Softpanorama Content License. Original materials copyright belong to respective owners. Quotes are made for educational purposes only in compliance with the fair use doctrine.
FAIR USE NOTICE This site contains copyrighted material the use of which has not always been specifically authorized by the copyright owner. We are making such material available to advance understanding of computer science, IT technology, economic, scientific, and social issues. We believe this constitutes a 'fair use' of any such copyrighted material as provided by section 107 of the US Copyright Law according to which such material can be distributed without profit exclusively for research and educational purposes.
This is a Spartan WHYFF (We Help You For Free) site written by people for whom English is not a native language. Grammar and spelling errors should be expected. The site contain some broken links as it develops like a living tree...
|
|
You can use PayPal to to buy a cup of coffee for authors of this site |
Disclaimer:
The statements, views and opinions presented on this web page are those of the author (or referenced source) and are not endorsed by, nor do they necessarily reflect, the opinions of the Softpanorama society. We do not warrant the correctness of the information provided or its fitness for any purpose. The site uses AdSense so you need to be aware of Google privacy policy. You you do not want to be tracked by Google please disable Javascript for this site. This site is perfectly usable without Javascript.
Last modified: December 10, 2020